Current Articles
Display Method: |
2024, 37: 12.
doi: 10.1186/s10033-024-00994-x
Abstract:
This paper proposes a modified iterative learning control (MILC) periodical feedback-feedforward algorithm to reduce the vibration of a rotor caused by coupled unbalance and parallel misalignment. The control of the vibration of the rotor is provided by an active magnetic actuator (AMA). The iterative gain of the MILC algorithm here presented has a self-adjustment based on the magnitude of the vibration. Notch filters are adopted to extract the synchronous (1 × Ω) and twice rotational frequency (2 × Ω) components of the rotor vibration. Both the notch frequency of the filter and the size of feedforward storage used during the experiment have a real-time adaptation to the rotational speed. The method proposed in this work can provide effective suppression of the vibration of the rotor in case of sudden changes or fluctuations of the rotor speed. Simulations and experiments using the MILC algorithm proposed here are carried out and give evidence to the feasibility and robustness of the technique proposed.
This paper proposes a modified iterative learning control (MILC) periodical feedback-feedforward algorithm to reduce the vibration of a rotor caused by coupled unbalance and parallel misalignment. The control of the vibration of the rotor is provided by an active magnetic actuator (AMA). The iterative gain of the MILC algorithm here presented has a self-adjustment based on the magnitude of the vibration. Notch filters are adopted to extract the synchronous (1 × Ω) and twice rotational frequency (2 × Ω) components of the rotor vibration. Both the notch frequency of the filter and the size of feedforward storage used during the experiment have a real-time adaptation to the rotational speed. The method proposed in this work can provide effective suppression of the vibration of the rotor in case of sudden changes or fluctuations of the rotor speed. Simulations and experiments using the MILC algorithm proposed here are carried out and give evidence to the feasibility and robustness of the technique proposed.
2024, 37: 52.
doi: 10.1186/s10033-024-01030-8
Abstract:
A winding system is a time-varying system that considers complex nonlinear characteristics, and how to control the stability of the winding tension during the winding process is the primary problem that has hindered development in this field in recent years. Many nonlinear factors affect the tension in the winding process, such as friction, structured uncertainties, unstructured uncertainties, and external interference. These terms severely restrict the tension tracking performance. Existing tension control strategies are mainly based on the composite control of the tension and speed loops, and previous studies involve complex decoupling operations. Owing to the large number of calculations required for this method, it is inconvenient for practical engineering applications. To simplify the tension generation mechanism and the influence of the nonlinear characteristics of the winding system, a simpler nonlinear dynamic model of the winding tension was established. An adaptive method was applied to update the feedback gain of the continuous robust integral of the sign of the error (RISE). Furthermore, an extended state observer was used to estimate modeling errors and external disturbances. The model disturbance term can be compensated for in the designed RISE controller. The asymptotic stability of the system was proven according to the Lyapunov stability theory. Finally, a comparative analysis of the proposed nonlinear controller and several other controllers was performed. The results indicated that the control of the winding tension was significantly enhanced.
A winding system is a time-varying system that considers complex nonlinear characteristics, and how to control the stability of the winding tension during the winding process is the primary problem that has hindered development in this field in recent years. Many nonlinear factors affect the tension in the winding process, such as friction, structured uncertainties, unstructured uncertainties, and external interference. These terms severely restrict the tension tracking performance. Existing tension control strategies are mainly based on the composite control of the tension and speed loops, and previous studies involve complex decoupling operations. Owing to the large number of calculations required for this method, it is inconvenient for practical engineering applications. To simplify the tension generation mechanism and the influence of the nonlinear characteristics of the winding system, a simpler nonlinear dynamic model of the winding tension was established. An adaptive method was applied to update the feedback gain of the continuous robust integral of the sign of the error (RISE). Furthermore, an extended state observer was used to estimate modeling errors and external disturbances. The model disturbance term can be compensated for in the designed RISE controller. The asymptotic stability of the system was proven according to the Lyapunov stability theory. Finally, a comparative analysis of the proposed nonlinear controller and several other controllers was performed. The results indicated that the control of the winding tension was significantly enhanced.
2024, 37: 91.
doi: 10.1186/s10033-024-01066-w
Abstract:
Collisions between objects are a relatively common phenomenon in nature. Analyses of collision processes can greatly contribute to solving problems such as impact-rub faults and particle impacts. The coefficient of restitution is a critical parameter in the analysis of collision processes. Many experiments have shown that the coefficient of restitution is closely related to the plate thickness, and the smaller the plate thickness, the more inaccurate the coefficient of restitution predicted by the existing model, which seriously affects the process of collision analysis. To remedy this shortcoming, this paper proposes a plate thickness influence factor with the ratio of sphere diameter to plate thickness as the variable. The plate thickness influence factor can optimize the coefficient of restitution model to effectively predict the coefficient of restitution of impacting elastoplastic spheres with finite plate thickness. Finally, the validity of the new model is verified using a large amount of experimental data.
Collisions between objects are a relatively common phenomenon in nature. Analyses of collision processes can greatly contribute to solving problems such as impact-rub faults and particle impacts. The coefficient of restitution is a critical parameter in the analysis of collision processes. Many experiments have shown that the coefficient of restitution is closely related to the plate thickness, and the smaller the plate thickness, the more inaccurate the coefficient of restitution predicted by the existing model, which seriously affects the process of collision analysis. To remedy this shortcoming, this paper proposes a plate thickness influence factor with the ratio of sphere diameter to plate thickness as the variable. The plate thickness influence factor can optimize the coefficient of restitution model to effectively predict the coefficient of restitution of impacting elastoplastic spheres with finite plate thickness. Finally, the validity of the new model is verified using a large amount of experimental data.
2024, 37: 8.
doi: 10.1186/s10033-023-00989-0
Abstract:
On-site and real-time non-destructive measurement of elastic constants for materials of a component in a in-service structure is a challenge due to structural complexities, such as ambiguous boundary, variable thickness, nonuniform material properties. This work develops for the first time a method that uses ultrasound echo groups and artificial neural network (ANN) for reliable on-site real-time identification of material parameters. The use of echo groups allows the use of lower frequencies, and hence more accommodative to structural complexity. To train the ANNs, a numerical model is established that is capable of computing the waveform of ultrasonic echo groups for any given set of material properties of a given structure. The waveform of an ultrasonic echo groups at an interest location on the surface the structure with material parameters varying in a predefined range are then computed using the numerical model. This results in a set of dataset for training the ANN model. Once the ANN is trained, the material parameters can be identified simultaneously using the actual measured echo waveform as input to the ANN. Intensive tests have been conducted both numerically and experimentally to evaluate the effectiveness and accuracy of the currently proposed method. The results show that the maximum identification error of numerical example is less than 2%, and the maximum identification error of experimental test is less than 7%. Compared with currently prevailing methods and equipment, the proposefy the density and thickness, in addition to the elastic constants. Moreover, the reliability and accuracy of inverse prediction is significantly improved. Thus, it has broad applications and enables real-time field measurements, which has not been fulfilled by any other available methods or equipment.
On-site and real-time non-destructive measurement of elastic constants for materials of a component in a in-service structure is a challenge due to structural complexities, such as ambiguous boundary, variable thickness, nonuniform material properties. This work develops for the first time a method that uses ultrasound echo groups and artificial neural network (ANN) for reliable on-site real-time identification of material parameters. The use of echo groups allows the use of lower frequencies, and hence more accommodative to structural complexity. To train the ANNs, a numerical model is established that is capable of computing the waveform of ultrasonic echo groups for any given set of material properties of a given structure. The waveform of an ultrasonic echo groups at an interest location on the surface the structure with material parameters varying in a predefined range are then computed using the numerical model. This results in a set of dataset for training the ANN model. Once the ANN is trained, the material parameters can be identified simultaneously using the actual measured echo waveform as input to the ANN. Intensive tests have been conducted both numerically and experimentally to evaluate the effectiveness and accuracy of the currently proposed method. The results show that the maximum identification error of numerical example is less than 2%, and the maximum identification error of experimental test is less than 7%. Compared with currently prevailing methods and equipment, the proposefy the density and thickness, in addition to the elastic constants. Moreover, the reliability and accuracy of inverse prediction is significantly improved. Thus, it has broad applications and enables real-time field measurements, which has not been fulfilled by any other available methods or equipment.
2024, 37: 25.
doi: 10.1186/s10033-024-01011-x
Abstract:
Minimum quantity Lubrication (MQL) is a sustainable lubrication system that is famous in many machining systems. It involve the spray of an infinitesimal amount of mist-like lubricants during machining processes. The MQL system is affirmed to exhibit an excellent machining performance, and it is highly economical. The nanofluids are understood to exhibit excellent lubricity and heat evacuation capability, compared to pure oil-based MQL system. Studies have shown that the surface quality and amount of energy expended in the grinding operations can be reduced considerably due to the positive effect of these nanofluids. This work presents an experimental study on the tribological performance of SiO2 nanofluid during grinding of Si3N4 ceramic. The effect different grinding modes and lubrication systems during the grinding operation was also analyzed. Different concentrations of the SiO2 nanofluid was manufactured using canola, corn and sunflower oils. The quantitative evaluation of the grinding process was done based on the amount of grinding forces, specific grinding energy, frictional coefficient, and surface integrity. It was found that the canola oil exhibits optimal lubrication performance compared to corn oil, sunflower oil, and traditional lubrication systems. Additionally, the introduction of ultrasonic vibrations with the SiO2 nanofluid in MQL system was found to reduce the specific grinding energy, normal grinding forces, tangential grinding forces, and surface roughness by 65%, 57%, 65%, and 18% respectively. Finally, regression analysis was used to obtain an optimum parameter combinations. The observations from this work will aid the smooth transition towards ecofriendly and sustainable machining of engineering ceramics.
Minimum quantity Lubrication (MQL) is a sustainable lubrication system that is famous in many machining systems. It involve the spray of an infinitesimal amount of mist-like lubricants during machining processes. The MQL system is affirmed to exhibit an excellent machining performance, and it is highly economical. The nanofluids are understood to exhibit excellent lubricity and heat evacuation capability, compared to pure oil-based MQL system. Studies have shown that the surface quality and amount of energy expended in the grinding operations can be reduced considerably due to the positive effect of these nanofluids. This work presents an experimental study on the tribological performance of SiO2 nanofluid during grinding of Si3N4 ceramic. The effect different grinding modes and lubrication systems during the grinding operation was also analyzed. Different concentrations of the SiO2 nanofluid was manufactured using canola, corn and sunflower oils. The quantitative evaluation of the grinding process was done based on the amount of grinding forces, specific grinding energy, frictional coefficient, and surface integrity. It was found that the canola oil exhibits optimal lubrication performance compared to corn oil, sunflower oil, and traditional lubrication systems. Additionally, the introduction of ultrasonic vibrations with the SiO2 nanofluid in MQL system was found to reduce the specific grinding energy, normal grinding forces, tangential grinding forces, and surface roughness by 65%, 57%, 65%, and 18% respectively. Finally, regression analysis was used to obtain an optimum parameter combinations. The observations from this work will aid the smooth transition towards ecofriendly and sustainable machining of engineering ceramics.
2024, 37: 161.
doi: 10.1186/s10033-024-01156-9
Abstract:
Traditional structural forms are difficult to meet the lightweight requirements of subsequent spacecraft for load-bearing structures. In the aerospace industry, filling structure with lattices is a popular approach to reduce the weight of a spacecraft. However, this design strategy has deficiencies in the spatial distribution of lattice cells as well as its affection on the mechanical properties. In this study, a two-step topology optimization technique is proposed to solve the spatial distribution problem of nanosatellite. Firstly, an entire nanosatellite box composed of panels which filled with uniform lattices is sent to the vibration test to obtain the frequency data. Then, a finite element (FE) model of the nanosatellite structure which contains the same uniform lattices is built and validated with the obtained frequency data above. For the subsequent calculation of topology optimization. An equivalent model of the verified FE model is established by replacing the lattice cells in the sandwich layer with equivalent fictional elements. Subsequently, a topology optimization problem under the mass constraints is formulated for maximize the nature frequency, and a new light weighted nanosatellite which filled with non-uniform lattices is established by applying the density mapping method and the previous topology configuration result. By separating the design problem of nanosatellite into two steps, the proposed optimization design method achieves the maximum frequency design under the weight constraint. Furthermore, the frequency is also guaranteed to be around the nature frequency. The results reveal that the mass of the new structure with non-uniform lattices is reduced by 50.32% and the frequency is increased by 1.19%. An important technical importance and application value of this proposed technique is that it improves the performance and design efficiency of the load-bearing structures of a nanosatellite, and this method has significant technical significance and application value.
Traditional structural forms are difficult to meet the lightweight requirements of subsequent spacecraft for load-bearing structures. In the aerospace industry, filling structure with lattices is a popular approach to reduce the weight of a spacecraft. However, this design strategy has deficiencies in the spatial distribution of lattice cells as well as its affection on the mechanical properties. In this study, a two-step topology optimization technique is proposed to solve the spatial distribution problem of nanosatellite. Firstly, an entire nanosatellite box composed of panels which filled with uniform lattices is sent to the vibration test to obtain the frequency data. Then, a finite element (FE) model of the nanosatellite structure which contains the same uniform lattices is built and validated with the obtained frequency data above. For the subsequent calculation of topology optimization. An equivalent model of the verified FE model is established by replacing the lattice cells in the sandwich layer with equivalent fictional elements. Subsequently, a topology optimization problem under the mass constraints is formulated for maximize the nature frequency, and a new light weighted nanosatellite which filled with non-uniform lattices is established by applying the density mapping method and the previous topology configuration result. By separating the design problem of nanosatellite into two steps, the proposed optimization design method achieves the maximum frequency design under the weight constraint. Furthermore, the frequency is also guaranteed to be around the nature frequency. The results reveal that the mass of the new structure with non-uniform lattices is reduced by 50.32% and the frequency is increased by 1.19%. An important technical importance and application value of this proposed technique is that it improves the performance and design efficiency of the load-bearing structures of a nanosatellite, and this method has significant technical significance and application value.
2024, 37: 164.
doi: 10.1186/s10033-024-01154-x
Abstract:
Thin copper substrates with high accuracy are highly required in precision physical experiments. However, even using double-sided lapping, the flatness is still limited due to the accuracy of lapping plate, process vibration and so on. Hence, as a subsequent process, this paper employs magnetorheological finishing (MRF) to further improve the flatness. Nevertheless, thin copper substrates, which are sensitive to the stress, deformed easily with uneven material removal on the surface. Therefore, MRF is adopted on machining thin copper substrate for the first time considering deformation induced by stress. A finite element model is established to evaluate the deformation by residual stress, and the results show that the deformation tends to be more serious with the increase of the material removal. According to the simulation results, the material removal is optimized considering both deformation and efficiency, and a series of experiments are conducted on a Φ100×2.8 mm workpiece to verify the simulation results. The experimental results show that the flatness is further improved from peak to valley (PV) 6.6 μm to PV 2.3 μm with optimized processing parameters. Hence, the feasibility of magnetorheological finishing on thin copper substrate is demonstrated.
Thin copper substrates with high accuracy are highly required in precision physical experiments. However, even using double-sided lapping, the flatness is still limited due to the accuracy of lapping plate, process vibration and so on. Hence, as a subsequent process, this paper employs magnetorheological finishing (MRF) to further improve the flatness. Nevertheless, thin copper substrates, which are sensitive to the stress, deformed easily with uneven material removal on the surface. Therefore, MRF is adopted on machining thin copper substrate for the first time considering deformation induced by stress. A finite element model is established to evaluate the deformation by residual stress, and the results show that the deformation tends to be more serious with the increase of the material removal. According to the simulation results, the material removal is optimized considering both deformation and efficiency, and a series of experiments are conducted on a Φ100×2.8 mm workpiece to verify the simulation results. The experimental results show that the flatness is further improved from peak to valley (PV) 6.6 μm to PV 2.3 μm with optimized processing parameters. Hence, the feasibility of magnetorheological finishing on thin copper substrate is demonstrated.
2024, 37: 86.
doi: 10.1186/s10033-024-01068-8
Abstract:
Ensuring high product quality is of paramount importance in pharmaceutical drug manufacturing, as it is subject to rigorous regulatory practices. This study presents a research focused on the development of an on-line detection method and system for identifying surface defects in pharmaceutical products packaged in aluminum-plastic blisters. Firstly, the aluminum-plastic blister packages exhibit multi-scale features and inter-class indistinction. To address this, the deep semantic network with boundary refinement (DSN-BR) model is proposed, which leverages semantic segmentation domain knowledge, to accurately segment the defects in pixel level. Additionally, a specialized image acquisition module that minimizes the impact of ambient light is established, ensuring high-quality image capture. Finally, the image acquisition module, image detection module, and data management module are designed to construct a comprehensive online surface defect detection system. To validate the effectiveness of our approach, we employ a real dataset for instance verification on the implemented system. The experimental results substantiate the outstanding performance of the DSN-BR, achieving the mean intersection over union (MIoU) of 90.5%. Furthermore, the proposed system achieves an inference speed of up to 14.12 f/s, while attaining an F1-Score of 98.25%. These results demonstrate that the system meets the actual needs of the enterprise and provides theoretical and methodological support for intelligent inspection of product surface quality. By standardizing the control process of pharmaceutical manufacturing and improving the management capability of the manufacturing process, our approach holds significant market application prospects.
Ensuring high product quality is of paramount importance in pharmaceutical drug manufacturing, as it is subject to rigorous regulatory practices. This study presents a research focused on the development of an on-line detection method and system for identifying surface defects in pharmaceutical products packaged in aluminum-plastic blisters. Firstly, the aluminum-plastic blister packages exhibit multi-scale features and inter-class indistinction. To address this, the deep semantic network with boundary refinement (DSN-BR) model is proposed, which leverages semantic segmentation domain knowledge, to accurately segment the defects in pixel level. Additionally, a specialized image acquisition module that minimizes the impact of ambient light is established, ensuring high-quality image capture. Finally, the image acquisition module, image detection module, and data management module are designed to construct a comprehensive online surface defect detection system. To validate the effectiveness of our approach, we employ a real dataset for instance verification on the implemented system. The experimental results substantiate the outstanding performance of the DSN-BR, achieving the mean intersection over union (MIoU) of 90.5%. Furthermore, the proposed system achieves an inference speed of up to 14.12 f/s, while attaining an F1-Score of 98.25%. These results demonstrate that the system meets the actual needs of the enterprise and provides theoretical and methodological support for intelligent inspection of product surface quality. By standardizing the control process of pharmaceutical manufacturing and improving the management capability of the manufacturing process, our approach holds significant market application prospects.
2024, 37: 1.
doi: 10.1186/s10033-023-00972-9
Abstract:
There are lots of researches on fixture layout optimization for large thin-walled parts. Current researches focus on the positioning problem, i.e., optimizing the positions of a constant number of fixtures. However, how to determine the number of fixtures is ignored. In most cases, the number of fixtures located on large thin-walled parts is determined based on engineering experience, which leads to huge fixture number and extra waste. Therefore, this paper constructs an optimization model to minimize the number of fixtures. The constraints are set in the optimization model to ensure that the part deformation is within the surface profile tolerance. In addition, the assembly gap between two parts is also controlled. To conduct the optimization, this paper develops an improved particle swarm optimization (IPSO) algorithm by integrating the shrinkage factor and adaptive inertia weight. In the algorithm, particles are encoded according to the fixture position. Each dimension of the particle is assigned to a sub-region by constraining the optional position range of each fixture to improve the optimization efficiency. Finally, a case study on ship curved panel assembly is provided to prove that our method can optimize the number of fixtures while meeting the assembly quality requirements. This research proposes a method to optimize the number of fixtures, which can reduce the number of fixtures and achieve deformation control at the same time.
There are lots of researches on fixture layout optimization for large thin-walled parts. Current researches focus on the positioning problem, i.e., optimizing the positions of a constant number of fixtures. However, how to determine the number of fixtures is ignored. In most cases, the number of fixtures located on large thin-walled parts is determined based on engineering experience, which leads to huge fixture number and extra waste. Therefore, this paper constructs an optimization model to minimize the number of fixtures. The constraints are set in the optimization model to ensure that the part deformation is within the surface profile tolerance. In addition, the assembly gap between two parts is also controlled. To conduct the optimization, this paper develops an improved particle swarm optimization (IPSO) algorithm by integrating the shrinkage factor and adaptive inertia weight. In the algorithm, particles are encoded according to the fixture position. Each dimension of the particle is assigned to a sub-region by constraining the optional position range of each fixture to improve the optimization efficiency. Finally, a case study on ship curved panel assembly is provided to prove that our method can optimize the number of fixtures while meeting the assembly quality requirements. This research proposes a method to optimize the number of fixtures, which can reduce the number of fixtures and achieve deformation control at the same time.
2024, 37: 157.
doi: 10.1186/s10033-024-01131-4
Abstract:
Wiper tools are revered for their capacity to simultaneously achieve high-quality and high-efficient machining. Nonetheless, the cutting mechanism of wiper tools remains unclear, and the cutting force prediction model of wiper tools has not been reported, leading to severe wear of the bottom wiper edge and unstable cutting in machining processes. In this study, the cutting mechanism of wiper tools is systematically analyzed, and the mechanistic cutting force model considering the wiper edge cutting effect was established. The cutting force coefficients were calibrated by the cutting force separation method, which can quickly calibrate the cutting force coefficients for the flank cutting region dominated by the shear effect, the bottom cutting region dominated by the shear effect, and the bottom wiper region dominated by plough effect. Compared with measured cutting forces, the maximum average absolute errors in the predicted forces are 9.2 %, 7.6 %, and 9.3 % in the x, y, and z directions, respectively. Furthermore, the feed rate and the length of the wiper edge were primary determinants of the bottom-edge cutting forces. This study provides theoretical guidance and technical support for the wear mechanism and design of wiper tools.
Wiper tools are revered for their capacity to simultaneously achieve high-quality and high-efficient machining. Nonetheless, the cutting mechanism of wiper tools remains unclear, and the cutting force prediction model of wiper tools has not been reported, leading to severe wear of the bottom wiper edge and unstable cutting in machining processes. In this study, the cutting mechanism of wiper tools is systematically analyzed, and the mechanistic cutting force model considering the wiper edge cutting effect was established. The cutting force coefficients were calibrated by the cutting force separation method, which can quickly calibrate the cutting force coefficients for the flank cutting region dominated by the shear effect, the bottom cutting region dominated by the shear effect, and the bottom wiper region dominated by plough effect. Compared with measured cutting forces, the maximum average absolute errors in the predicted forces are 9.2 %, 7.6 %, and 9.3 % in the x, y, and z directions, respectively. Furthermore, the feed rate and the length of the wiper edge were primary determinants of the bottom-edge cutting forces. This study provides theoretical guidance and technical support for the wear mechanism and design of wiper tools.
2024, 37: 51.
doi: 10.1186/s10033-024-01033-5
Abstract:
Textured surfaces with certain micro/nano structures have been proven to possess some advanced functions, such as reducing friction, improving wear and increasing wettability. Accurate prediction of micro/nano surface textures is of great significance for the design, fabrication and application of functional textured surfaces. In this paper, based on the kinematic analysis of cutter teeth, the discretization of ultrasonic machining process, transformation method of coordinate systems and the cubic spline data interpolation, an integrated theoretical model was established to characterize the distribution and geometric features of micro textures on the surfaces machined by different types of ultrasonic vibration-assisted milling (UVAM). Based on the theoretical model, the effect of key process parameters (vibration directions, vibration dimensions, cutting parameters and vibration parameters) on tool trajectories and microtextured surface morphology in UVAM is investigated. Besides, the effect of phase difference on the elliptical shape in 2D/3D ultrasonic elliptical vibration-assisted milling (UEVAM) was analyzed. Compared to conventional numerical models, the method of the cubic spline data interpolation is applied to the simulation of microtextured surface morphology in UVAM, which is more suitable for characterizing the morphological features of microtextured surfaces than traditional methods due to the presence of numerous micro textures. The prediction of surface roughness indicates that the magnitude of ultrasonic amplitude in z-direction should be strictly limited in 1D rotary UVAM, 2D and 3D UEVAM due to the unfavorable effect of axial ultrasonic vibration on the surface quality. This study can provide theoretical guidance for the design and fabrication of microtextured surfaces in UVAM.
Textured surfaces with certain micro/nano structures have been proven to possess some advanced functions, such as reducing friction, improving wear and increasing wettability. Accurate prediction of micro/nano surface textures is of great significance for the design, fabrication and application of functional textured surfaces. In this paper, based on the kinematic analysis of cutter teeth, the discretization of ultrasonic machining process, transformation method of coordinate systems and the cubic spline data interpolation, an integrated theoretical model was established to characterize the distribution and geometric features of micro textures on the surfaces machined by different types of ultrasonic vibration-assisted milling (UVAM). Based on the theoretical model, the effect of key process parameters (vibration directions, vibration dimensions, cutting parameters and vibration parameters) on tool trajectories and microtextured surface morphology in UVAM is investigated. Besides, the effect of phase difference on the elliptical shape in 2D/3D ultrasonic elliptical vibration-assisted milling (UEVAM) was analyzed. Compared to conventional numerical models, the method of the cubic spline data interpolation is applied to the simulation of microtextured surface morphology in UVAM, which is more suitable for characterizing the morphological features of microtextured surfaces than traditional methods due to the presence of numerous micro textures. The prediction of surface roughness indicates that the magnitude of ultrasonic amplitude in z-direction should be strictly limited in 1D rotary UVAM, 2D and 3D UEVAM due to the unfavorable effect of axial ultrasonic vibration on the surface quality. This study can provide theoretical guidance for the design and fabrication of microtextured surfaces in UVAM.
2024, 37: 60.
doi: 10.1186/s10033-024-01016-6
Abstract:
Thermal conductivity is one of the most significant criterion of three-dimensional carbon fiber-reinforced SiC matrix composites (3D C/SiC). Represent volume element (RVE) models of microscale, void/matrix and mesoscale proposed in this work are used to simulate the thermal conductivity behaviors of the 3D C/SiC composites. An entirely new process is introduced to weave the preform with three-dimensional orthogonal architecture. The 3D steady-state analysis step is created for assessing the thermal conductivity behaviors of the composites by applying periodic temperature boundary conditions. Three RVE models of cuboid, hexagonal and fiber random distribution are respectively developed to comparatively study the influence of fiber package pattern on the thermal conductivities at the microscale. Besides, the effect of void morphology on the thermal conductivity of the matrix is analyzed by the void/matrix models. The prediction results at the mesoscale correspond closely to the experimental values. The effect of the porosities and fiber volume fractions on the thermal conductivities is also taken into consideration. The multi-scale models mentioned in this paper can be used to predict the thermal conductivity behaviors of other composites with complex structures.
Thermal conductivity is one of the most significant criterion of three-dimensional carbon fiber-reinforced SiC matrix composites (3D C/SiC). Represent volume element (RVE) models of microscale, void/matrix and mesoscale proposed in this work are used to simulate the thermal conductivity behaviors of the 3D C/SiC composites. An entirely new process is introduced to weave the preform with three-dimensional orthogonal architecture. The 3D steady-state analysis step is created for assessing the thermal conductivity behaviors of the composites by applying periodic temperature boundary conditions. Three RVE models of cuboid, hexagonal and fiber random distribution are respectively developed to comparatively study the influence of fiber package pattern on the thermal conductivities at the microscale. Besides, the effect of void morphology on the thermal conductivity of the matrix is analyzed by the void/matrix models. The prediction results at the mesoscale correspond closely to the experimental values. The effect of the porosities and fiber volume fractions on the thermal conductivities is also taken into consideration. The multi-scale models mentioned in this paper can be used to predict the thermal conductivity behaviors of other composites with complex structures.
2024, 37: 30.
doi: 10.1186/s10033-024-01006-8
Abstract:
The twin-body plasma arc has the decoupling control ability of heat transfer and mass transfer, which is beneficial to shape and property control in wire arc additive manufacturing. In this paper, with the wire feeding speed as a characteristic quantity, the wire melting control ability of twin-body plasma arc was studied by adjusting the current separation ratio (under the condition of a constant total current), the wire current/main current and the position of the wire in the arc axial direction. The results showed that under the premise that the total current remains unchanged (100 A), as the current separation ratio increased, the middle and minimum melting amounts increased approximately synchronously under the effect of anode effect power, the first melting mass range remained constant; the maximum melting amount increased twice as fast as the middle melting amount under the effect of the wire feeding speed, and the second melting mass range was expanded. When the wire current increased, the anode effect power and the plasma arc power were both factors causing the increase in the wire melting amount; however, when the main current increased, the plasma arc power was the only factor causing the increase in the wire melting amount. The average wire melting increment caused by the anode effect power was approximately 2.7 times that caused by the plasma arc power. The minimum melting amount was not affected by the wire-torch distance under any current separation ratio tested. When the current separation ratio increased and reached a threshold, the middle melting amount remained constant with increasing wire-torch distance. When the current separation ratio continued to increase and reached the next threshold, the maximum melting amount remained constant with the increasing wire-torch distance. The effect of the wire-torch distance on the wire melting amount reduced with the increase in the current separation ratio. Through this study, the decoupling mechanism and ability of this innovative arc heat source is more clearly.
The twin-body plasma arc has the decoupling control ability of heat transfer and mass transfer, which is beneficial to shape and property control in wire arc additive manufacturing. In this paper, with the wire feeding speed as a characteristic quantity, the wire melting control ability of twin-body plasma arc was studied by adjusting the current separation ratio (under the condition of a constant total current), the wire current/main current and the position of the wire in the arc axial direction. The results showed that under the premise that the total current remains unchanged (100 A), as the current separation ratio increased, the middle and minimum melting amounts increased approximately synchronously under the effect of anode effect power, the first melting mass range remained constant; the maximum melting amount increased twice as fast as the middle melting amount under the effect of the wire feeding speed, and the second melting mass range was expanded. When the wire current increased, the anode effect power and the plasma arc power were both factors causing the increase in the wire melting amount; however, when the main current increased, the plasma arc power was the only factor causing the increase in the wire melting amount. The average wire melting increment caused by the anode effect power was approximately 2.7 times that caused by the plasma arc power. The minimum melting amount was not affected by the wire-torch distance under any current separation ratio tested. When the current separation ratio increased and reached a threshold, the middle melting amount remained constant with increasing wire-torch distance. When the current separation ratio continued to increase and reached the next threshold, the maximum melting amount remained constant with the increasing wire-torch distance. The effect of the wire-torch distance on the wire melting amount reduced with the increase in the current separation ratio. Through this study, the decoupling mechanism and ability of this innovative arc heat source is more clearly.
2024, 37: 101.
doi: 10.1186/s10033-024-01092-8
Abstract:
High-end equipment always operate in low-speed and heavy-load working environments, highlighting the need for cam-lobe hydraulic motors with excellent speed stability (< 1 r/min) and ultrahigh-power rotary output (> 1 MW). The successful operation of cam-lobe hydraulic motors relies on the circulation supply of high- and low-pressure oil. However, the switching between high-/low-pressure oil controlled by the oil distributor inevitably causes an obvious pressure impact and speed pulsation, which directly reduces the speed stability of hydraulic motors. Therefore, an optimization design approach for the oil distributor port is proposed to minimize the speed pulsation of cam-lobe hydraulic motors. In the proposed approach, a simulation model that links the oil distributor port structural parameters with the hydraulic motor speed pulsation was developed to clarify the effect of the oil distributor structural parameters on speed pulsation. Then, an orthogonal analysis method was used to identify the optimized oil distributor port structural parameters while minimizing the hydraulic motor's speed pulsation as much as possible. Finally, several experiments were conducted to validate the effectiveness and accuracy of the proposed optimization design approach. The experimental results indicate that the pulsation rate of the hydraulic motor equipped with the optimized oil distributor was 62.5% lower than that of the original motor at a working pressure of 25 MPa, which is consistent with the simulation results using the proposed optimization design approach. The findings of this study offer a feasible and effective approach to guide the design optimization of the oil distributor port for low-pulsation hydraulic motors.
High-end equipment always operate in low-speed and heavy-load working environments, highlighting the need for cam-lobe hydraulic motors with excellent speed stability (< 1 r/min) and ultrahigh-power rotary output (> 1 MW). The successful operation of cam-lobe hydraulic motors relies on the circulation supply of high- and low-pressure oil. However, the switching between high-/low-pressure oil controlled by the oil distributor inevitably causes an obvious pressure impact and speed pulsation, which directly reduces the speed stability of hydraulic motors. Therefore, an optimization design approach for the oil distributor port is proposed to minimize the speed pulsation of cam-lobe hydraulic motors. In the proposed approach, a simulation model that links the oil distributor port structural parameters with the hydraulic motor speed pulsation was developed to clarify the effect of the oil distributor structural parameters on speed pulsation. Then, an orthogonal analysis method was used to identify the optimized oil distributor port structural parameters while minimizing the hydraulic motor's speed pulsation as much as possible. Finally, several experiments were conducted to validate the effectiveness and accuracy of the proposed optimization design approach. The experimental results indicate that the pulsation rate of the hydraulic motor equipped with the optimized oil distributor was 62.5% lower than that of the original motor at a working pressure of 25 MPa, which is consistent with the simulation results using the proposed optimization design approach. The findings of this study offer a feasible and effective approach to guide the design optimization of the oil distributor port for low-pulsation hydraulic motors.
2024, 37: 41.
doi: 10.1186/s10033-024-01021-9
Abstract:
The co-frequency vibration fault is one of the common faults in the operation of rotating equipment, and realizing the real-time diagnosis of the co-frequency vibration fault is of great significance for monitoring the health state and carrying out vibration suppression of the equipment. In engineering scenarios, co-frequency vibration faults are highlighted by rotational frequency and are difficult to identify, and existing intelligent methods require more hardware conditions and are exclusively time-consuming. Therefore, Lightweight-convolutional neural networks (LW-CNN) algorithm is proposed in this paper to achieve real-time fault diagnosis. The critical parameters are discussed and verified by simulated and experimental signals for the sliding window data augmentation method. Based on LW-CNN and data augmentation, the real-time intelligent diagnosis of co-frequency is realized. Moreover, a real-time detection method of fault diagnosis algorithm is proposed for data acquisition to fault diagnosis. It is verified by experiments that the LW-CNN and sliding window methods are used with high accuracy and real-time performance.
The co-frequency vibration fault is one of the common faults in the operation of rotating equipment, and realizing the real-time diagnosis of the co-frequency vibration fault is of great significance for monitoring the health state and carrying out vibration suppression of the equipment. In engineering scenarios, co-frequency vibration faults are highlighted by rotational frequency and are difficult to identify, and existing intelligent methods require more hardware conditions and are exclusively time-consuming. Therefore, Lightweight-convolutional neural networks (LW-CNN) algorithm is proposed in this paper to achieve real-time fault diagnosis. The critical parameters are discussed and verified by simulated and experimental signals for the sliding window data augmentation method. Based on LW-CNN and data augmentation, the real-time intelligent diagnosis of co-frequency is realized. Moreover, a real-time detection method of fault diagnosis algorithm is proposed for data acquisition to fault diagnosis. It is verified by experiments that the LW-CNN and sliding window methods are used with high accuracy and real-time performance.
2024, 37: 151.
doi: 10.1186/s10033-024-01136-z
Abstract:
The multi-fidelity Kriging model is a promising technique in surrogate-based design, balancing model accuracy and the cost of sample generation by combining low- and high-fidelity data. However, the cost of building a multi-fidelity Kriging model increases significantly as problem complexity grows. To address this issue, we propose an efficient Hierarchical Kriging modeling method. In building the low-fidelity model, distance correlation is used to determine the relative value of the hyperparameter. This transforms the maximum likelihood estimation problem into a one-dimensional optimization task, which can be solved efficiently, significantly improving modeling efficiency. The high-fidelity model is built similarly, with the low-fidelity model's hyperparameter used as the relative value for the high-fidelity model's hyperparameter. The proposed method's effectiveness is evaluated through analytical problems and a real-world engineering problem involving modeling the isentropic efficiency of a compressor rotor. Experimental results show that the proposed method reduces modeling time significantly without compromising accuracy. For the compressor rotor isentropic efficiency model, the proposed method yields over 99% cost savings compared to conventional approaches, while also achieving higher accuracy.
The multi-fidelity Kriging model is a promising technique in surrogate-based design, balancing model accuracy and the cost of sample generation by combining low- and high-fidelity data. However, the cost of building a multi-fidelity Kriging model increases significantly as problem complexity grows. To address this issue, we propose an efficient Hierarchical Kriging modeling method. In building the low-fidelity model, distance correlation is used to determine the relative value of the hyperparameter. This transforms the maximum likelihood estimation problem into a one-dimensional optimization task, which can be solved efficiently, significantly improving modeling efficiency. The high-fidelity model is built similarly, with the low-fidelity model's hyperparameter used as the relative value for the high-fidelity model's hyperparameter. The proposed method's effectiveness is evaluated through analytical problems and a real-world engineering problem involving modeling the isentropic efficiency of a compressor rotor. Experimental results show that the proposed method reduces modeling time significantly without compromising accuracy. For the compressor rotor isentropic efficiency model, the proposed method yields over 99% cost savings compared to conventional approaches, while also achieving higher accuracy.
2024, 37: 92.
doi: 10.1186/s10033-024-01051-3
Abstract:
The current research of sandwich structures under dynamic loading mainly focus on the response characteristic of structure. The micro-topology of core layers would sufficiently influence the property of sandwich structure. However, the micro deformation and topology mechanism of structural deformation and energy absorption are unclear. In this paper, based on the bi-directional evolutionary structural optimization method and periodic base cell (PBC) technology, a topology optimization frame work is proposed to optimize the core layer of sandwich beams. The objective of the present optimization problem is to maximize shear stiffness of PBC with a volume constraint. The effects of the volume fraction, filter radius, and initial PBC aspect ratio on the micro-topology of the core were discussed. The dynamic response process, core compression, and energy absorption capacity of the sandwich beams under blast impact loading were analyzed by the finite element method. The results demonstrated that the over-pressure action stage was coupled with the core compression stage. Under the same loading and mass per unit area, the sandwich beam with a 20% volume fraction core layer had the best blast resistance. The filter radius has a slight effect on the shear stiffness and blast resistances of the sandwich beams. But increasing the filter radius could slightly improve the bending stiffness. Upon changing the initial PBC aspect ratio, there are three ways for PBC evolution: The first is to change the angle between the adjacent bars, the second is to further form holes in the bars, and the third is to combine the first two ways. However, not all three ways can improve the energy absorption capacity of the structure. Changing the aspect ratio of the PBC arbitrarily may lead to worse results. More studies are necessary for further detailed optimization. This research proposes a new topology sandwich beam structure by micro-topology optimization, which has sufficient shear stiffness. The micro mechanism of structural energy absorption is clarified, it is significant for structural energy absorption design.
The current research of sandwich structures under dynamic loading mainly focus on the response characteristic of structure. The micro-topology of core layers would sufficiently influence the property of sandwich structure. However, the micro deformation and topology mechanism of structural deformation and energy absorption are unclear. In this paper, based on the bi-directional evolutionary structural optimization method and periodic base cell (PBC) technology, a topology optimization frame work is proposed to optimize the core layer of sandwich beams. The objective of the present optimization problem is to maximize shear stiffness of PBC with a volume constraint. The effects of the volume fraction, filter radius, and initial PBC aspect ratio on the micro-topology of the core were discussed. The dynamic response process, core compression, and energy absorption capacity of the sandwich beams under blast impact loading were analyzed by the finite element method. The results demonstrated that the over-pressure action stage was coupled with the core compression stage. Under the same loading and mass per unit area, the sandwich beam with a 20% volume fraction core layer had the best blast resistance. The filter radius has a slight effect on the shear stiffness and blast resistances of the sandwich beams. But increasing the filter radius could slightly improve the bending stiffness. Upon changing the initial PBC aspect ratio, there are three ways for PBC evolution: The first is to change the angle between the adjacent bars, the second is to further form holes in the bars, and the third is to combine the first two ways. However, not all three ways can improve the energy absorption capacity of the structure. Changing the aspect ratio of the PBC arbitrarily may lead to worse results. More studies are necessary for further detailed optimization. This research proposes a new topology sandwich beam structure by micro-topology optimization, which has sufficient shear stiffness. The micro mechanism of structural energy absorption is clarified, it is significant for structural energy absorption design.
2024, 37: 55.
doi: 10.1186/s10033-024-01019-3
Abstract:
This paper presents a topology optimization approach for the surface flows on variable design domains. Via this approach, the matching between the pattern of a surface flow and the 2-manifold used to define the pattern can be optimized, where the 2-manifold is implicitly defined on another fixed 2-manifold named as the base manifold. The fiber bundle topology optimization approach is developed based on the description of the topological structure of the surface flow by using the differential geometry concept of the fiber bundle. The material distribution method is used to achieve the evolution of the pattern of the surface flow. The evolution of the implicit 2-manifold is realized via a homeomorphous map. The design variable of the pattern of the surface flow and that of the implicit 2-manifold are regularized by two sequentially implemented surface-PDE filters. The two surface-PDE filters are coupled, because they are defined on the implicit 2-manifold and base manifold, respectively. The surface Navier-Stokes equations, defined on the implicit 2-manifold, are used to describe the surface flow. The fiber bundle topology optimization problem is analyzed using the continuous adjoint method implemented on the first-order Sobolev space. Several numerical examples have been provided to demonstrate this approach, where the combination of the viscous dissipation and pressure drop is used as the design objective.
This paper presents a topology optimization approach for the surface flows on variable design domains. Via this approach, the matching between the pattern of a surface flow and the 2-manifold used to define the pattern can be optimized, where the 2-manifold is implicitly defined on another fixed 2-manifold named as the base manifold. The fiber bundle topology optimization approach is developed based on the description of the topological structure of the surface flow by using the differential geometry concept of the fiber bundle. The material distribution method is used to achieve the evolution of the pattern of the surface flow. The evolution of the implicit 2-manifold is realized via a homeomorphous map. The design variable of the pattern of the surface flow and that of the implicit 2-manifold are regularized by two sequentially implemented surface-PDE filters. The two surface-PDE filters are coupled, because they are defined on the implicit 2-manifold and base manifold, respectively. The surface Navier-Stokes equations, defined on the implicit 2-manifold, are used to describe the surface flow. The fiber bundle topology optimization problem is analyzed using the continuous adjoint method implemented on the first-order Sobolev space. Several numerical examples have been provided to demonstrate this approach, where the combination of the viscous dissipation and pressure drop is used as the design objective.
2024, 37: 166.
doi: 10.1186/s10033-024-01155-w
Abstract:
When a hydrogen storage vessel is subjected to a local impact load, damage may occur in the liner and result in hydrogen leakage and other catastrophic consequences. When predicting liner damage of a hydrogen storage vessel using the finite element method (FEM), although large element size is required to achieve a desired computational efficiency, it oftentimes causes inaccuracy in the damage model. To remedy this problem, in this study a novel approach which calculates the material damage based on the GISSMO (Generalized Incremental Stress State dependent damage Model) damage model and employs a submodeling strategy is proposed. According to this approach, the global model is discretized to large elements to increase the efficiency, while the submodel is meshed to much smaller elements to accurately reflect the material damage. Employing the established approach and material parameters calibrated from a large set of notched aluminum alloy 5083 specimens, the liner damage of a type Ⅲ hydrogen storage vessel subjected to a local compressive load was simulated. This way, the study reveals how the characteristics of the stress and material damage interact with each other. In addition, the study also demonstrates that the proposed approach can be used as a viable means to evaluate the damage within hydrogen storage vessels.
When a hydrogen storage vessel is subjected to a local impact load, damage may occur in the liner and result in hydrogen leakage and other catastrophic consequences. When predicting liner damage of a hydrogen storage vessel using the finite element method (FEM), although large element size is required to achieve a desired computational efficiency, it oftentimes causes inaccuracy in the damage model. To remedy this problem, in this study a novel approach which calculates the material damage based on the GISSMO (Generalized Incremental Stress State dependent damage Model) damage model and employs a submodeling strategy is proposed. According to this approach, the global model is discretized to large elements to increase the efficiency, while the submodel is meshed to much smaller elements to accurately reflect the material damage. Employing the established approach and material parameters calibrated from a large set of notched aluminum alloy 5083 specimens, the liner damage of a type Ⅲ hydrogen storage vessel subjected to a local compressive load was simulated. This way, the study reveals how the characteristics of the stress and material damage interact with each other. In addition, the study also demonstrates that the proposed approach can be used as a viable means to evaluate the damage within hydrogen storage vessels.
2024, 37: 148.
doi: 10.1186/s10033-024-01129-y
Abstract:
To optimize the magnetic fluid seal design, the single-factor method is usually used to study the effect of the rectangular pole teeth structure parameters on the sealing capacity of the magnetic fluid seal by current research, and the design formula is obtained. However, the supporting data is too few to make the results universalizable. In this paper, to obtain a wider range of applicable design formulas, a large number of modeling and simulation experiments are conducted using the co-simulation analysis experimental method of MATLAB and COMSOL. The influence of structure parameters of rectangular pole teeth and the coupling effects of the structure parameters on the sealing capacity of sealing devices has been studied under different lengths of pole piece (Lp) and seal gap (Lg). The results explain the influences of tooth height (Lh), tooth width (Lt), groove width (Ls), and their coupling effects on the theoretical sealing capacity of magnetic fluid seals, and more widely applicable design formulas for pole teeth structure parameters are given. The design formulas can help to obtain good design parameters directly or reduce the optimization range when the magnetic fluid seals need to be optimized to meet the miniaturization and lightweight requirements of magnetic fluid sealing devices or improve the sealing capacity under the same seal size.
To optimize the magnetic fluid seal design, the single-factor method is usually used to study the effect of the rectangular pole teeth structure parameters on the sealing capacity of the magnetic fluid seal by current research, and the design formula is obtained. However, the supporting data is too few to make the results universalizable. In this paper, to obtain a wider range of applicable design formulas, a large number of modeling and simulation experiments are conducted using the co-simulation analysis experimental method of MATLAB and COMSOL. The influence of structure parameters of rectangular pole teeth and the coupling effects of the structure parameters on the sealing capacity of sealing devices has been studied under different lengths of pole piece (Lp) and seal gap (Lg). The results explain the influences of tooth height (Lh), tooth width (Lt), groove width (Ls), and their coupling effects on the theoretical sealing capacity of magnetic fluid seals, and more widely applicable design formulas for pole teeth structure parameters are given. The design formulas can help to obtain good design parameters directly or reduce the optimization range when the magnetic fluid seals need to be optimized to meet the miniaturization and lightweight requirements of magnetic fluid sealing devices or improve the sealing capacity under the same seal size.
2024, 37: 170.
doi: 10.1186/s10033-024-01101-w
Abstract:
Cf/SiC composites are characterized as anisotropic, heterogeneous, brittle, and hard materials. The process of manufacturing Cf/SiC composites using traditional machining techniques is prone to edge chipping damage and tool wear, which makes it difficult to meet the machining quality and machining accuracy. The purpose of this paper is to investigate the milling characteristics and damage assessment during ultrasonic vibration-assisted end milling (UVAEM) of Cf/SiC composites. Firstly, UVAEM experiments on Cf/SiC composites were carried out at different ultrasonic amplitudes and comparative experiments with conventional milling (CM). In addition, tool wear, surface roughness, surface micromorphology, milling force and subsurface damage (SSD) were measured and analysed. Finally, the SSD factors of Cf/SiC composites were established to quantify machining damage, and analyzed the effect of ultrasonic amplitude on SSD. Furthermore, the formation mechanism of SSD was investigated and discussed. The findings indicate that appropriate ultrasonic amplitude improves the surface quality by UVAEM, while excessive amplitude deteriorates the surface quality. During the UVAEM, micro/macro brittle fracture of the fibers on the surface occurs, leading to machining defects such as fiber breakage, fiber-interface debonding and pits. The milling force gradually decreases with the increase of ultrasonic amplitude. On the other hand, the forms of SSD in CM and UVAEM are mainly fiber pullout, subsurface crack, crack extension and machining pits. Matrix cracking and fiber pullout in SSD were affected by fiber orientation. Moreover, the introduction of ultrasonic vibration plays a significant contribution in the inhibition of the SSD in Cf/SiC composites.
Cf/SiC composites are characterized as anisotropic, heterogeneous, brittle, and hard materials. The process of manufacturing Cf/SiC composites using traditional machining techniques is prone to edge chipping damage and tool wear, which makes it difficult to meet the machining quality and machining accuracy. The purpose of this paper is to investigate the milling characteristics and damage assessment during ultrasonic vibration-assisted end milling (UVAEM) of Cf/SiC composites. Firstly, UVAEM experiments on Cf/SiC composites were carried out at different ultrasonic amplitudes and comparative experiments with conventional milling (CM). In addition, tool wear, surface roughness, surface micromorphology, milling force and subsurface damage (SSD) were measured and analysed. Finally, the SSD factors of Cf/SiC composites were established to quantify machining damage, and analyzed the effect of ultrasonic amplitude on SSD. Furthermore, the formation mechanism of SSD was investigated and discussed. The findings indicate that appropriate ultrasonic amplitude improves the surface quality by UVAEM, while excessive amplitude deteriorates the surface quality. During the UVAEM, micro/macro brittle fracture of the fibers on the surface occurs, leading to machining defects such as fiber breakage, fiber-interface debonding and pits. The milling force gradually decreases with the increase of ultrasonic amplitude. On the other hand, the forms of SSD in CM and UVAEM are mainly fiber pullout, subsurface crack, crack extension and machining pits. Matrix cracking and fiber pullout in SSD were affected by fiber orientation. Moreover, the introduction of ultrasonic vibration plays a significant contribution in the inhibition of the SSD in Cf/SiC composites.
2024, 37: 163.
doi: 10.1186/s10033-024-01148-9
Abstract:
In recent years, the rapid development of large-scale satellite constellations has challenged the mass production capabilities of satellite manufacturers. Assembly is the last and critical phase of satellite production. Achieving satellite mass assembly is the key to realizing satellite mass production. To this end, satellite manufacturers are working to construct the satellite mass assembly shop-floor (SMAS) to enable moving assembly. However, there is still a lack of a modularized manufacturing system oriented to flexible production for SMAS, as well as disturbance detection methods and production-logistics synchronization methods to deal with various disturbances. Therefore, this paper proposes a digital twin-based production-logistics synchronization system (DT-PLSS) for SMAS. The framework of DT-PLSS is introduced first. In this framework, DT-PLSS can achieve modular construction, as well as distributed management and control. Based on the proposed framework, the construction methods of resource level digital twin (DT), workstation level DT, and shop-floor level DT in SMAS are discussed. The DT-based disturbance detection method for SMAS is presented, aiming to detect or predict different types of disturbances and to analyze the effect of disturbances. Then, a DT enhanced production-logistics synchronization mechanism for SMAS is proposed. With this mechanism, the logistics distribution in the dynamic shop-floor environment and production-logistics synchronization under various disturbances can be realized. Finally, a case study in a real SMAS verifies the feasibility and effectiveness of the proposed system and methods. This research proposes a practical framework and system which could realize disturbance detection, logistics distribution, and the production-logistics synchronization in complex SMAS scenario effectively.
In recent years, the rapid development of large-scale satellite constellations has challenged the mass production capabilities of satellite manufacturers. Assembly is the last and critical phase of satellite production. Achieving satellite mass assembly is the key to realizing satellite mass production. To this end, satellite manufacturers are working to construct the satellite mass assembly shop-floor (SMAS) to enable moving assembly. However, there is still a lack of a modularized manufacturing system oriented to flexible production for SMAS, as well as disturbance detection methods and production-logistics synchronization methods to deal with various disturbances. Therefore, this paper proposes a digital twin-based production-logistics synchronization system (DT-PLSS) for SMAS. The framework of DT-PLSS is introduced first. In this framework, DT-PLSS can achieve modular construction, as well as distributed management and control. Based on the proposed framework, the construction methods of resource level digital twin (DT), workstation level DT, and shop-floor level DT in SMAS are discussed. The DT-based disturbance detection method for SMAS is presented, aiming to detect or predict different types of disturbances and to analyze the effect of disturbances. Then, a DT enhanced production-logistics synchronization mechanism for SMAS is proposed. With this mechanism, the logistics distribution in the dynamic shop-floor environment and production-logistics synchronization under various disturbances can be realized. Finally, a case study in a real SMAS verifies the feasibility and effectiveness of the proposed system and methods. This research proposes a practical framework and system which could realize disturbance detection, logistics distribution, and the production-logistics synchronization in complex SMAS scenario effectively.
2024, 37: 27.
doi: 10.1186/s10033-023-00988-1
Abstract:
Each joint of a hydraulic-driven legged robot adopts a highly integrated hydraulic drive unit (HDU), which features a high power–weight ratio. However, most HDUs are throttling-valve-controlled cylinder systems, which exhibit high energy losses. By contrast, pump control systems offer a high efficiency. Nevertheless, their response ability is unsatisfactory. To fully utilize the advantages of pump and valve control systems, in this study, a new type of pump–valve compound drive system (PCDS) is designed, which can not only effectively reduce the energy loss, but can also ensure the response speed and response accuracy of the HDUs in robot joints to satisfy the performance requirements of robots. Herein, considering the force control requirements of energy conservation, high precision, and fast response of the robot joint HDU, a nonlinear mathematical model of the PCDS force control system is first introduced. In addition, pressure–flow nonlinearity, friction nonlinearity, load complexity and variability, and other factors affecting the system are considered, and a novel force control method based on quantitative feedback theory (QFT) and a disturbance torque observer (DTO) is designed, which is denoted as QFT–DTOC herein. This method improves the control accuracy and robustness of the force control system, reduces the effect of the disturbance torque on the control performance of the servo motor, and improves the overall force control performance of the system. Finally, experimental verification is performed using the PCDS performance test platform. The experimental results and quantitative data show that the QFT–DTOC proposed herein can significantly improve the force control performance of the PCDS. The relevant force control method can be used as a bottom-control method for the hydraulic servo system to provide a foundation for implementing the top-level trajectory planning of the robot.
Each joint of a hydraulic-driven legged robot adopts a highly integrated hydraulic drive unit (HDU), which features a high power–weight ratio. However, most HDUs are throttling-valve-controlled cylinder systems, which exhibit high energy losses. By contrast, pump control systems offer a high efficiency. Nevertheless, their response ability is unsatisfactory. To fully utilize the advantages of pump and valve control systems, in this study, a new type of pump–valve compound drive system (PCDS) is designed, which can not only effectively reduce the energy loss, but can also ensure the response speed and response accuracy of the HDUs in robot joints to satisfy the performance requirements of robots. Herein, considering the force control requirements of energy conservation, high precision, and fast response of the robot joint HDU, a nonlinear mathematical model of the PCDS force control system is first introduced. In addition, pressure–flow nonlinearity, friction nonlinearity, load complexity and variability, and other factors affecting the system are considered, and a novel force control method based on quantitative feedback theory (QFT) and a disturbance torque observer (DTO) is designed, which is denoted as QFT–DTOC herein. This method improves the control accuracy and robustness of the force control system, reduces the effect of the disturbance torque on the control performance of the servo motor, and improves the overall force control performance of the system. Finally, experimental verification is performed using the PCDS performance test platform. The experimental results and quantitative data show that the QFT–DTOC proposed herein can significantly improve the force control performance of the PCDS. The relevant force control method can be used as a bottom-control method for the hydraulic servo system to provide a foundation for implementing the top-level trajectory planning of the robot.
2024, 37: 162.
doi: 10.1186/s10033-024-01147-w
Abstract:
Currently, a 2-port microwave transmission line with a glass window is usually used to transmit microwave energy to a pressure vessel while sealing the high-pressure gas. In this situation, the damage of the brittle glass window will inevitably result in disastrous accidents. In this paper, the idea of a "2+4"-port microwave transmission line is first proposed to solve this problem. A 4-port waveguide bridge structure is connected to the input port of a traditional 2-port structure, which can release the high-pressure gas safely when the glass window of the 2-port microwave transmitting structure fails. To test this idea, a "2+4"-port microwave transmission line at 2.45 GHz was designed and fabricated. The effectiveness of the whole system in microwave transmission was validated by both simulations and experiments. A high microwave transmittance of more than 97% in the simulation and 91% in the experiment was achieved. The long-time transmission of 15-kW microwave energy, 5 times higher than the previous work, was realized. Moreover, the effectiveness of the transmission line in releasing high-pressure gas (0.6 MPa) was validated by a series of fluid-structure interaction simulations. This research proposes a new transmission structure for transmitting microwave into a pressurized environment safely and efficiently, which can be promoted to a series of applications including vacuum electron devices, microwave ovens, and so on.
Currently, a 2-port microwave transmission line with a glass window is usually used to transmit microwave energy to a pressure vessel while sealing the high-pressure gas. In this situation, the damage of the brittle glass window will inevitably result in disastrous accidents. In this paper, the idea of a "2+4"-port microwave transmission line is first proposed to solve this problem. A 4-port waveguide bridge structure is connected to the input port of a traditional 2-port structure, which can release the high-pressure gas safely when the glass window of the 2-port microwave transmitting structure fails. To test this idea, a "2+4"-port microwave transmission line at 2.45 GHz was designed and fabricated. The effectiveness of the whole system in microwave transmission was validated by both simulations and experiments. A high microwave transmittance of more than 97% in the simulation and 91% in the experiment was achieved. The long-time transmission of 15-kW microwave energy, 5 times higher than the previous work, was realized. Moreover, the effectiveness of the transmission line in releasing high-pressure gas (0.6 MPa) was validated by a series of fluid-structure interaction simulations. This research proposes a new transmission structure for transmitting microwave into a pressurized environment safely and efficiently, which can be promoted to a series of applications including vacuum electron devices, microwave ovens, and so on.
2024, 37: 75.
doi: 10.1186/s10033-024-01049-x
Abstract:
Vibration quality is a vital indicator for assessing the progress of modern equipment. The dynamic vibration absorber (DVA) based on the acoustic black hole (ABH) feature is a new passive control method that manipulates waves. It offers efficient energy focalization and broad-spectrum vibration suppression, making it highly promising for applications in large equipment such as aircraft, trains, and ships. Despite previous advancements in ABH-DVA development, certain challenges remain, particularly in ensuring effective coupling with host structures during control. To address these issues, this study proposes a partitioned ABH-featured dynamic vibration absorber (PABH-DVA) with partitions in the radial direction of the disc. By employing a plate as the host structure, simulations and experiments were conducted, demonstrating that the PABH-DVA outperforms the original symmetric ABH-DVA in terms of damping performance. The study also calculated and compared the coupling coefficients of the two ABH-DVAs to uncover the mechanism behind the enhanced damping. Simulation results revealed that the PABH-DVA exhibits more coupled modes, occasionally with lower coupling coefficients than the symmetric ABH-DVA. The influence of frequency ratio and modal mass was further analyzed to explain the reasons behind the PABH-DVA's superior damping performance. Additionally, the study discussed the impact of the number of slits and their orientation. This research further explains the coupling mechanism between the ABH-DVA and the controlled structure, and provides new ideas for the further application of ABH in engineering.
Vibration quality is a vital indicator for assessing the progress of modern equipment. The dynamic vibration absorber (DVA) based on the acoustic black hole (ABH) feature is a new passive control method that manipulates waves. It offers efficient energy focalization and broad-spectrum vibration suppression, making it highly promising for applications in large equipment such as aircraft, trains, and ships. Despite previous advancements in ABH-DVA development, certain challenges remain, particularly in ensuring effective coupling with host structures during control. To address these issues, this study proposes a partitioned ABH-featured dynamic vibration absorber (PABH-DVA) with partitions in the radial direction of the disc. By employing a plate as the host structure, simulations and experiments were conducted, demonstrating that the PABH-DVA outperforms the original symmetric ABH-DVA in terms of damping performance. The study also calculated and compared the coupling coefficients of the two ABH-DVAs to uncover the mechanism behind the enhanced damping. Simulation results revealed that the PABH-DVA exhibits more coupled modes, occasionally with lower coupling coefficients than the symmetric ABH-DVA. The influence of frequency ratio and modal mass was further analyzed to explain the reasons behind the PABH-DVA's superior damping performance. Additionally, the study discussed the impact of the number of slits and their orientation. This research further explains the coupling mechanism between the ABH-DVA and the controlled structure, and provides new ideas for the further application of ABH in engineering.
2024, 37: 46.
doi: 10.1186/s10033-024-01028-2
Abstract:
Laser tracers are a three-dimensional coordinate measurement system that are widely used in industrial measurement. We propose a geometric error identification method based on multi-station synchronization laser tracers to enable the rapid and high-precision measurement of geometric errors for gantry-type computer numerical control (CNC) machine tools. This method also improves on the existing measurement efficiency issues in the single-base station measurement method and multi-base station time-sharing measurement method. We consider a three-axis gantry-type CNC machine tool, and the geometric error mathematical model is derived and established based on the combination of screw theory and a topological analysis of the machine kinematic chain. The four-station laser tracers position and measurement points are realized based on the multi-point positioning principle. A self-calibration algorithm is proposed for the coordinate calibration process of a laser tracer using the Levenberg–Marquardt nonlinear least squares method, and the geometric error is solved using Taylor's first-order linearization iteration. The experimental results show that the geometric error calculated based on this modeling method is comparable to the results from the Etalon laser tracer. For a volume of 800 mm × 1000 mm × 350 mm, the maximum differences of the linear, angular, and spatial position errors were 2.0 μm, 2.7 μrad, and 12.0 μm, respectively, which verifies the accuracy of the proposed algorithm. This research proposes a modeling method for the precise measurement of errors in machine tools, and the applied nature of this study also makes it relevant both to researchers and those in the industrial sector.
Laser tracers are a three-dimensional coordinate measurement system that are widely used in industrial measurement. We propose a geometric error identification method based on multi-station synchronization laser tracers to enable the rapid and high-precision measurement of geometric errors for gantry-type computer numerical control (CNC) machine tools. This method also improves on the existing measurement efficiency issues in the single-base station measurement method and multi-base station time-sharing measurement method. We consider a three-axis gantry-type CNC machine tool, and the geometric error mathematical model is derived and established based on the combination of screw theory and a topological analysis of the machine kinematic chain. The four-station laser tracers position and measurement points are realized based on the multi-point positioning principle. A self-calibration algorithm is proposed for the coordinate calibration process of a laser tracer using the Levenberg–Marquardt nonlinear least squares method, and the geometric error is solved using Taylor's first-order linearization iteration. The experimental results show that the geometric error calculated based on this modeling method is comparable to the results from the Etalon laser tracer. For a volume of 800 mm × 1000 mm × 350 mm, the maximum differences of the linear, angular, and spatial position errors were 2.0 μm, 2.7 μrad, and 12.0 μm, respectively, which verifies the accuracy of the proposed algorithm. This research proposes a modeling method for the precise measurement of errors in machine tools, and the applied nature of this study also makes it relevant both to researchers and those in the industrial sector.
2024, 37: 83.
doi: 10.1186/s10033-024-01069-7
Abstract:
Ceramic cutting inserts are a type of cutting tool commonly used in high-speed metal cutting applications. However, the wear of these inserts caused by friction between the workpiece and cutting inserts limits their overall effectiveness. In order to improve the tool life and reduce wear, this study introduces an emerging method called magnetic field-assisted batch polishing (MABP) for simultaneously polishing multiple ceramic cutting inserts. Several polishing experiments were conducted under different conditions, and the wear characteristics were clarified by cutting S136H steel. The results showed that after 15 min of polishing, the surface roughness at the flank face, edge, and nose of the inserts was reduced to below 2.5 nm, 6.25 nm, and 45.8 nm, respectively. Furthermore, the nose radii of the inserts did not change significantly, and there were no significant changes in the weight percentage of elements before and after polishing. Additionally, the tool life of the batch polished inserts was found to be up to 1.75 times longer than that of unpolished inserts. These findings suggest that the MABP method is an effective way to mass polish ceramic cutting inserts, resulting in significantly reduced tool wear. Furthermore, this novel method offers new possibilities for polishing other tools.
Ceramic cutting inserts are a type of cutting tool commonly used in high-speed metal cutting applications. However, the wear of these inserts caused by friction between the workpiece and cutting inserts limits their overall effectiveness. In order to improve the tool life and reduce wear, this study introduces an emerging method called magnetic field-assisted batch polishing (MABP) for simultaneously polishing multiple ceramic cutting inserts. Several polishing experiments were conducted under different conditions, and the wear characteristics were clarified by cutting S136H steel. The results showed that after 15 min of polishing, the surface roughness at the flank face, edge, and nose of the inserts was reduced to below 2.5 nm, 6.25 nm, and 45.8 nm, respectively. Furthermore, the nose radii of the inserts did not change significantly, and there were no significant changes in the weight percentage of elements before and after polishing. Additionally, the tool life of the batch polished inserts was found to be up to 1.75 times longer than that of unpolished inserts. These findings suggest that the MABP method is an effective way to mass polish ceramic cutting inserts, resulting in significantly reduced tool wear. Furthermore, this novel method offers new possibilities for polishing other tools.
2024, 37: 39.
doi: 10.1186/s10033-024-01027-3
Abstract:
A flexible or planar eddy current probe with a differential structure can suppress the lift-off noise during the inspection of defects. However, the extent of the lift-off effect on differential probes, including different coil structures, varies. In this study, two planar eddy current probes with differential pickup structures and the same size, Koch and circular probes, were used to compare lift-off effects. The eddy current distributions of the probes perturbed by 0° and 90° cracks were obtained by finite element analysis. The analysis results show that the 90° crack can impede the eddy current induced by the Koch probe even further at relatively low lift-off distance. The peak-to-peak values of the signal output from the two probes were compared at different lift-off distances using finite element analysis and experimental methods. In addition, the effects of different frequencies on the lift-off were studied experimentally. The results show that the signal peak-to-peak value of the Koch probe for the inspection of cracks in 90° orientation is larger than that of the circular probe when the lift-off distance is smaller than 1.2 mm. In addition, the influence of the lift-off distance on the peak-to-peak signal value of the two probes was studied via normalization. This indicates that the influence becomes more evident with an increase in excitation frequency. This research discloses the lift-off effect of differential planar eddy current probes with different coil shapes and proves the detection merit of the Koch probe for 90° cracks at low lift-off distances.
A flexible or planar eddy current probe with a differential structure can suppress the lift-off noise during the inspection of defects. However, the extent of the lift-off effect on differential probes, including different coil structures, varies. In this study, two planar eddy current probes with differential pickup structures and the same size, Koch and circular probes, were used to compare lift-off effects. The eddy current distributions of the probes perturbed by 0° and 90° cracks were obtained by finite element analysis. The analysis results show that the 90° crack can impede the eddy current induced by the Koch probe even further at relatively low lift-off distance. The peak-to-peak values of the signal output from the two probes were compared at different lift-off distances using finite element analysis and experimental methods. In addition, the effects of different frequencies on the lift-off were studied experimentally. The results show that the signal peak-to-peak value of the Koch probe for the inspection of cracks in 90° orientation is larger than that of the circular probe when the lift-off distance is smaller than 1.2 mm. In addition, the influence of the lift-off distance on the peak-to-peak signal value of the two probes was studied via normalization. This indicates that the influence becomes more evident with an increase in excitation frequency. This research discloses the lift-off effect of differential planar eddy current probes with different coil shapes and proves the detection merit of the Koch probe for 90° cracks at low lift-off distances.
2024, 37: 125.
doi: 10.1186/s10033-024-01090-w
Abstract:
Based on the advantages of triply periodic minimal surface (TPMS) porous structures, extensive research on NiTi shape memory alloy TPMS scaffolds has been conducted. However, the current reports about TPMS porous structures highly rely on the implicit equation, which limited the design flexibility. In this work, novel shell-based TPMS structures were designed and fabricated by laser powder bed fusion. The comparisons of manufacturability, mechanical properties, and shape recovery responses between traditional solid-based and novel shell-based TPMS structures were evaluated. Results indicated that the shell-based TPMS porous structures possessed larger Young's moduli and higher compressive strengths. Specifically, Diamond shell structure possessed the highest Young's moduli of 605.8±24.5 MPa, while Gyroid shell structure possessed the highest compressive strength of 43.90±3.32 MPa. In addition, because of the larger specific surface area, higher critical stress to induce martensite transformation, and lower austenite finish temperature, the Diamond shell porous structure exhibited much higher shape recovery performance (only 0.1% residual strain left at pre-strains of 6%) than other porous structures. These results substantially uncover the effects of structural topology on the mechanical properties and shape recovery responses of NiTi shape memory alloy scaffolds, and confirm the effectiveness of this novel structural design method. This research can provide guidance for the structural design application of NiTi porous scaffolds in bone implants.
Based on the advantages of triply periodic minimal surface (TPMS) porous structures, extensive research on NiTi shape memory alloy TPMS scaffolds has been conducted. However, the current reports about TPMS porous structures highly rely on the implicit equation, which limited the design flexibility. In this work, novel shell-based TPMS structures were designed and fabricated by laser powder bed fusion. The comparisons of manufacturability, mechanical properties, and shape recovery responses between traditional solid-based and novel shell-based TPMS structures were evaluated. Results indicated that the shell-based TPMS porous structures possessed larger Young's moduli and higher compressive strengths. Specifically, Diamond shell structure possessed the highest Young's moduli of 605.8±24.5 MPa, while Gyroid shell structure possessed the highest compressive strength of 43.90±3.32 MPa. In addition, because of the larger specific surface area, higher critical stress to induce martensite transformation, and lower austenite finish temperature, the Diamond shell porous structure exhibited much higher shape recovery performance (only 0.1% residual strain left at pre-strains of 6%) than other porous structures. These results substantially uncover the effects of structural topology on the mechanical properties and shape recovery responses of NiTi shape memory alloy scaffolds, and confirm the effectiveness of this novel structural design method. This research can provide guidance for the structural design application of NiTi porous scaffolds in bone implants.
2024, 37: 49.
doi: 10.1186/s10033-024-01037-1
Abstract:
Fine particulate matter produced during the rapid industrialization over the past decades can cause significant harm to human health. Twin-fluid atomization technology is an effective means of controlling fine particulate matter pollution. In this paper, the influences of the main parameters on the droplet size, effective atomization range and sound pressure level (SPL) of a twin-fluid nozzle (TFN) are investigated, and in order to improve the atomization performance, a multi-objective synergetic optimization algorithm is presented. A multi-physics coupled acoustic-mechanics model based on the discrete phase model (DPM), large eddy simulation (LES) model, and Ffowcs Williams-Hawkings (FW-H) model is established, and the numerical simulation results of the multi-physics coupled acoustic-mechanics method are verified via experimental comparison. Based on the analysis of the multi-physics coupled acoustic-mechanics numerical simulation results, the effects of the water flow on the characteristics of the atomization flow distribution were obtained. A multi-physics coupled acoustic-mechanics numerical simulation result was employed to establish an orthogonal test database, and a multi-objective synergetic optimization algorithm was adopted to optimize the key parameters of the TFN. The optimal parameters are as follows: A gas flow of 0.94 m3/h, water flow of 0.0237 m3/h, orifice diameter of the self-excited vibrating cavity (SVC) of 1.19 mm, SVC orifice depth of 0.53 mm, distance between SVC and the outlet of nozzle of 5.11 mm, and a nozzle outlet diameter of 3.15 mm. The droplet particle size in the atomization flow field was significantly reduced, the spray distance improved by 71.56%, and the SPL data at each corresponding measurement point decreased by an average of 38.96%. The conclusions of this study offer a references for future TFN research.
Fine particulate matter produced during the rapid industrialization over the past decades can cause significant harm to human health. Twin-fluid atomization technology is an effective means of controlling fine particulate matter pollution. In this paper, the influences of the main parameters on the droplet size, effective atomization range and sound pressure level (SPL) of a twin-fluid nozzle (TFN) are investigated, and in order to improve the atomization performance, a multi-objective synergetic optimization algorithm is presented. A multi-physics coupled acoustic-mechanics model based on the discrete phase model (DPM), large eddy simulation (LES) model, and Ffowcs Williams-Hawkings (FW-H) model is established, and the numerical simulation results of the multi-physics coupled acoustic-mechanics method are verified via experimental comparison. Based on the analysis of the multi-physics coupled acoustic-mechanics numerical simulation results, the effects of the water flow on the characteristics of the atomization flow distribution were obtained. A multi-physics coupled acoustic-mechanics numerical simulation result was employed to establish an orthogonal test database, and a multi-objective synergetic optimization algorithm was adopted to optimize the key parameters of the TFN. The optimal parameters are as follows: A gas flow of 0.94 m3/h, water flow of 0.0237 m3/h, orifice diameter of the self-excited vibrating cavity (SVC) of 1.19 mm, SVC orifice depth of 0.53 mm, distance between SVC and the outlet of nozzle of 5.11 mm, and a nozzle outlet diameter of 3.15 mm. The droplet particle size in the atomization flow field was significantly reduced, the spray distance improved by 71.56%, and the SPL data at each corresponding measurement point decreased by an average of 38.96%. The conclusions of this study offer a references for future TFN research.
2024, 37: 67.
doi: 10.1186/s10033-024-01053-1
Abstract:
As an innovative, low-power consuming, and low-stiffness suspension approach, the diamagnetic levitation technique has attracted considerable interest because of its potential applicability in miniaturized mechanical systems. The foundation of a diamagnetic levitation system is mathematical modeling, which is essential for operating performance optimization and stability prediction. However, few studies on systematic mathematical modeling have been reported. In this study, a systematic mathematical model for a disc-shaped diamagnetically levitated rotor on a permanent magnet array is proposed. Based on the proposed model, the magnetic field distribution characteristics, diamagnetic levitation force characteristics (i.e., levitation height and stiffness), and optimized theoretical conditions for realizing stable levitation are determined. Experiments are conducted to verify the feasibility of the proposed mathematical model. Theoretical predictions and experimental results indicate that increasing the levitation height enlarges the stable region. Moreover, with a further increase in the rotor radius, the stable regions of the rotor gradually diminish and even vanish. Thus, when the levitation height is fixed, a moderate rotor radius permits stable levitation. This study proposes a mathematical modeling method for a diamagnetic levitation system that has potential applications in miniaturized mechanical systems.
As an innovative, low-power consuming, and low-stiffness suspension approach, the diamagnetic levitation technique has attracted considerable interest because of its potential applicability in miniaturized mechanical systems. The foundation of a diamagnetic levitation system is mathematical modeling, which is essential for operating performance optimization and stability prediction. However, few studies on systematic mathematical modeling have been reported. In this study, a systematic mathematical model for a disc-shaped diamagnetically levitated rotor on a permanent magnet array is proposed. Based on the proposed model, the magnetic field distribution characteristics, diamagnetic levitation force characteristics (i.e., levitation height and stiffness), and optimized theoretical conditions for realizing stable levitation are determined. Experiments are conducted to verify the feasibility of the proposed mathematical model. Theoretical predictions and experimental results indicate that increasing the levitation height enlarges the stable region. Moreover, with a further increase in the rotor radius, the stable regions of the rotor gradually diminish and even vanish. Thus, when the levitation height is fixed, a moderate rotor radius permits stable levitation. This study proposes a mathematical modeling method for a diamagnetic levitation system that has potential applications in miniaturized mechanical systems.
2024, 37: 165.
doi: 10.1186/s10033-024-01142-1
Abstract:
In the process of grinding carbon fiber reinforced polymer (CFRP), the changing state of acceleration vibration signal is closely related to the grinding surface quality. Therefore, the time domain and frequency domain signal changes in acceleration can be used to monitor and control the grinding process to improve machining quality and efficiency. In this paper, changes in acceleration frequency domain signals under different grinding angles are studied, and the relationship between the vibration forms of acceleration frequency domain signals at the beginning, middle and end of grinding as well as the surface morphology and quality of the corresponding grinding position is studied. Combined with the micro-morphology of the grinding area, it can be seen that, a high frequency and low amplitude vibration can improve the grinding surface quality, but a high amplitude will have a negative impact on the grinding quality. The acceleration vibration during grinding is more stable and the corresponding surface quality is better. With an increase in grinding angle, the maximum amplitude of acceleration first increases and then decreases. The length of the surface fiber also initially decreases and then increases. Lastly, the resin residue first increases and then decreases. The purpose of this study is to provide a theoretical basis for the subsequent grinding state adjustment.
In the process of grinding carbon fiber reinforced polymer (CFRP), the changing state of acceleration vibration signal is closely related to the grinding surface quality. Therefore, the time domain and frequency domain signal changes in acceleration can be used to monitor and control the grinding process to improve machining quality and efficiency. In this paper, changes in acceleration frequency domain signals under different grinding angles are studied, and the relationship between the vibration forms of acceleration frequency domain signals at the beginning, middle and end of grinding as well as the surface morphology and quality of the corresponding grinding position is studied. Combined with the micro-morphology of the grinding area, it can be seen that, a high frequency and low amplitude vibration can improve the grinding surface quality, but a high amplitude will have a negative impact on the grinding quality. The acceleration vibration during grinding is more stable and the corresponding surface quality is better. With an increase in grinding angle, the maximum amplitude of acceleration first increases and then decreases. The length of the surface fiber also initially decreases and then increases. Lastly, the resin residue first increases and then decreases. The purpose of this study is to provide a theoretical basis for the subsequent grinding state adjustment.
2024, 37: 22.
doi: 10.1186/s10033-024-00995-w
Abstract:
Improvement of fabrication efficiency and part performance was the main challenge for the large-scale powder bed fusion (PBF) process. In this study, a dynamic monitoring and feedback system of powder bed temperature field using an infrared thermal imager has been established and integrated into a four-laser PBF equipment with a working area of 2000 mm × 2000 mm. The heat-affected zone (HAZ) temperature field has been controlled by adjusting the scanning speed dynamically. Simultaneously, the relationship among spot size, HAZ temperature, and part performance has been established. The fluctuation of the HAZ temperature in four-laser scanning areas was decreased from 30.85 ℃ to 17.41 ℃. Thus, the consistency of the sintering performance of the produced large component has been improved. Based on the controllable temperature field, a dynamically adjusting strategy for laser spot size was proposed, by which the fabrication efficiency was improved up to 65.38%. The current research results were of great significance to the further industrial applications of large-scale PBF equipment.
Improvement of fabrication efficiency and part performance was the main challenge for the large-scale powder bed fusion (PBF) process. In this study, a dynamic monitoring and feedback system of powder bed temperature field using an infrared thermal imager has been established and integrated into a four-laser PBF equipment with a working area of 2000 mm × 2000 mm. The heat-affected zone (HAZ) temperature field has been controlled by adjusting the scanning speed dynamically. Simultaneously, the relationship among spot size, HAZ temperature, and part performance has been established. The fluctuation of the HAZ temperature in four-laser scanning areas was decreased from 30.85 ℃ to 17.41 ℃. Thus, the consistency of the sintering performance of the produced large component has been improved. Based on the controllable temperature field, a dynamically adjusting strategy for laser spot size was proposed, by which the fabrication efficiency was improved up to 65.38%. The current research results were of great significance to the further industrial applications of large-scale PBF equipment.
2024, 37: 84.
doi: 10.1186/s10033-024-01071-z
Abstract:
Ultrasonic scalpel design for minimally invasive surgical procedures is mainly focused on optimizing cutting performance. However, an important issue is the low fatigue life of traditional ultrasonic scalpels, which affects their long-term reliability and effectiveness and creates hidden dangers for surgery. In this study, a multi-objective optimal design for the cutting performance and fatigue life of ultrasonic scalpels was proposed using finite element analysis and fatigue simulation. The optimal design parameters of resonance frequency and amplitude were determined. By setting the transition fillet and keeping the gain structure away from the node position to enable the scalpel to have a high service life with excellent cutting performance. The frequency modulation method of setting the vibration node bosses at the node position and setting the vibration antinode grooves at the antinode position was compared. Then, the mechanism of the influence of various design elements, such as tip, shank, node position, and antinode position, on the resonance frequency, amplitude, and fatigue life of the ultrasonic scalpel was analyzed, and the optimal design principles of the ultrasonic scalpel were obtained. The proposed ultrasonic scalpel design was confirmed by simulations, impedance measurements, and liver tissue cutting experiments, demonstrating its feasibility and enhanced performance. This research introduces innovative design strategies to improve the fatigue life and performance of ultrasonic scalpels to address an important issue in minimally invasive surgery.
Ultrasonic scalpel design for minimally invasive surgical procedures is mainly focused on optimizing cutting performance. However, an important issue is the low fatigue life of traditional ultrasonic scalpels, which affects their long-term reliability and effectiveness and creates hidden dangers for surgery. In this study, a multi-objective optimal design for the cutting performance and fatigue life of ultrasonic scalpels was proposed using finite element analysis and fatigue simulation. The optimal design parameters of resonance frequency and amplitude were determined. By setting the transition fillet and keeping the gain structure away from the node position to enable the scalpel to have a high service life with excellent cutting performance. The frequency modulation method of setting the vibration node bosses at the node position and setting the vibration antinode grooves at the antinode position was compared. Then, the mechanism of the influence of various design elements, such as tip, shank, node position, and antinode position, on the resonance frequency, amplitude, and fatigue life of the ultrasonic scalpel was analyzed, and the optimal design principles of the ultrasonic scalpel were obtained. The proposed ultrasonic scalpel design was confirmed by simulations, impedance measurements, and liver tissue cutting experiments, demonstrating its feasibility and enhanced performance. This research introduces innovative design strategies to improve the fatigue life and performance of ultrasonic scalpels to address an important issue in minimally invasive surgery.
2024, 37: 4.
doi: 10.1186/s10033-023-00978-3
Abstract:
Predictive maintenance has emerged as an effective tool for curbing maintenance costs, yet prevailing research predominantly concentrates on the abnormal phases. Within the ostensibly stable healthy phase, the reliance on anomaly detection to preempt equipment malfunctions faces the challenge of sudden anomaly discernment. To address this challenge, this paper proposes a dual-task learning approach for bearing anomaly detection and state evaluation of safe regions. The proposed method transforms the execution of the two tasks into an optimization issue of the hypersphere center. By leveraging the monotonicity and distinguishability pertinent to the tasks as the foundation for optimization, it reconstructs the SVDD model to ensure equilibrium in the model's performance across the two tasks. Subsequent experiments verify the proposed method's effectiveness, which is interpreted from the perspectives of parameter adjustment and enveloping trade-offs. In the meantime, experimental results also show two deficiencies in anomaly detection accuracy and state evaluation metrics. Their theoretical analysis inspires us to focus on feature extraction and data collection to achieve improvements. The proposed method lays the foundation for realizing predictive maintenance in a healthy stage by improving condition awareness in safe regions.
Predictive maintenance has emerged as an effective tool for curbing maintenance costs, yet prevailing research predominantly concentrates on the abnormal phases. Within the ostensibly stable healthy phase, the reliance on anomaly detection to preempt equipment malfunctions faces the challenge of sudden anomaly discernment. To address this challenge, this paper proposes a dual-task learning approach for bearing anomaly detection and state evaluation of safe regions. The proposed method transforms the execution of the two tasks into an optimization issue of the hypersphere center. By leveraging the monotonicity and distinguishability pertinent to the tasks as the foundation for optimization, it reconstructs the SVDD model to ensure equilibrium in the model's performance across the two tasks. Subsequent experiments verify the proposed method's effectiveness, which is interpreted from the perspectives of parameter adjustment and enveloping trade-offs. In the meantime, experimental results also show two deficiencies in anomaly detection accuracy and state evaluation metrics. Their theoretical analysis inspires us to focus on feature extraction and data collection to achieve improvements. The proposed method lays the foundation for realizing predictive maintenance in a healthy stage by improving condition awareness in safe regions.
2024, 37: 34.
doi: 10.1186/s10033-024-01017-5
Abstract:
Inconel 718 (IN718) alloy is widely applied to fabricate high temperature resistant or corrosion resistant parts due to its excellent mechanical performance. However, the machining of IN718 alloy is difficult as it may cause serious tool wear and poor surface quality (SQ) of the workpiece. In this work, grinding experiments on IN718 alloy at different speeds were conducted by using a CBN grinding wheel. The relationship between grinding speed, SQ and subsurface damage (SSD) was well studied. With increasing grinding speed, surface roughness decreased, and SQ was greatly improved. Meanwhile, the microhardness of the grinding surface declined as the grinding speed increased. The SSD depth was almost unchanged when the grinding speed was lower than 15 m/s, then it decreased with higher grinding speeds. It was attributed to the mechanical-thermal synergistic effect in the grinding process. The results indicated that increasing grinding speed can effectively improve the SQ and reduce the SSD of IN718 alloy. The conclusion in the work may also provide insight into processing other hard-to-machining materials.
Inconel 718 (IN718) alloy is widely applied to fabricate high temperature resistant or corrosion resistant parts due to its excellent mechanical performance. However, the machining of IN718 alloy is difficult as it may cause serious tool wear and poor surface quality (SQ) of the workpiece. In this work, grinding experiments on IN718 alloy at different speeds were conducted by using a CBN grinding wheel. The relationship between grinding speed, SQ and subsurface damage (SSD) was well studied. With increasing grinding speed, surface roughness decreased, and SQ was greatly improved. Meanwhile, the microhardness of the grinding surface declined as the grinding speed increased. The SSD depth was almost unchanged when the grinding speed was lower than 15 m/s, then it decreased with higher grinding speeds. It was attributed to the mechanical-thermal synergistic effect in the grinding process. The results indicated that increasing grinding speed can effectively improve the SQ and reduce the SSD of IN718 alloy. The conclusion in the work may also provide insight into processing other hard-to-machining materials.
2024, 37: 54.
doi: 10.1186/s10033-024-01020-w
Abstract:
Low damping characteristics have always been a key sticking points in the development of gas bearings. The application of squeeze film dampers can significantly improve the damping performance of gas lubricated bearings. This paper proposed a novel hermetic diaphragm squeeze film damper (HDSFD) for oil-free turbomachinery supported by gas lubricated bearings. Several types of HDSFDs with symmetrical structure were proposed for good damping performance. By considering the compressibility of the damper fluid, based on hydraulic fluid mechanics theory, a dynamic model of HDSFDs under medium is proposed, which successfully reflects the frequency dependence of force coefficients. Based on the dynamic model, the effects of damper fluid viscosity, bulk modulus of damper fluid, thickness of damper fluid film and plunger thickness on the dynamic stiffness and damping of HDSFDs were analyzed. An experimental test rig was assembled and series of experimental studies on HDSFDs were conducted. The damper fluid transverse flow is added to the existing HDSFD concept, which aims to make the dynamic force coefficients independent of frequency. Although the force coefficient is still frequency dependent, the damping coefficient at high frequency excitation with damper fluid supply twice as that without damper fluid supply. The results serve as a benchmark for the calibration of analytical tools under development.
Low damping characteristics have always been a key sticking points in the development of gas bearings. The application of squeeze film dampers can significantly improve the damping performance of gas lubricated bearings. This paper proposed a novel hermetic diaphragm squeeze film damper (HDSFD) for oil-free turbomachinery supported by gas lubricated bearings. Several types of HDSFDs with symmetrical structure were proposed for good damping performance. By considering the compressibility of the damper fluid, based on hydraulic fluid mechanics theory, a dynamic model of HDSFDs under medium is proposed, which successfully reflects the frequency dependence of force coefficients. Based on the dynamic model, the effects of damper fluid viscosity, bulk modulus of damper fluid, thickness of damper fluid film and plunger thickness on the dynamic stiffness and damping of HDSFDs were analyzed. An experimental test rig was assembled and series of experimental studies on HDSFDs were conducted. The damper fluid transverse flow is added to the existing HDSFD concept, which aims to make the dynamic force coefficients independent of frequency. Although the force coefficient is still frequency dependent, the damping coefficient at high frequency excitation with damper fluid supply twice as that without damper fluid supply. The results serve as a benchmark for the calibration of analytical tools under development.
2024, 37: 80.
doi: 10.1186/s10033-024-01062-0
Abstract:
Adding nanoparticles can significantly improve the tribological properties of lubricants. However, there is a lack of understanding regarding the influence of nanoparticle shape on lubrication performance. In this work, the influence of diamond nanoparticles (DNPs) on the tribological properties of lubricants is investigated through friction experiments. Additionally, the friction characteristics of lubricants regarding ellipsoidal particle shape are investigated using molecular dynamics (MD) simulations. The results show that DNPs can drastically lower the lubricant's friction coefficient μ from 0.21 to 0.117. The shearing process reveals that as the aspect ratio (α) of the nanoparticles approaches 1.0, the friction performance improves, and wear on the wall diminishes. At the same time, the shape of the nanoparticles tends to be spherical. When 0.85 ≤ α ≤ 1.0, rolling is ellipsoidal particles' main form of motion, and the friction force changes according to a periodic sinusoidal law. In the range of 0.80 ≤ α < 0.85, ellipsoidal particles primarily exhibit sliding as the dominant movement mode. As α decreases within this range, the friction force progressively increases. The friction coefficient μ calculated through MD simulation is 0.128, which is consistent with the experimental data.
Adding nanoparticles can significantly improve the tribological properties of lubricants. However, there is a lack of understanding regarding the influence of nanoparticle shape on lubrication performance. In this work, the influence of diamond nanoparticles (DNPs) on the tribological properties of lubricants is investigated through friction experiments. Additionally, the friction characteristics of lubricants regarding ellipsoidal particle shape are investigated using molecular dynamics (MD) simulations. The results show that DNPs can drastically lower the lubricant's friction coefficient μ from 0.21 to 0.117. The shearing process reveals that as the aspect ratio (α) of the nanoparticles approaches 1.0, the friction performance improves, and wear on the wall diminishes. At the same time, the shape of the nanoparticles tends to be spherical. When 0.85 ≤ α ≤ 1.0, rolling is ellipsoidal particles' main form of motion, and the friction force changes according to a periodic sinusoidal law. In the range of 0.80 ≤ α < 0.85, ellipsoidal particles primarily exhibit sliding as the dominant movement mode. As α decreases within this range, the friction force progressively increases. The friction coefficient μ calculated through MD simulation is 0.128, which is consistent with the experimental data.
2024, 37: 73.
doi: 10.1186/s10033-024-01058-w
Abstract:
Profile shift is a highly effective technique for optimizing the performance of spur gear transmission systems. However, tooth surface wear is inevitable during gear meshing due to inadequate lubrication and long-term operation. Both profile shift and tooth surface wear (TSW) can impact the meshing characteristics by altering the involute tooth profile. In this study, a tooth stiffness model of spur gears that incorporates profile shift, TSW, tooth deformation, tooth contact deformation, fillet-foundation deformation, and gear body structure coupling is established. This model efficiently and accurately determines the time-varying mesh stiffness (TVMS). Additionally, an improved wear depth prediction method for spur gears is developed, which takes into consideration the mutually prime teeth numbers and more accurately reflects actual gear meshing conditions. Results show that consideration of the mutual prime of teeth numbers will have a certain impact on the TSW process. Furthermore, the finite element method (FEM) is employed to accurately verify the values of TVMS and load sharing ratio (LSR) of profile-shifted gears and worn gears. This study quantitatively analyzes the effect of profile shift on the surface wear process, which suggests that gear profile shift can partially alleviate the negative effects of TSW. The contribution of this study provides valuable insights into the design and maintenance of spur gear systems.
Profile shift is a highly effective technique for optimizing the performance of spur gear transmission systems. However, tooth surface wear is inevitable during gear meshing due to inadequate lubrication and long-term operation. Both profile shift and tooth surface wear (TSW) can impact the meshing characteristics by altering the involute tooth profile. In this study, a tooth stiffness model of spur gears that incorporates profile shift, TSW, tooth deformation, tooth contact deformation, fillet-foundation deformation, and gear body structure coupling is established. This model efficiently and accurately determines the time-varying mesh stiffness (TVMS). Additionally, an improved wear depth prediction method for spur gears is developed, which takes into consideration the mutually prime teeth numbers and more accurately reflects actual gear meshing conditions. Results show that consideration of the mutual prime of teeth numbers will have a certain impact on the TSW process. Furthermore, the finite element method (FEM) is employed to accurately verify the values of TVMS and load sharing ratio (LSR) of profile-shifted gears and worn gears. This study quantitatively analyzes the effect of profile shift on the surface wear process, which suggests that gear profile shift can partially alleviate the negative effects of TSW. The contribution of this study provides valuable insights into the design and maintenance of spur gear systems.
2024, 37: 63.
doi: 10.1186/s10033-024-01044-2
Abstract:
In practice, simultaneous impact localization and time history reconstruction can hardly be achieved, due to the ill-posed and under-determined problems induced by the constrained and harsh measuring conditions. Although\begin{document}$ \ell_{1} $\end{document} \begin{document}$ \ell_{p} $\end{document} \begin{document}$ \ell_{p} $\end{document} \begin{document}$ \ell_{p} $\end{document} \begin{document}$ \ell_{0.6} $\end{document} \begin{document}$ \ell_{1} $\end{document}
In practice, simultaneous impact localization and time history reconstruction can hardly be achieved, due to the ill-posed and under-determined problems induced by the constrained and harsh measuring conditions. Although
2024, 37: 169.
doi: 10.1186/s10033-024-01146-x
Abstract:
The axial collapse mechanical behavior and energy absorption characteristics of circular foam-filled tubes mimicking the bamboo characteristics under quasi-static and low-velocity impact loads were investigated via experiments and numerical simulations in this study. The crushing deformation process, load-displacement responses, the strain field and temperature field distribution characteristics of foam-filled tubes were explored. The energy absorption mechanism and crashworthiness performance of specimens were evaluated and compared with conventional empty tubes. Effects of ambient temperature on axial collapse behavior and crashworthiness indices were also clarified. The results revealed that the superior energy absorption capacity of foam-filled tubes was attributed to the strengthening effect of bionic joints and the filling effect of aluminium foam. The energy absorption (EA), specific energy absorption (SEA), and other crashworthiness indices of foam-filled tubes under axial impact load were greatly improved than that of quasi-static load. Compared to conventional empty tubes, the foam-filled tube had a larger energy-absorbing effectiveness factor under both quasi-static and dynamic loads. The increased temperature weakens the crashworthiness performance and energy absorption ability of the foam-filled tube. The SEA values ranged from 28.2 J/g to 22.1 J/g for the quasi-static load and 31.9 J/g to 26.3 J/g for the dynamic load when the temperature elevated from −50 ℃ to 100 ℃.
The axial collapse mechanical behavior and energy absorption characteristics of circular foam-filled tubes mimicking the bamboo characteristics under quasi-static and low-velocity impact loads were investigated via experiments and numerical simulations in this study. The crushing deformation process, load-displacement responses, the strain field and temperature field distribution characteristics of foam-filled tubes were explored. The energy absorption mechanism and crashworthiness performance of specimens were evaluated and compared with conventional empty tubes. Effects of ambient temperature on axial collapse behavior and crashworthiness indices were also clarified. The results revealed that the superior energy absorption capacity of foam-filled tubes was attributed to the strengthening effect of bionic joints and the filling effect of aluminium foam. The energy absorption (EA), specific energy absorption (SEA), and other crashworthiness indices of foam-filled tubes under axial impact load were greatly improved than that of quasi-static load. Compared to conventional empty tubes, the foam-filled tube had a larger energy-absorbing effectiveness factor under both quasi-static and dynamic loads. The increased temperature weakens the crashworthiness performance and energy absorption ability of the foam-filled tube. The SEA values ranged from 28.2 J/g to 22.1 J/g for the quasi-static load and 31.9 J/g to 26.3 J/g for the dynamic load when the temperature elevated from −50 ℃ to 100 ℃.
2024, 37: 145.
doi: 10.1186/s10033-024-01127-0
Abstract:
Water dissolution ultraprecision continuous polishing is a nontraditional machining method specifically designed for water-soluble crystals. The aim of this study is primarily to reduce the surface roughness for small sizes from an experimental standpoint. A trajectory uniformity simulation analysis is carried out for a consistent material removal. A material removal model is developed based on the water dissolution principle and kinematic analysis. Numerical simulations of single- and multiple-water-core polishing trajectories are performed to explore the influences of the processing parameters such as movement form, number of water cores, speed ratio, polishing time, and period ratio on the material removal uniformity. The material removal rate is calculated according to the Preston equation. The trajectory density nonuniformity is utilized to evaluate the global uniformity of the trajectory distributions and optimize the processing parameters for a better material removal uniformity. Verification experiments are conducted on a large-size ultraprecision continuous polisher using a typical potassium dihydrogen phosphate (KDP) crystal with a water-soluble structure. The edge collapse is improved from 51.499 μm to 1.477 μm by trajectory uniformity optimization. The changing trends of line profile variations in the validation experiment and simulation are similar. An ultrasmooth surface of a 180 mm × 180 mm KDP crystal with a surface roughness root mean square of 1.718 nm is obtained after water dissolution ultraprecision continuous polishing. This study provides a comprehensive method for evaluation of material removal uniformity, which is valuable for the realization of high-quality machining for water-soluble crystals.
Water dissolution ultraprecision continuous polishing is a nontraditional machining method specifically designed for water-soluble crystals. The aim of this study is primarily to reduce the surface roughness for small sizes from an experimental standpoint. A trajectory uniformity simulation analysis is carried out for a consistent material removal. A material removal model is developed based on the water dissolution principle and kinematic analysis. Numerical simulations of single- and multiple-water-core polishing trajectories are performed to explore the influences of the processing parameters such as movement form, number of water cores, speed ratio, polishing time, and period ratio on the material removal uniformity. The material removal rate is calculated according to the Preston equation. The trajectory density nonuniformity is utilized to evaluate the global uniformity of the trajectory distributions and optimize the processing parameters for a better material removal uniformity. Verification experiments are conducted on a large-size ultraprecision continuous polisher using a typical potassium dihydrogen phosphate (KDP) crystal with a water-soluble structure. The edge collapse is improved from 51.499 μm to 1.477 μm by trajectory uniformity optimization. The changing trends of line profile variations in the validation experiment and simulation are similar. An ultrasmooth surface of a 180 mm × 180 mm KDP crystal with a surface roughness root mean square of 1.718 nm is obtained after water dissolution ultraprecision continuous polishing. This study provides a comprehensive method for evaluation of material removal uniformity, which is valuable for the realization of high-quality machining for water-soluble crystals.
2024, 37: 168.
doi: 10.1186/s10033-024-01125-2
Abstract:
This study proposes an accurate dead zone compensation control method for electro-hydrostatic actuators (EHAs) under low-speed conditions. Specifically, the nonlinear dead zone characteristics under low-speed conditions are summarized based on numerous EHA experiments. An adaptive compensation function (ACF) is then constructed for the dead zone. Next, this study proposes an adaptive dead zone compensation control method for EHAs by integrating the ACF with a virtual decomposition controller (VDC) based on the established EHA model. The stability of the proposed control method is also proven. Finally, the proposed control method is verified using an EHA platform. The test results show that the dead zone trajectory tracking errors of EHAs are significantly reduced when combined with the ACF. Furthermore, since most EHAs are controlled by adjusting the motor speed, the method presented in this study is simpler and easier to use than methods that employ flow compensation.
This study proposes an accurate dead zone compensation control method for electro-hydrostatic actuators (EHAs) under low-speed conditions. Specifically, the nonlinear dead zone characteristics under low-speed conditions are summarized based on numerous EHA experiments. An adaptive compensation function (ACF) is then constructed for the dead zone. Next, this study proposes an adaptive dead zone compensation control method for EHAs by integrating the ACF with a virtual decomposition controller (VDC) based on the established EHA model. The stability of the proposed control method is also proven. Finally, the proposed control method is verified using an EHA platform. The test results show that the dead zone trajectory tracking errors of EHAs are significantly reduced when combined with the ACF. Furthermore, since most EHAs are controlled by adjusting the motor speed, the method presented in this study is simpler and easier to use than methods that employ flow compensation.
2024, 37: 140.
doi: 10.1186/s10033-024-01134-1
Abstract:
Ultrasonic drilling has emerged as a prominent technique in extraterrestrial environments due to its advantageous features. However, its application in extraterrestrial sampling missions is constrained by challenges such as drilling, chip removal efficiency, and high and low temperature adaptability. Addressing these limitations, this study introduces a novel multi-point driven rotary helical longitudinal torsion horn. The initial phase involved a detailed analysis of the actuator's structure and operational principle. Subsequently, the actuator's vibration mode and elliptical motion trajectory were validated through finite element simulation. The study further explores a methodology for adjusting the parameters of the helical groove and the displacement amplitude of the impact head. Following the theoretical analysis, prototypes of the actuator and drill were fabricated. Their adaptability to high and low temperatures, as well as their output characteristics, were rigorously tested. Experimental results demonstrate that with an increase in temperature, the dynamic impedance of the actuator initially rises before decreasing, while the mechanical quality factor exhibits the opposite trend. Notably, the concurrent activation of points P1 and P2 significantly enhances the no-load speed, achieving a maximum of 506 revolutions per minute (r/min). Under conditions of power below 35 W and a drilling pressure of 10 N, the drilling speed achieved in basalt is 6.2 millimeters per minute (mm/min). The proposed multipoint-driven actuator can effectively improve the drilling and chip removal efficiency of the driller, which is an important application prospect in future extraterrestrial drilling missions.
Ultrasonic drilling has emerged as a prominent technique in extraterrestrial environments due to its advantageous features. However, its application in extraterrestrial sampling missions is constrained by challenges such as drilling, chip removal efficiency, and high and low temperature adaptability. Addressing these limitations, this study introduces a novel multi-point driven rotary helical longitudinal torsion horn. The initial phase involved a detailed analysis of the actuator's structure and operational principle. Subsequently, the actuator's vibration mode and elliptical motion trajectory were validated through finite element simulation. The study further explores a methodology for adjusting the parameters of the helical groove and the displacement amplitude of the impact head. Following the theoretical analysis, prototypes of the actuator and drill were fabricated. Their adaptability to high and low temperatures, as well as their output characteristics, were rigorously tested. Experimental results demonstrate that with an increase in temperature, the dynamic impedance of the actuator initially rises before decreasing, while the mechanical quality factor exhibits the opposite trend. Notably, the concurrent activation of points P1 and P2 significantly enhances the no-load speed, achieving a maximum of 506 revolutions per minute (r/min). Under conditions of power below 35 W and a drilling pressure of 10 N, the drilling speed achieved in basalt is 6.2 millimeters per minute (mm/min). The proposed multipoint-driven actuator can effectively improve the drilling and chip removal efficiency of the driller, which is an important application prospect in future extraterrestrial drilling missions.
2024, 37: 132.
doi: 10.1186/s10033-024-01138-x
Abstract:
Aiming at problems such as slow cutting speed, poor cutting quality and inability to cut thick plates effectively with traditional single-layer nozzle structure, it is proposed to add an outer ring core to form a double-layer nozzle structure on the basis of the single-layer nozzle structure to improve its cutting performance. The three-dimensional entity of single- and double-layer nozzle is established, and the simulation model of auxiliary gas flow field is established by using N-S equation and SST k-ω turbulence model assisted by laser cutting in this paper. The simulation results show that under the same cutting parameters, the auxiliary gas flow rate, oxygen concentration, mass flow rate, shear force and dynamic pressure of the double-layer nozzle structure are higher than those of the single-layer nozzle structure. In addition, compared with the single-layer nozzle structure, the double-layer nozzle structure can effectively improve the attenuation of oxygen concentration in the direction of sheet thickness. Two nozzle structures were used to laser cutting carbon steel plates with a thickness of 20 mm in the experiment, and the experimental parameters of cutting speed were 1.2–1.6 m/min. The comparison results show that the cutting speed and cutting section quality of the double-layer nozzle are better than those of the single-layer nozzle, and the results of simulation analysis are consistent with the cutting test results.
Aiming at problems such as slow cutting speed, poor cutting quality and inability to cut thick plates effectively with traditional single-layer nozzle structure, it is proposed to add an outer ring core to form a double-layer nozzle structure on the basis of the single-layer nozzle structure to improve its cutting performance. The three-dimensional entity of single- and double-layer nozzle is established, and the simulation model of auxiliary gas flow field is established by using N-S equation and SST k-ω turbulence model assisted by laser cutting in this paper. The simulation results show that under the same cutting parameters, the auxiliary gas flow rate, oxygen concentration, mass flow rate, shear force and dynamic pressure of the double-layer nozzle structure are higher than those of the single-layer nozzle structure. In addition, compared with the single-layer nozzle structure, the double-layer nozzle structure can effectively improve the attenuation of oxygen concentration in the direction of sheet thickness. Two nozzle structures were used to laser cutting carbon steel plates with a thickness of 20 mm in the experiment, and the experimental parameters of cutting speed were 1.2–1.6 m/min. The comparison results show that the cutting speed and cutting section quality of the double-layer nozzle are better than those of the single-layer nozzle, and the results of simulation analysis are consistent with the cutting test results.
2024, 37: 72.
doi: 10.1186/s10033-024-01054-0
Abstract:
In order to predict the damage behaviours of 3D-printed continuous carbon fibre (CCF) reinforced composites, when additional short carbon fibre (SCF) composite components are employed for continuous printing or special functionality, a novel path-dependent progressive failure (PDPF) numerical approach is developed. First, a progressive failure model using Hashin failure criteria with continuum damage mechanics to account for the damage initiation and evaluation of 3D-printed CCF reinforced polyamide (PA) composites is developed, based on actual fibre placement trajectories with physical measurements of 3D-printed CCF/PA constituents. Meanwhile, an elastic-plastic model is employed to predict the plastic damage behaviours of SCF/PA parts. Then, the accuracy of the PDPF model was validated so as to study 3D-printed CCF/PA composites with either negative Poisson's ratio or high stiffness. The results demonstrate that the proposed PDPF model can achieve higher prediction accuracies in mechanical properties of these 3D-printed CCF/PA composites. Mechanism analyses show that the stress distribution is generally aggregated in the CCF areas along the fibre placement paths, and the shear damage and matrix tensile/compressive damage are the key damage modes. This study provides a new approach with valuable information for characterising complex 3D-printed continuous fibre-matrix composites with variable mechanical properties and multiple constituents.
In order to predict the damage behaviours of 3D-printed continuous carbon fibre (CCF) reinforced composites, when additional short carbon fibre (SCF) composite components are employed for continuous printing or special functionality, a novel path-dependent progressive failure (PDPF) numerical approach is developed. First, a progressive failure model using Hashin failure criteria with continuum damage mechanics to account for the damage initiation and evaluation of 3D-printed CCF reinforced polyamide (PA) composites is developed, based on actual fibre placement trajectories with physical measurements of 3D-printed CCF/PA constituents. Meanwhile, an elastic-plastic model is employed to predict the plastic damage behaviours of SCF/PA parts. Then, the accuracy of the PDPF model was validated so as to study 3D-printed CCF/PA composites with either negative Poisson's ratio or high stiffness. The results demonstrate that the proposed PDPF model can achieve higher prediction accuracies in mechanical properties of these 3D-printed CCF/PA composites. Mechanism analyses show that the stress distribution is generally aggregated in the CCF areas along the fibre placement paths, and the shear damage and matrix tensile/compressive damage are the key damage modes. This study provides a new approach with valuable information for characterising complex 3D-printed continuous fibre-matrix composites with variable mechanical properties and multiple constituents.
2024, 37: 150.
doi: 10.1186/s10033-024-01137-y
Abstract:
Optimizing the geometric configuration of the tool cutting surface, reducing the resistance in the cutting process and energy consumption, are always a concern. Through the method of bionic design, the directrix function of the longitudinal section of the beaver tooth rake face is extracted, and its variable curvature characteristics are analyzed. Based on this, a turning tool with variable curvature directrix configuration rake face is designed. The cutting force experiment and machining surface quality analysis experiment were carried out with the designed tool and the linear directrix configuration rake face tool respectively. The measured data of the variable curvature directrix configuration rake face tool is better than the linear directrix configuration rake face tool and its drag reduction performance of the tool is verified by experiments. Through the analysis of the working rake angle and shear angle of the tool with variable curvature directrix configuration rake face, the relationship between the parameters of the variable curvature directrix function and the working rake angle, and shear angle has been obtained. By the method of finite element simulation analysis, the stress field in the cutting zone of two different configuration tools has been analyzed. It has been found that the tool with variable curvature directrix rake face has a 'bending moment' effect on the tool-chip interface due to its curved surface configuration, and a 'prying' effect at the tool tip. These two effects promote the separation of chips from the workpiece and make the cutting process more force-saving. The research of this paper will have reference significance for the design and application of the curved surface configuration rake face tool.
Optimizing the geometric configuration of the tool cutting surface, reducing the resistance in the cutting process and energy consumption, are always a concern. Through the method of bionic design, the directrix function of the longitudinal section of the beaver tooth rake face is extracted, and its variable curvature characteristics are analyzed. Based on this, a turning tool with variable curvature directrix configuration rake face is designed. The cutting force experiment and machining surface quality analysis experiment were carried out with the designed tool and the linear directrix configuration rake face tool respectively. The measured data of the variable curvature directrix configuration rake face tool is better than the linear directrix configuration rake face tool and its drag reduction performance of the tool is verified by experiments. Through the analysis of the working rake angle and shear angle of the tool with variable curvature directrix configuration rake face, the relationship between the parameters of the variable curvature directrix function and the working rake angle, and shear angle has been obtained. By the method of finite element simulation analysis, the stress field in the cutting zone of two different configuration tools has been analyzed. It has been found that the tool with variable curvature directrix rake face has a 'bending moment' effect on the tool-chip interface due to its curved surface configuration, and a 'prying' effect at the tool tip. These two effects promote the separation of chips from the workpiece and make the cutting process more force-saving. The research of this paper will have reference significance for the design and application of the curved surface configuration rake face tool.
2024, 37: 136.
doi: 10.1186/s10033-024-01139-w
Abstract:
In recent years, additive manufacturing (AM) has gained popularity in the aerospace, automobile, and medical industries due to its ability to produce complex profiles with minimal tolerances. Micro-milling is recommended for machining AM-based parts to improve surface quality and form accuracy. Therefore, the machinability of a titanium alloy (Ti6Al4V) manufactured using selective laser melting (SLM) is explored and compared to that of wrought Ti6Al4V in micro-milling. The experimental results reveal the surface topology, chip morphology, burr formation, and tool wear characteristics of both samples. The micro-milling of AM-based Ti6Al4V generates a surface roughness of 19.2 nm, which is 13.9% lower than that of wrought workpieces, and this component exhibits less tool wear. SLM-based Ti6Al4V produces continuous chips, while wrought Ti6Al4V yields relatively short chips. Additionally, SLM-fabricated Ti6Al4V exhibits smaller burrs after micro-milling than wrought Ti6Al4V. Despite the higher hardness of SLM-based Ti6Al4V, it demonstrates better machinability than wrought Ti6Al4V, resulting in better surface quality with lower tool wear levels and shorter burr heights. This study provides valuable insights into future research on postprocessing AM-based titanium parts, especially using micro-milling.
In recent years, additive manufacturing (AM) has gained popularity in the aerospace, automobile, and medical industries due to its ability to produce complex profiles with minimal tolerances. Micro-milling is recommended for machining AM-based parts to improve surface quality and form accuracy. Therefore, the machinability of a titanium alloy (Ti6Al4V) manufactured using selective laser melting (SLM) is explored and compared to that of wrought Ti6Al4V in micro-milling. The experimental results reveal the surface topology, chip morphology, burr formation, and tool wear characteristics of both samples. The micro-milling of AM-based Ti6Al4V generates a surface roughness of 19.2 nm, which is 13.9% lower than that of wrought workpieces, and this component exhibits less tool wear. SLM-based Ti6Al4V produces continuous chips, while wrought Ti6Al4V yields relatively short chips. Additionally, SLM-fabricated Ti6Al4V exhibits smaller burrs after micro-milling than wrought Ti6Al4V. Despite the higher hardness of SLM-based Ti6Al4V, it demonstrates better machinability than wrought Ti6Al4V, resulting in better surface quality with lower tool wear levels and shorter burr heights. This study provides valuable insights into future research on postprocessing AM-based titanium parts, especially using micro-milling.
2024, 37: 48.
doi: 10.1186/s10033-024-01023-7
Abstract:
Proton exchange membrane fuel cell (PEMFC) is of paramount significance to the development of clean energy. The components of PEMFC are assembled using many pairs of nuts and bolts. The assembly champing bolt torque is critical to the electrochemical performance and mechanical stability of PEMFC. In this paper, a PEMFC with the three-channel serpentine flow field was used and studied. The different assembly clamping bolt torques were applied to the PEMFC in three uniform assembly bolt torque and six non-uniform assembly bolt torque conditions, respectively. And then, the electrochemical performance experiments were performed to study the effect of the assembly bolt torque on the electrochemical performance. The test results show that the assembly bolt torque significantly affected the electrochemical performance of the PEMFC. In uniform assembly bolt torque conditions, the maximal power density increased initially as the assembly bolt torque increased, and then decreased on further increasing the assembly torque. It existed the optimum assembly torque which was found to be 3.0 N·m in this work. In non-uniform assembly clamping bolt torque conditions, the optimum electrochemical performance appeared in the condition where the assembly torque of each bolt was closer to be 3.0 N·m. This could be due to the change of the contact resistance between the gas diffusion layer and bipolar plate and mass transport resistance for the hydrogen and oxygen towards the catalyst layers. This work could optimize the assembly force conditions and provide useful information for the practical PEMFC stack assembly.
Proton exchange membrane fuel cell (PEMFC) is of paramount significance to the development of clean energy. The components of PEMFC are assembled using many pairs of nuts and bolts. The assembly champing bolt torque is critical to the electrochemical performance and mechanical stability of PEMFC. In this paper, a PEMFC with the three-channel serpentine flow field was used and studied. The different assembly clamping bolt torques were applied to the PEMFC in three uniform assembly bolt torque and six non-uniform assembly bolt torque conditions, respectively. And then, the electrochemical performance experiments were performed to study the effect of the assembly bolt torque on the electrochemical performance. The test results show that the assembly bolt torque significantly affected the electrochemical performance of the PEMFC. In uniform assembly bolt torque conditions, the maximal power density increased initially as the assembly bolt torque increased, and then decreased on further increasing the assembly torque. It existed the optimum assembly torque which was found to be 3.0 N·m in this work. In non-uniform assembly clamping bolt torque conditions, the optimum electrochemical performance appeared in the condition where the assembly torque of each bolt was closer to be 3.0 N·m. This could be due to the change of the contact resistance between the gas diffusion layer and bipolar plate and mass transport resistance for the hydrogen and oxygen towards the catalyst layers. This work could optimize the assembly force conditions and provide useful information for the practical PEMFC stack assembly.
2024, 37: 33.
doi: 10.1186/s10033-024-01012-w
Abstract:
The Chinese express delivery industry processes nearly 110 billion items in 2022, averaging an annual growth rate of 200%. Among the various types of sorting systems used for handling express items, cross-belt sorting systems stand out as the most crucial. However, despite their high degree of automation, the workload for operators has intensified owing to the surging volume of express items. In the era of Industry 5.0, it is imperative to adopt new technologies that not only enhance worker welfare but also improve the efficiency of cross-belt systems. Striking a balance between efficiency in handling express items and operator well-being is challenging. Digital twin technology offers a promising solution in this respect. A realization method of a human–machine integrated digital twin is proposed in this study, enabling the interaction of biological human bodies, virtual human bodies, virtual equipment, and logistics equipment in a closed loop, thus setting an operating framework. Key technologies in the proposed framework include a collection of heterogeneous data from multiple sources, construction of the relationship between operator fatigue and operation efficiency based on physiological measurements, virtual model construction, and an online optimization module based on real-time simulation. The feasibility of the proposed method was verified in an express distribution center.
The Chinese express delivery industry processes nearly 110 billion items in 2022, averaging an annual growth rate of 200%. Among the various types of sorting systems used for handling express items, cross-belt sorting systems stand out as the most crucial. However, despite their high degree of automation, the workload for operators has intensified owing to the surging volume of express items. In the era of Industry 5.0, it is imperative to adopt new technologies that not only enhance worker welfare but also improve the efficiency of cross-belt systems. Striking a balance between efficiency in handling express items and operator well-being is challenging. Digital twin technology offers a promising solution in this respect. A realization method of a human–machine integrated digital twin is proposed in this study, enabling the interaction of biological human bodies, virtual human bodies, virtual equipment, and logistics equipment in a closed loop, thus setting an operating framework. Key technologies in the proposed framework include a collection of heterogeneous data from multiple sources, construction of the relationship between operator fatigue and operation efficiency based on physiological measurements, virtual model construction, and an online optimization module based on real-time simulation. The feasibility of the proposed method was verified in an express distribution center.
2024, 37: 129.
doi: 10.1186/s10033-024-01126-1
Abstract:
Currently, conventional single-sided friction stir welding is primarily suitable for joining thin plate aluminum alloys, and its application to thick plates is still challenging in terms of welding efficiency and joint mechanical properties. Simultaneous double-sided friction stir welding (SDS-FSW) is a high-efficiency joining technique specifically developed for welding thick plates. However, there is little research on the influence of SDS-FSW process parameters on the joint mechanical properties. In this study, a 12 mm thick AA6061-T6 aluminum alloy and dual robot welding equipment are used to conduct SDS-FSW experiments exploring the influence of rotational speed\begin{document}$ \omega $\end{document} \begin{document}$ \omega $\end{document} \begin{document}$ \omega $\end{document}
Currently, conventional single-sided friction stir welding is primarily suitable for joining thin plate aluminum alloys, and its application to thick plates is still challenging in terms of welding efficiency and joint mechanical properties. Simultaneous double-sided friction stir welding (SDS-FSW) is a high-efficiency joining technique specifically developed for welding thick plates. However, there is little research on the influence of SDS-FSW process parameters on the joint mechanical properties. In this study, a 12 mm thick AA6061-T6 aluminum alloy and dual robot welding equipment are used to conduct SDS-FSW experiments exploring the influence of rotational speed
2024, 37: 56.
doi: 10.1186/s10033-024-01029-1
Abstract:
Effective fault diagnosis and fault-tolerant control method for aeronautics electromechanical actuator is concerned in this paper. By borrowing the advantages of model-driven and data-driven methods, a fault tolerant nonsingular terminal sliding mode control method based on support vector machine (SVM) is proposed. A SVM is designed to estimate the fault by off-line learning from small sample data with solving convex quadratic programming method and is introduced into a high-gain observer, so as to improve the state estimation and fault detection accuracy when the fault occurs. The state estimation value of the observer is used for state reconfiguration. A novel nonsingular terminal sliding mode surface is designed, and Lyapunov theorem is used to derive a parameter adaptation law and a control law. It is guaranteed that the proposed controller can achieve asymptotical stability which is superior to many advanced fault-tolerant controllers. In addition, the parameter estimation also can help to diagnose the system faults because the faults can be reflected by the parameters variation. Extensive comparative simulation and experimental results illustrate the effectiveness and advancement of the proposed controller compared with several other main-stream controllers.
Effective fault diagnosis and fault-tolerant control method for aeronautics electromechanical actuator is concerned in this paper. By borrowing the advantages of model-driven and data-driven methods, a fault tolerant nonsingular terminal sliding mode control method based on support vector machine (SVM) is proposed. A SVM is designed to estimate the fault by off-line learning from small sample data with solving convex quadratic programming method and is introduced into a high-gain observer, so as to improve the state estimation and fault detection accuracy when the fault occurs. The state estimation value of the observer is used for state reconfiguration. A novel nonsingular terminal sliding mode surface is designed, and Lyapunov theorem is used to derive a parameter adaptation law and a control law. It is guaranteed that the proposed controller can achieve asymptotical stability which is superior to many advanced fault-tolerant controllers. In addition, the parameter estimation also can help to diagnose the system faults because the faults can be reflected by the parameters variation. Extensive comparative simulation and experimental results illustrate the effectiveness and advancement of the proposed controller compared with several other main-stream controllers.
2024, 37: 64.
doi: 10.1186/s10033-024-01046-0
Abstract:
Intelligent fault diagnosis is an important method in rotating machinery fault diagnosis and equipment health management. To deal with co-frequency vibration faults, a type of typical fault in rotating machinery, this paper proposes a fault diagnosis method based on the stacked autoencoder (SAE) and ensembled ResNet-SVM. Furthermore, the time- and frequency-domain features of several co-frequency vibration faults are summarized based on the mechanism analysis and calculated using actual vibration data. To realize and validate the high-precision diagnosis method of rotating equipment with co-frequency faults proposed in this study, the following three criteria are required: First, to improve the effectiveness and robustness of the ensembled model and the sliding window using data augmentation, adding noise, autoencoder (AE) and SAE methods are analyzed in terms of principle and practical effects. Second, ResNet is used as the feature extractor for the ensembled ResNet-SVM model. Feature extraction is carried out twice, and the extracted co-frequency fault features are more comprehensive. Finally, the data augmentation method and ensemble ResNet-SVM are combined for fault diagnosis and compared with other methods. The experimental results show that the accuracy of the proposed method can exceed 99.9%.
Intelligent fault diagnosis is an important method in rotating machinery fault diagnosis and equipment health management. To deal with co-frequency vibration faults, a type of typical fault in rotating machinery, this paper proposes a fault diagnosis method based on the stacked autoencoder (SAE) and ensembled ResNet-SVM. Furthermore, the time- and frequency-domain features of several co-frequency vibration faults are summarized based on the mechanism analysis and calculated using actual vibration data. To realize and validate the high-precision diagnosis method of rotating equipment with co-frequency faults proposed in this study, the following three criteria are required: First, to improve the effectiveness and robustness of the ensembled model and the sliding window using data augmentation, adding noise, autoencoder (AE) and SAE methods are analyzed in terms of principle and practical effects. Second, ResNet is used as the feature extractor for the ensembled ResNet-SVM model. Feature extraction is carried out twice, and the extracted co-frequency fault features are more comprehensive. Finally, the data augmentation method and ensemble ResNet-SVM are combined for fault diagnosis and compared with other methods. The experimental results show that the accuracy of the proposed method can exceed 99.9%.
2024, 37: 38.
doi: 10.1186/s10033-024-01022-8
Abstract:
The accurate estimation of parameters is the premise for establishing a high-fidelity simulation model of a valve-controlled cylinder system. Bench test data are easily obtained, but it is challenging to emulate actual loads in the research on parameter estimation of valve-controlled cylinder system. Despite the actual load information contained in the operating data of the control valve, its acquisition remains challenging. This paper proposes a method that fuses bench test and operating data for parameter estimation to address the aforementioned problems. The proposed method is based on Bayesian theory, and its core is a pool fusion of prior information from bench test and operating data. Firstly, a system model is established, and the parameters in the model are analysed. Secondly, the bench and operating data of the system are collected. Then, the model parameters and weight coefficients are estimated using the data fusion method. Finally, the estimated effects of the data fusion method, Bayesian method, and particle swarm optimisation (PSO) algorithm on system model parameters are compared. The research shows that the weight coefficient represents the contribution of different prior information to the parameter estimation result. The effect of parameter estimation based on the data fusion method is better than that of the Bayesian method and the PSO algorithm. Increasing load complexity leads to a decrease in model accuracy, highlighting the crucial role of the data fusion method in parameter estimation studies.
The accurate estimation of parameters is the premise for establishing a high-fidelity simulation model of a valve-controlled cylinder system. Bench test data are easily obtained, but it is challenging to emulate actual loads in the research on parameter estimation of valve-controlled cylinder system. Despite the actual load information contained in the operating data of the control valve, its acquisition remains challenging. This paper proposes a method that fuses bench test and operating data for parameter estimation to address the aforementioned problems. The proposed method is based on Bayesian theory, and its core is a pool fusion of prior information from bench test and operating data. Firstly, a system model is established, and the parameters in the model are analysed. Secondly, the bench and operating data of the system are collected. Then, the model parameters and weight coefficients are estimated using the data fusion method. Finally, the estimated effects of the data fusion method, Bayesian method, and particle swarm optimisation (PSO) algorithm on system model parameters are compared. The research shows that the weight coefficient represents the contribution of different prior information to the parameter estimation result. The effect of parameter estimation based on the data fusion method is better than that of the Bayesian method and the PSO algorithm. Increasing load complexity leads to a decrease in model accuracy, highlighting the crucial role of the data fusion method in parameter estimation studies.
2024, 37: 79.
doi: 10.1186/s10033-024-01065-x
Abstract:
Mesh reflector antennas are widely used in space tasks owing to their light weight, high surface accuracy, and large folding ratio. They are stowed during launch and then fully deployed in orbit to form a mesh reflector that transmits signals. Smooth deployment is essential for duty services; therefore, accurate and efficient dynamic modeling and analysis of the deployment process are essential. One major challenge is depicting time-varying resistance of the cable network and capturing the cable-truss coupling behavior during the deployment process. This paper proposes a general dynamic analysis methodology for cable-truss coupling. Considering the topological diversity and geometric nonlinearity, the cable network's equilibrium equation is derived, and an explicit expression of the time-varying tension of the boundary cables, which provides the main resistance in truss deployment, is obtained. The deployment dynamic model is established, which considers the coupling effect between the soft cables and deployable truss. The effects of the antenna's driving modes and parameters on the dynamic deployment performance were investigated. A scaled prototype was manufactured, and the deployment experiment was conducted to verify the accuracy of the proposed modeling method. The proposed methodology is suitable for general cable antennas with arbitrary topologies and parameters, providing theoretical guidance for the dynamic performance evaluation of antenna driving schemes.
Mesh reflector antennas are widely used in space tasks owing to their light weight, high surface accuracy, and large folding ratio. They are stowed during launch and then fully deployed in orbit to form a mesh reflector that transmits signals. Smooth deployment is essential for duty services; therefore, accurate and efficient dynamic modeling and analysis of the deployment process are essential. One major challenge is depicting time-varying resistance of the cable network and capturing the cable-truss coupling behavior during the deployment process. This paper proposes a general dynamic analysis methodology for cable-truss coupling. Considering the topological diversity and geometric nonlinearity, the cable network's equilibrium equation is derived, and an explicit expression of the time-varying tension of the boundary cables, which provides the main resistance in truss deployment, is obtained. The deployment dynamic model is established, which considers the coupling effect between the soft cables and deployable truss. The effects of the antenna's driving modes and parameters on the dynamic deployment performance were investigated. A scaled prototype was manufactured, and the deployment experiment was conducted to verify the accuracy of the proposed modeling method. The proposed methodology is suitable for general cable antennas with arbitrary topologies and parameters, providing theoretical guidance for the dynamic performance evaluation of antenna driving schemes.
2024, 37: 88.
doi: 10.1186/s10033-024-01072-y
Abstract:
The high-speed on/off valve (HSV) serves as the fundamental component responsible for generating discrete fluids within digital hydraulic systems. As the switching frequency of the HSV increases, the properties of the generated discrete fluid approach those of continuous fluids. Therefore, a higher frequency response characteristic of HSV is the key to ensure the control accuracy of digital hydraulic systems. However, the current research mainly focuses on its dynamic performance, but neglect its FRC. This paper presents a theoretical analysis demonstrating that the FRC of the HSV can be enhanced by minimizing its switching time. The maximum switching frequency (MSF) is mainly determined by opening dynamic performance when HSV operates with low switching duty ratio (SDR), whereas the closing dynamic performance limits the MSF when HSV operates with high SDR. Building upon these findings, the pre-excitation control algorithm (PECA) is proposed to reduce the switching time of the HSV, and consequently enhance its FRC. Experimental results demonstrate that PECA shortens the opening delay time of HSV by 1.12 ms, the closing delay time by 2.54 ms, and the closing moving time by 0.47 ms in comparison to the existing advanced control algorithms. As a result, a larger MSF of 417 Hz and a wider controllable SDR range from 20% to 70% were achieved at a switching frequency of 250 Hz. Thus, the proposed PFCA in this paper has been verified as an effective and promising approach for enhancing the control performance of digital hydraulic systems.
The high-speed on/off valve (HSV) serves as the fundamental component responsible for generating discrete fluids within digital hydraulic systems. As the switching frequency of the HSV increases, the properties of the generated discrete fluid approach those of continuous fluids. Therefore, a higher frequency response characteristic of HSV is the key to ensure the control accuracy of digital hydraulic systems. However, the current research mainly focuses on its dynamic performance, but neglect its FRC. This paper presents a theoretical analysis demonstrating that the FRC of the HSV can be enhanced by minimizing its switching time. The maximum switching frequency (MSF) is mainly determined by opening dynamic performance when HSV operates with low switching duty ratio (SDR), whereas the closing dynamic performance limits the MSF when HSV operates with high SDR. Building upon these findings, the pre-excitation control algorithm (PECA) is proposed to reduce the switching time of the HSV, and consequently enhance its FRC. Experimental results demonstrate that PECA shortens the opening delay time of HSV by 1.12 ms, the closing delay time by 2.54 ms, and the closing moving time by 0.47 ms in comparison to the existing advanced control algorithms. As a result, a larger MSF of 417 Hz and a wider controllable SDR range from 20% to 70% were achieved at a switching frequency of 250 Hz. Thus, the proposed PFCA in this paper has been verified as an effective and promising approach for enhancing the control performance of digital hydraulic systems.
2024, 37: 159.
doi: 10.1186/s10033-024-01152-z
Abstract:
Tool wear is a critical challenge in titanium alloy friction stir welding (FSW). Vortex flow-based FSW (VFSW) is a potential solution for this issue because the VFSW process uses a similar material to the base metal as the tool. In this study, TC4 titanium alloy was welded by VFSW for the first time. Parameter optimization of the vortex flow formation is first done, and then the weld formation and the joints' microstructure and mechanical performance are investigated at different traversing speeds. The results prove that the plunging velocity is the dominant factor in the vortex depth. A lower plunging speed is beneficial for the formation of a deeper vortex. Full penetration is achieved at traversing speeds of 50–120 mm/min at 300 r/min. At welding speed above 130 mm/min, insufficient penetration defects occur. In the heat affected zone, grain coarsening and β-phase volume fraction increase arise, whereas, in the weld nugget, an α+β lamellar structure emerges. Under the optimized parameters, the joint tensile strength is nearly 98% of the base material, but the elongation decreases significantly. The oxides drawn into the weld by the vortex at the junction between the vortex and the base material are the main reason for the small elongation. This study proves that the VFSW process is feasible for titanium alloys.
Tool wear is a critical challenge in titanium alloy friction stir welding (FSW). Vortex flow-based FSW (VFSW) is a potential solution for this issue because the VFSW process uses a similar material to the base metal as the tool. In this study, TC4 titanium alloy was welded by VFSW for the first time. Parameter optimization of the vortex flow formation is first done, and then the weld formation and the joints' microstructure and mechanical performance are investigated at different traversing speeds. The results prove that the plunging velocity is the dominant factor in the vortex depth. A lower plunging speed is beneficial for the formation of a deeper vortex. Full penetration is achieved at traversing speeds of 50–120 mm/min at 300 r/min. At welding speed above 130 mm/min, insufficient penetration defects occur. In the heat affected zone, grain coarsening and β-phase volume fraction increase arise, whereas, in the weld nugget, an α+β lamellar structure emerges. Under the optimized parameters, the joint tensile strength is nearly 98% of the base material, but the elongation decreases significantly. The oxides drawn into the weld by the vortex at the junction between the vortex and the base material are the main reason for the small elongation. This study proves that the VFSW process is feasible for titanium alloys.
2024, 37: 96.
doi: 10.1186/s10033-024-01074-w
Abstract:
With the development of fluid-power transmission and control technology, electro-hydraulic-driven technology can significantly improve the load-carrying capacity, stiffness, and control accuracy of stabilization platforms. However, compared with mechanically driven platforms, the stiffness and damping of the fluid, as well as the coupling effect between the fluid and the structure need to be considered for electro-hydraulic-driven parallel stabilization platforms, making the modal and dynamic response characteristics of the mechanism more complex. With the aim of solving the aforementioned issues, we research the electro-hydraulic driven 3-UPS/S parallel stabilization platform considering the hinge stiffness. Moreover, the characteristic vibration equation of the mechanism is established using the virtual work principle. Subsequently, the variation characteristics of the natural frequency and the vibration response according to the position of the mechanism are analyzed based on the dynamic equation. Finally, the correctness of the model is verified by a modal test and Runge-Kutta methods. This study provides a theoretical basis for the dynamic design of electrohydraulic-driven parallel mechanisms.
With the development of fluid-power transmission and control technology, electro-hydraulic-driven technology can significantly improve the load-carrying capacity, stiffness, and control accuracy of stabilization platforms. However, compared with mechanically driven platforms, the stiffness and damping of the fluid, as well as the coupling effect between the fluid and the structure need to be considered for electro-hydraulic-driven parallel stabilization platforms, making the modal and dynamic response characteristics of the mechanism more complex. With the aim of solving the aforementioned issues, we research the electro-hydraulic driven 3-UPS/S parallel stabilization platform considering the hinge stiffness. Moreover, the characteristic vibration equation of the mechanism is established using the virtual work principle. Subsequently, the variation characteristics of the natural frequency and the vibration response according to the position of the mechanism are analyzed based on the dynamic equation. Finally, the correctness of the model is verified by a modal test and Runge-Kutta methods. This study provides a theoretical basis for the dynamic design of electrohydraulic-driven parallel mechanisms.
2024, 37: 142.
doi: 10.1186/s10033-024-01095-5
Abstract:
Fringe projection profilometry (FPP) has been widely applied to non-contact three-dimensional measurement in industries owing to its high accuracy and speed. The point cloud, which is a measurement result of the FPP system, typically contains a large number of invalid points caused by the background, ambient light, shadows, and object edge regions. Research on noisy point detection and elimination has been conducted over the past two decades. However, existing invalid point removal methods are based on image intensity analysis and are only applicable to simple measurement backgrounds that are purely dark. In this paper, we propose a novel invalid point removal framework that consists of two aspects: (1) A convolutional neural network (CNN) is designed to segment the foreground from the background of different intensity conditions in FPP measurement circumstances to remove background points and the most discrete points in background regions. (2) A two-step method based on the fringe image intensity threshold and a bilateral filter is proposed to eliminate the small number of discrete points remaining after background segmentation caused by shadows and edge areas on objects. Experimental results verify that the proposed framework (1) can remove background points intelligently and accurately in different types of complex circumstances, and (2) performs excellently in discrete point detection from object regions.
Fringe projection profilometry (FPP) has been widely applied to non-contact three-dimensional measurement in industries owing to its high accuracy and speed. The point cloud, which is a measurement result of the FPP system, typically contains a large number of invalid points caused by the background, ambient light, shadows, and object edge regions. Research on noisy point detection and elimination has been conducted over the past two decades. However, existing invalid point removal methods are based on image intensity analysis and are only applicable to simple measurement backgrounds that are purely dark. In this paper, we propose a novel invalid point removal framework that consists of two aspects: (1) A convolutional neural network (CNN) is designed to segment the foreground from the background of different intensity conditions in FPP measurement circumstances to remove background points and the most discrete points in background regions. (2) A two-step method based on the fringe image intensity threshold and a bilateral filter is proposed to eliminate the small number of discrete points remaining after background segmentation caused by shadows and edge areas on objects. Experimental results verify that the proposed framework (1) can remove background points intelligently and accurately in different types of complex circumstances, and (2) performs excellently in discrete point detection from object regions.
2024, 37: 144.
doi: 10.1186/s10033-024-01103-8
Abstract:
GH 3230 superalloy is a solution strengthening nickel-based superalloy and it is commonly used for fabricating hot components with the service temperature of above 900 ℃. In order to further improve high-temperature performance, nickel-based alloy matrix composites (NMCs) were proposed. Meanwhile, it is known that laser additive manufacturing is an optional method for fabricating nickel-based composites. However, the research on ceramic-reinforced GH 3230 fabricated by laser metal deposition (LMD) are highly lacking. The aim of this study is to develop TiC ceramic particle reinforced GH 3230 composites using laser metal deposition (LMD) method and study the effect of TiC content on their microstructure and tensile properties. The results showed that TiC particles not only changed the intensity and position of the X-ray diffraction peaks of the alloy matrix but also had a significant effect on the refinement of the cellular dendrites. Meanwhile, it was found that an interfacial layer with sub-micrometer thickness was formed between the TiC ceramic particle and the superalloy matrix, which was identified to be (W, Ti)C1-x phase by the TEM. In terms of the as-built composites, the ultimate tensile strength (UTS) and yield strength (YS) gradually increased, but elongation (EL) decreased with the increase of TiC content. For the as-LMDed 10 vol.% TiC/GH3230 composites, UTS and EL reached 1077.0 MPa and 12.4%, respectively. The enhancement of the tensile strength for composites was attributed to the combined effect of grain refinement strengthening, Orowan strengthening, dislocation strengthening and loading-bearing strengthening.
GH 3230 superalloy is a solution strengthening nickel-based superalloy and it is commonly used for fabricating hot components with the service temperature of above 900 ℃. In order to further improve high-temperature performance, nickel-based alloy matrix composites (NMCs) were proposed. Meanwhile, it is known that laser additive manufacturing is an optional method for fabricating nickel-based composites. However, the research on ceramic-reinforced GH 3230 fabricated by laser metal deposition (LMD) are highly lacking. The aim of this study is to develop TiC ceramic particle reinforced GH 3230 composites using laser metal deposition (LMD) method and study the effect of TiC content on their microstructure and tensile properties. The results showed that TiC particles not only changed the intensity and position of the X-ray diffraction peaks of the alloy matrix but also had a significant effect on the refinement of the cellular dendrites. Meanwhile, it was found that an interfacial layer with sub-micrometer thickness was formed between the TiC ceramic particle and the superalloy matrix, which was identified to be (W, Ti)C1-x phase by the TEM. In terms of the as-built composites, the ultimate tensile strength (UTS) and yield strength (YS) gradually increased, but elongation (EL) decreased with the increase of TiC content. For the as-LMDed 10 vol.% TiC/GH3230 composites, UTS and EL reached 1077.0 MPa and 12.4%, respectively. The enhancement of the tensile strength for composites was attributed to the combined effect of grain refinement strengthening, Orowan strengthening, dislocation strengthening and loading-bearing strengthening.
2024, 37: 143.
doi: 10.1186/s10033-024-01132-3
Abstract:
This paper proposes a gradient conformal design technique to modify the multi-directional stiffness characteristics of 3D printed chiral metamaterials, using various airfoil shapes. The method ensures the integrity of chiral cell nodal circles while improving load transmission efficiency and enhancing manufacturing precision for 3D printing applications. A parametric design framework, integrating finite element analysis and optimization modules, is developed to enhance the wing's multidirectional stiffness. The optimization process demonstrates that the distribution of chiral structural ligaments and nodal circles significantly affects wing deformation. The stiffness gradient optimization results reveal a variation of over 78% in tail stiffness performance between the best and worst parameter combinations. Experimental outcomes suggest that this strategy can develop metamaterials with enhanced deformability, offering a promising approach for designing morphing wings.
This paper proposes a gradient conformal design technique to modify the multi-directional stiffness characteristics of 3D printed chiral metamaterials, using various airfoil shapes. The method ensures the integrity of chiral cell nodal circles while improving load transmission efficiency and enhancing manufacturing precision for 3D printing applications. A parametric design framework, integrating finite element analysis and optimization modules, is developed to enhance the wing's multidirectional stiffness. The optimization process demonstrates that the distribution of chiral structural ligaments and nodal circles significantly affects wing deformation. The stiffness gradient optimization results reveal a variation of over 78% in tail stiffness performance between the best and worst parameter combinations. Experimental outcomes suggest that this strategy can develop metamaterials with enhanced deformability, offering a promising approach for designing morphing wings.
2024, 37: 5.
doi: 10.1186/s10033-023-00985-4
Abstract:
Blank holder force (BHF) is a crucial parameter in deep drawing, having close relation with the forming quality of sheet metal. However, there are different BHFs maintaining the best forming effect in different stages of deep drawing. The variable blank holder force (VBHF) varying with the drawing stage can overcome this problem at an extent. The optimization of VBHF is to determine the optimal BHF in every deep drawing stage. In this paper, a new heuristic optimization algorithm named Jaya is introduced to solve the optimization efficiently. An improved "Quasi-oppositional" strategy is added to Jaya algorithm for improving population diversity. Meanwhile, an innovated stop criterion is added for better convergence. Firstly, the quality evaluation criteria for wrinkling and tearing are built. Secondly, the Kriging models are developed to approximate and quantify the relation between VBHF and forming defects under random sampling. Finally, the optimization models are established and solved by the improved QO-Jaya algorithm. A VBHF optimization example of component with complicated shape and thin wall is studied to prove the effectiveness of the improved Jaya algorithm. The optimization results are compared with that obtained by other algorithms based on the TOPSIS method.
Blank holder force (BHF) is a crucial parameter in deep drawing, having close relation with the forming quality of sheet metal. However, there are different BHFs maintaining the best forming effect in different stages of deep drawing. The variable blank holder force (VBHF) varying with the drawing stage can overcome this problem at an extent. The optimization of VBHF is to determine the optimal BHF in every deep drawing stage. In this paper, a new heuristic optimization algorithm named Jaya is introduced to solve the optimization efficiently. An improved "Quasi-oppositional" strategy is added to Jaya algorithm for improving population diversity. Meanwhile, an innovated stop criterion is added for better convergence. Firstly, the quality evaluation criteria for wrinkling and tearing are built. Secondly, the Kriging models are developed to approximate and quantify the relation between VBHF and forming defects under random sampling. Finally, the optimization models are established and solved by the improved QO-Jaya algorithm. A VBHF optimization example of component with complicated shape and thin wall is studied to prove the effectiveness of the improved Jaya algorithm. The optimization results are compared with that obtained by other algorithms based on the TOPSIS method.
2024, 37: 3.
doi: 10.1186/s10033-023-00986-3
Abstract:
The current research of Charpy impact mainly focuses on obtaining the ductile brittle transition temperature of materials by experiments. Compared with experiments, numerical simulation can study many problems with harsh conditions. However, there are still few studies on the influence of geometric factors such as side grooves. In this paper, the geometry of standard Charpy impact test is designed. Specimens with different widths and side grooves are tested. The finite element model of Charpy impact was established by ABAQUS software. Use test results and simulation results to verify each other. The effects of sample width, side groove depth and side groove bottom fillet on the impact fracture resistance of the sample were studied. The results show that the specimen width is positively correlated with the impact toughness of the specimen. The side groove greatly reduces the impact toughness of the material; the toughness of side groove decreases with the increase of depth; the fracture toughness of side groove decreases with the increase of fillet at the bottom of side groove. The proportion of toughness energy to impact energy of samples was analyzed. The results show that the toughness energy accounts for about 70% of the impact energy of the sample, which has little to do with the geometric characteristics of the sample. This study presents a reliable method for studying Charpy impact tests. The influence of geometric parameters is obtained, which provides a reference method for the study of impact toughness of high toughness materials.
The current research of Charpy impact mainly focuses on obtaining the ductile brittle transition temperature of materials by experiments. Compared with experiments, numerical simulation can study many problems with harsh conditions. However, there are still few studies on the influence of geometric factors such as side grooves. In this paper, the geometry of standard Charpy impact test is designed. Specimens with different widths and side grooves are tested. The finite element model of Charpy impact was established by ABAQUS software. Use test results and simulation results to verify each other. The effects of sample width, side groove depth and side groove bottom fillet on the impact fracture resistance of the sample were studied. The results show that the specimen width is positively correlated with the impact toughness of the specimen. The side groove greatly reduces the impact toughness of the material; the toughness of side groove decreases with the increase of depth; the fracture toughness of side groove decreases with the increase of fillet at the bottom of side groove. The proportion of toughness energy to impact energy of samples was analyzed. The results show that the toughness energy accounts for about 70% of the impact energy of the sample, which has little to do with the geometric characteristics of the sample. This study presents a reliable method for studying Charpy impact tests. The influence of geometric parameters is obtained, which provides a reference method for the study of impact toughness of high toughness materials.
2024, 37: 66.
doi: 10.1186/s10033-024-01059-9
Abstract:
To ensure an accurate selection of rolling guide shoe materials, an analysis of the intricate relationship between linear speed and wear is imperative. Finite element simulations and experimental measurements are employed to evaluate four distinct types of materials: polyurethane, rubber, polytetrafluoroethylene (PTFE), and nylon. The speed-index of each material is measured, serving as a preparation for subsequent analysis. Furthermore, the velocity-wear factor is determined, providing insights into the resilience and durability of the material across varying speeds. Additionally, a wear model tailored specifically for viscoelastic bodies is explored, which is pivotal in understanding the wear mechanisms within the material. Leveraging this model, wear predictions are made under higher speed conditions, facilitating the choice of material for rolling guide shoes. To validate the accuracy of the model, the predicted degree of wear is compared with experimental data, ensuring its alignment with both theoretical principles and real-world performance. This comprehensive analysis has verified the effectiveness of the model in the selection of materials under high-speed conditions, thereby offering confidence in its reliability and ensuring optimal performance.
To ensure an accurate selection of rolling guide shoe materials, an analysis of the intricate relationship between linear speed and wear is imperative. Finite element simulations and experimental measurements are employed to evaluate four distinct types of materials: polyurethane, rubber, polytetrafluoroethylene (PTFE), and nylon. The speed-index of each material is measured, serving as a preparation for subsequent analysis. Furthermore, the velocity-wear factor is determined, providing insights into the resilience and durability of the material across varying speeds. Additionally, a wear model tailored specifically for viscoelastic bodies is explored, which is pivotal in understanding the wear mechanisms within the material. Leveraging this model, wear predictions are made under higher speed conditions, facilitating the choice of material for rolling guide shoes. To validate the accuracy of the model, the predicted degree of wear is compared with experimental data, ensuring its alignment with both theoretical principles and real-world performance. This comprehensive analysis has verified the effectiveness of the model in the selection of materials under high-speed conditions, thereby offering confidence in its reliability and ensuring optimal performance.
2024, 37: 44.
doi: 10.1186/s10033-024-01031-7
Abstract:
Fibre reinforced polymer composites have become a new generation of structural materials due to their unique advantages such as high specific strength, designability, good dimensional stability and ease of large-area monolithic forming. However, the problem of interfacial bonding between the resin matrix and the fibres limits the direct use of reinforcing fibres and has become a central difficulty in the development of basalt fibre-epoxy composites. This paper proposes a solution for enhancing the strength of the fibre-resin interface using maize starch nanocrystals, which are highly yield and eco-friendly. Firstly, in this paper, corn starch nanocrystals (SNC) were prepared by hydrolysis, and were deposited on the surface of basalt fibers by electrostatic adsorption. After that, in order to maximize the modification effect of nano-starch crystals on the interface, the basalt fiber-epoxy resin composite samples were prepared by mixing in a pressureless molding method. The test results shown that the addition of basalt fibers alone led to a reduction in the strength of the sample. Deposition of 0.1 wt% SNC on the surface of basalt fibers can make the strength consistent with pure epoxy resin. When the adsorption amount of SNC reached 0.5 wt%, the tensile strength of the samples was 23.7% higher than that of pure epoxy resin. This is due to the formation of ether bond homopolymers between the SNC at the fibre-epoxy interface and the epoxy resin, which distorts the originally smooth interface, leading to increased stress concentration and the development of cracks. This enhances the binding of basalt fibers. The conclusions of this paper can provide an effective, simple, low-cost and non-polluting method of interfacial enhancement modification.
Fibre reinforced polymer composites have become a new generation of structural materials due to their unique advantages such as high specific strength, designability, good dimensional stability and ease of large-area monolithic forming. However, the problem of interfacial bonding between the resin matrix and the fibres limits the direct use of reinforcing fibres and has become a central difficulty in the development of basalt fibre-epoxy composites. This paper proposes a solution for enhancing the strength of the fibre-resin interface using maize starch nanocrystals, which are highly yield and eco-friendly. Firstly, in this paper, corn starch nanocrystals (SNC) were prepared by hydrolysis, and were deposited on the surface of basalt fibers by electrostatic adsorption. After that, in order to maximize the modification effect of nano-starch crystals on the interface, the basalt fiber-epoxy resin composite samples were prepared by mixing in a pressureless molding method. The test results shown that the addition of basalt fibers alone led to a reduction in the strength of the sample. Deposition of 0.1 wt% SNC on the surface of basalt fibers can make the strength consistent with pure epoxy resin. When the adsorption amount of SNC reached 0.5 wt%, the tensile strength of the samples was 23.7% higher than that of pure epoxy resin. This is due to the formation of ether bond homopolymers between the SNC at the fibre-epoxy interface and the epoxy resin, which distorts the originally smooth interface, leading to increased stress concentration and the development of cracks. This enhances the binding of basalt fibers. The conclusions of this paper can provide an effective, simple, low-cost and non-polluting method of interfacial enhancement modification.
2024, 37: 155.
doi: 10.1186/s10033-024-01140-3
Abstract:
Variable-diameter deployable carbon fiber reinforced polymer (CFRP) composites possess deformation and load-bearing functions and are composed of stiff-flexible coupled preforms and matrix. The stiff-flexible coupled preform, serving as the reinforcing structure, directly determines the deployable properties, and its forming technology is currently a research challenge. This paper designs a braiding and needle-punching (BNP) composite preform forming technology suitable for stiff-flexible coupled preforms. Before forming, the preform is partitioned into flexible and rigid zones, with braiding and needle-punching performed layer by layer in the respective zones. A retractable rotating device is developed to form the stiff-flexible coupled preform, achieving a diameter variation rate of up to 26.6% for the BNP preform. A structural parameter model is also established to describe the geometric parameter changes in the deformation and load-bearing areas of the preform during deployment as a function of the braiding angle. Based on experiments, this paper explains the performance changes of BNP composites concerning the structural parameters of the preform. Experimental analysis shows that as the braiding angle increases, the tensile performance of BNP composites significantly decreases, with the change rate of tensile strength first decreasing and then increasing. Additionally, when the braiding angle is less than 21.89°, the impact toughness of BNP composites remains within the range of 83.66 ± 2 kJ/m2. However, when the braiding angle exceeds 21.89°, the impact toughness of BNP composites gradually decreases with increasing braiding angle. Furthermore, a hybrid agent model based on Latin hypercube sampling and error back-propagation neural network is developed to predict the tensile and impact properties of BNP composites with different structural parameters, with maximum test relative errors of 1.89% for tensile strength and 2.37% for impact toughness.
Variable-diameter deployable carbon fiber reinforced polymer (CFRP) composites possess deformation and load-bearing functions and are composed of stiff-flexible coupled preforms and matrix. The stiff-flexible coupled preform, serving as the reinforcing structure, directly determines the deployable properties, and its forming technology is currently a research challenge. This paper designs a braiding and needle-punching (BNP) composite preform forming technology suitable for stiff-flexible coupled preforms. Before forming, the preform is partitioned into flexible and rigid zones, with braiding and needle-punching performed layer by layer in the respective zones. A retractable rotating device is developed to form the stiff-flexible coupled preform, achieving a diameter variation rate of up to 26.6% for the BNP preform. A structural parameter model is also established to describe the geometric parameter changes in the deformation and load-bearing areas of the preform during deployment as a function of the braiding angle. Based on experiments, this paper explains the performance changes of BNP composites concerning the structural parameters of the preform. Experimental analysis shows that as the braiding angle increases, the tensile performance of BNP composites significantly decreases, with the change rate of tensile strength first decreasing and then increasing. Additionally, when the braiding angle is less than 21.89°, the impact toughness of BNP composites remains within the range of 83.66 ± 2 kJ/m2. However, when the braiding angle exceeds 21.89°, the impact toughness of BNP composites gradually decreases with increasing braiding angle. Furthermore, a hybrid agent model based on Latin hypercube sampling and error back-propagation neural network is developed to predict the tensile and impact properties of BNP composites with different structural parameters, with maximum test relative errors of 1.89% for tensile strength and 2.37% for impact toughness.
2024, 37: 126.
doi: 10.1186/s10033-024-01102-9
Abstract:
Heterogeneous metallic structures constitute a novel class of materials with excellent mechanical properties. However, the existing process for obtaining heterostructures from a single material does not meet large-scale industrial requirements. In this study, a pure copper heterostructured laminate (HSL) composed of a surface elongated-grain layer and a central equiaxed-grain layer was fabricated by rolling bonding and annealing. To study the effect of the interface on the mechanical properties of gradient-structured materials, both laminate metal composite (LMC) and non-composite laminate (NCL) were fabricated by cold-rolling pretreatment of the center layer (60% reduction) and cold-rolling bonding of the whole blank (67% reduction). Then, the HSL was obtained by controlling the post-annealing regimes, the microstructure of each layer was optimized, and a larger degree of microstructural heterogeneities, such as grain size, misorientation angle, and grain orientation, was obtained, which resulted in obvious mechanical differences. Tensile tests of the HSL, surface layer, center layer, and NCL specimens revealed that the HSL annealed at 300 ℃ for 1 h had a significantly higher strength than the center layer and a higher elongation than the surface layer. The HSL had a tensile strength and elongation at fracture of 278.08 MPa and 46.2%, respectively, indicating a good balance of strength and plasticity. The improved properties were primarily attributed to the strengthening or strain hardening due to the inhomogeneous deformation of the heterogeneous layers in the laminate and the mutual constraint acquired by the distinct layers with strong mechanical differences. The HSL had an interfacial bonding strength of 178.5 MPa, which played a vital role in the coordinated deformation of the heterogeneous layers. This study proposes an HSL design method that effectively simplifies the process of obtaining heterostructures in homogeneous materials by controlling the cumulative deformation of the surface and center layers.
Heterogeneous metallic structures constitute a novel class of materials with excellent mechanical properties. However, the existing process for obtaining heterostructures from a single material does not meet large-scale industrial requirements. In this study, a pure copper heterostructured laminate (HSL) composed of a surface elongated-grain layer and a central equiaxed-grain layer was fabricated by rolling bonding and annealing. To study the effect of the interface on the mechanical properties of gradient-structured materials, both laminate metal composite (LMC) and non-composite laminate (NCL) were fabricated by cold-rolling pretreatment of the center layer (60% reduction) and cold-rolling bonding of the whole blank (67% reduction). Then, the HSL was obtained by controlling the post-annealing regimes, the microstructure of each layer was optimized, and a larger degree of microstructural heterogeneities, such as grain size, misorientation angle, and grain orientation, was obtained, which resulted in obvious mechanical differences. Tensile tests of the HSL, surface layer, center layer, and NCL specimens revealed that the HSL annealed at 300 ℃ for 1 h had a significantly higher strength than the center layer and a higher elongation than the surface layer. The HSL had a tensile strength and elongation at fracture of 278.08 MPa and 46.2%, respectively, indicating a good balance of strength and plasticity. The improved properties were primarily attributed to the strengthening or strain hardening due to the inhomogeneous deformation of the heterogeneous layers in the laminate and the mutual constraint acquired by the distinct layers with strong mechanical differences. The HSL had an interfacial bonding strength of 178.5 MPa, which played a vital role in the coordinated deformation of the heterogeneous layers. This study proposes an HSL design method that effectively simplifies the process of obtaining heterostructures in homogeneous materials by controlling the cumulative deformation of the surface and center layers.
2024, 37: 40.
doi: 10.1186/s10033-024-01034-4
Abstract:
A novel double side friction stir Z shape lap-butt welding (DS-FSZW) process was proposed to achieve excellent mechanical properties of Al/Cu medium-thick dissimilar joints. The influence of welding parameters on weld microstructure and properties of DS-FSZW joint were systematically investigated. It indicated that defect-free medium-thick Al/Cu DS-FSZW joint could be achieved under an optimal welding parameter. DS-FSZW joint was prone to form void defects in the bottom of the second-pass weld. The recrystallization mechanisms at the top and middle of the weld nugget zone (WNZ) were continuous dynamic recrystallization (CDRX) and geometric dynamic recrystallization (GDRX). While the major recrystallization mechanism at the bottom of the WNZ was GDRX. DS-FSZW joint of the optimal welding condition with 850 r/min-400 mm/min was produced with a continuous thin and crack-free IMCs layer at the Al/Cu interface, and the maximum tensile strength of this joint is 160.57 MPa, which is equivalent to 65.54% of pure Cu base material. Moreover, the corrosion resistance of Al/Cu DS-FSZW joints also achieved its maximum value at the optimal welding parameter of 850 r/min-400 mm/min. It demonstrates that the DS-FSZW process can simultaneously produce medium-thick Al/Cu joints with excellent mechanical performance and corrosion resistance.
A novel double side friction stir Z shape lap-butt welding (DS-FSZW) process was proposed to achieve excellent mechanical properties of Al/Cu medium-thick dissimilar joints. The influence of welding parameters on weld microstructure and properties of DS-FSZW joint were systematically investigated. It indicated that defect-free medium-thick Al/Cu DS-FSZW joint could be achieved under an optimal welding parameter. DS-FSZW joint was prone to form void defects in the bottom of the second-pass weld. The recrystallization mechanisms at the top and middle of the weld nugget zone (WNZ) were continuous dynamic recrystallization (CDRX) and geometric dynamic recrystallization (GDRX). While the major recrystallization mechanism at the bottom of the WNZ was GDRX. DS-FSZW joint of the optimal welding condition with 850 r/min-400 mm/min was produced with a continuous thin and crack-free IMCs layer at the Al/Cu interface, and the maximum tensile strength of this joint is 160.57 MPa, which is equivalent to 65.54% of pure Cu base material. Moreover, the corrosion resistance of Al/Cu DS-FSZW joints also achieved its maximum value at the optimal welding parameter of 850 r/min-400 mm/min. It demonstrates that the DS-FSZW process can simultaneously produce medium-thick Al/Cu joints with excellent mechanical performance and corrosion resistance.
2024, 37: 81.
doi: 10.1186/s10033-024-01061-1
Abstract:
The crack-closure effect is a crucial factor that affects the crack growth rate and should be considered in simulation analysis and testing. A mixed-mode Ⅰ + Ⅱ loading fatigue crack growth test was performed using EA4T axle steel specimens. The variation of the plastic-induced crack closure (PICC) effect and the roughness-induced crack closure (RICC) effect during crack deflection in the mixed-mode is examined in this study. The results show that the load perpendicular to the crack propagation direction hinders the slip effect caused by the load parallel to the crack propagation direction under mixed-mode loading, and the crack deflection is an intuitive manifestation of the interaction between the PICC and RICC. The proportion of the RA value change on the crack side caused by contact friction was reduced by the interaction between PICC and RICC. The roughness of the crack surface before and after the crack deflection is different, and the spatial torsion crack surface is formed during the crack propagation process. With the increase of the crack length, the roughness of the fracture surface increases. During the crack deflection process, the PICC value fluctuates around 0.2, and the RICC value is increased to 0.15.
The crack-closure effect is a crucial factor that affects the crack growth rate and should be considered in simulation analysis and testing. A mixed-mode Ⅰ + Ⅱ loading fatigue crack growth test was performed using EA4T axle steel specimens. The variation of the plastic-induced crack closure (PICC) effect and the roughness-induced crack closure (RICC) effect during crack deflection in the mixed-mode is examined in this study. The results show that the load perpendicular to the crack propagation direction hinders the slip effect caused by the load parallel to the crack propagation direction under mixed-mode loading, and the crack deflection is an intuitive manifestation of the interaction between the PICC and RICC. The proportion of the RA value change on the crack side caused by contact friction was reduced by the interaction between PICC and RICC. The roughness of the crack surface before and after the crack deflection is different, and the spatial torsion crack surface is formed during the crack propagation process. With the increase of the crack length, the roughness of the fracture surface increases. During the crack deflection process, the PICC value fluctuates around 0.2, and the RICC value is increased to 0.15.
Lap-Shear Performance of Weld-Bonded Mg Alloy and Austenitic Stainless Steel in Three-Sheet Stack-Up
2024, 37: 70.
doi: 10.1186/s10033-024-01057-x
Abstract:
With the growing interest in utilizing Mg and austenitic stainless steel (ASS) in the automotive sector, joining them together in three-sheet configuration is inevitable. However, achieving this task presents considerable challenges due to the large differences in their physical, metallurgical and mechanical properties. To overcome these challenges, the feasibility of using weld-bonding to join Mg alloy/ASS/ASS was investigated. The nugget formation, interface characteristics, microstructure and mechanical properties of the joints were investigated. The results show that the connection between the Mg alloy and upper ASS was achieved through the combined effect of the cured adhesive and weld-brazing in the weld zone. On the other hand, a metallurgical bond was formed at the ASS/ASS interface. The Mg nugget microstructure exhibited fine columar grains composed predominantly of primary α-Mg grains along with a eutectic mixture of α-Mg and β-Mg17Al12. The nugget formed at the ASS/ASS interface consisted largely of columnar grains of austenite, with some equiaxed dendritic grains formed at the centerline of the joint. The weld-bonded joints exhibited an average peak load and energy absorption of about 8.5 kN and 17 J, respectively (the conventional RSW joints failed with minimal or no load application). The failure mode of the joints changed with increasing welding current from interfacial failure via the Mg nugget/upper ASS interface to partial interfacial failure (part of the Mg nugget was pulled out of the Mg sheet). Both failure modes were accompanied by cohesive failure in the adhesive zone.
With the growing interest in utilizing Mg and austenitic stainless steel (ASS) in the automotive sector, joining them together in three-sheet configuration is inevitable. However, achieving this task presents considerable challenges due to the large differences in their physical, metallurgical and mechanical properties. To overcome these challenges, the feasibility of using weld-bonding to join Mg alloy/ASS/ASS was investigated. The nugget formation, interface characteristics, microstructure and mechanical properties of the joints were investigated. The results show that the connection between the Mg alloy and upper ASS was achieved through the combined effect of the cured adhesive and weld-brazing in the weld zone. On the other hand, a metallurgical bond was formed at the ASS/ASS interface. The Mg nugget microstructure exhibited fine columar grains composed predominantly of primary α-Mg grains along with a eutectic mixture of α-Mg and β-Mg17Al12. The nugget formed at the ASS/ASS interface consisted largely of columnar grains of austenite, with some equiaxed dendritic grains formed at the centerline of the joint. The weld-bonded joints exhibited an average peak load and energy absorption of about 8.5 kN and 17 J, respectively (the conventional RSW joints failed with minimal or no load application). The failure mode of the joints changed with increasing welding current from interfacial failure via the Mg nugget/upper ASS interface to partial interfacial failure (part of the Mg nugget was pulled out of the Mg sheet). Both failure modes were accompanied by cohesive failure in the adhesive zone.
2024, 37: 7.
doi: 10.1186/s10033-023-00987-2
Abstract:
Non-penetration laser welding of lap joints in austenitic stainless steel sheets is commonly preferred in fields where the surface quality is of utmost importance. However, the application of non-penetration welded austenitic stainless steel parts is limited owing to the micro bulging distortion that occurs on the back surface of the partial penetration side. In this paper, non-penetration lap laser welding experiments, were conducted on galvanized and SUS304 austenitic stainless steel plates using a fiber laser, to investigate the mechanism of bulging distortion. A comparative experiment of DC01 galvanized steel-Q235 carbon steel lap laser welding was carried out, and the deflection and distortion profile of partially penetrated side of the sheets were measured using a non-contact laser interferometer. In addition, the cold-rolled SUS304 was subjected to heat holding at different temperatures and water quenching after bending to characterize its microstructure under tensile and compressive stress. The results show that, during the heating stage of the thermal cycle of laser lap welding, the partial penetration side of the SUS304 steel sheet generates compressive stress, which extrudes the material in the heat-affected zone to the outside of the back of the SUS304 steel sheet, thereby forming a bulge. The findings of these experiments can be of great value for controlling the distortion of the partial penetrated side of austenitic stainless steel sheet during laser non-penetration lap welding.
Non-penetration laser welding of lap joints in austenitic stainless steel sheets is commonly preferred in fields where the surface quality is of utmost importance. However, the application of non-penetration welded austenitic stainless steel parts is limited owing to the micro bulging distortion that occurs on the back surface of the partial penetration side. In this paper, non-penetration lap laser welding experiments, were conducted on galvanized and SUS304 austenitic stainless steel plates using a fiber laser, to investigate the mechanism of bulging distortion. A comparative experiment of DC01 galvanized steel-Q235 carbon steel lap laser welding was carried out, and the deflection and distortion profile of partially penetrated side of the sheets were measured using a non-contact laser interferometer. In addition, the cold-rolled SUS304 was subjected to heat holding at different temperatures and water quenching after bending to characterize its microstructure under tensile and compressive stress. The results show that, during the heating stage of the thermal cycle of laser lap welding, the partial penetration side of the SUS304 steel sheet generates compressive stress, which extrudes the material in the heat-affected zone to the outside of the back of the SUS304 steel sheet, thereby forming a bulge. The findings of these experiments can be of great value for controlling the distortion of the partial penetrated side of austenitic stainless steel sheet during laser non-penetration lap welding.
2024, 37: 167.
doi: 10.1186/s10033-024-01104-7
Abstract:
6082-T6 aluminum alloy is a commonly used aluminum alloy material in the field of rail transit because of its good molding properties, high mechanical properties, excellent corrosion resistance and weldability. In the high temperature and humid environment, the temperature change is bound to affect the stress corrosion resistance of the aluminum alloy and their welded joint. However, the influence mechanism of temperature on its stress corrosion resistance has not been explained in the existing research. In this paper, the mechanical properties and stress corrosion behaviors of melt-inert gas welded (MIG) 6082-T6 aluminum alloy welded joints were systematically studied under various temperatures condition. Results indicated the temperature scarcely affected stress corrosion cracking susceptibility index (PSCC) of base metal, while significantly affected the welded joint and higher temperature caused lower PSCC. After slow strain rate tensile test, a corrosion layer was formed, which was a typical brittle-toughness mixed failure, and the degree of brittleness increased with the increasing of temperature. Electrochemical analysis showed that corrosion resistance of the joint slightly decreased due to aluminum alloy accelerated dissolution caused by increasing of temperature. The proposed research will provide a theoretical basis for solving aluminum alloys used in rail transit, ship accessories and other industrial fields.
6082-T6 aluminum alloy is a commonly used aluminum alloy material in the field of rail transit because of its good molding properties, high mechanical properties, excellent corrosion resistance and weldability. In the high temperature and humid environment, the temperature change is bound to affect the stress corrosion resistance of the aluminum alloy and their welded joint. However, the influence mechanism of temperature on its stress corrosion resistance has not been explained in the existing research. In this paper, the mechanical properties and stress corrosion behaviors of melt-inert gas welded (MIG) 6082-T6 aluminum alloy welded joints were systematically studied under various temperatures condition. Results indicated the temperature scarcely affected stress corrosion cracking susceptibility index (PSCC) of base metal, while significantly affected the welded joint and higher temperature caused lower PSCC. After slow strain rate tensile test, a corrosion layer was formed, which was a typical brittle-toughness mixed failure, and the degree of brittleness increased with the increasing of temperature. Electrochemical analysis showed that corrosion resistance of the joint slightly decreased due to aluminum alloy accelerated dissolution caused by increasing of temperature. The proposed research will provide a theoretical basis for solving aluminum alloys used in rail transit, ship accessories and other industrial fields.
2024, 37: 2.
doi: 10.1186/s10033-023-00983-6
Abstract:
This study employs advanced electrochemical and surface characterization techniques to investigate the impact of electrochemical hydrogen charging on the corrosion behavior and surface film of the Ti-6Al-4V alloy. The findings revealed the formation of γ-TiH and δ-TiH2 hydrides in the alloy after hydrogen charging. Prolonging hydrogen charging resulted in more significant degradation of the alloy microstructure, leading to deteriorated protectiveness of the surface film. This trend was further confirmed by the electrochemical measurements, which showed that the corrosion resistance of the alloy progressively worsened as the hydrogen charging time was increased. Consequently, this work provides valuable insights into the mechanisms underlying the corrosion of Ti-6Al-4V alloy under hydrogen charging conditions.
This study employs advanced electrochemical and surface characterization techniques to investigate the impact of electrochemical hydrogen charging on the corrosion behavior and surface film of the Ti-6Al-4V alloy. The findings revealed the formation of γ-TiH and δ-TiH2 hydrides in the alloy after hydrogen charging. Prolonging hydrogen charging resulted in more significant degradation of the alloy microstructure, leading to deteriorated protectiveness of the surface film. This trend was further confirmed by the electrochemical measurements, which showed that the corrosion resistance of the alloy progressively worsened as the hydrogen charging time was increased. Consequently, this work provides valuable insights into the mechanisms underlying the corrosion of Ti-6Al-4V alloy under hydrogen charging conditions.
2024, 37: 139.
doi: 10.1186/s10033-024-01128-z
Abstract:
TiAlSiN is a potential protection coating for die steel to improve the surface hardness, anti-wear performance and suitability. In the present study, TiAlSiN is deposited on H13 die steel by high power impulse magnetron sputtering and the effects of bias voltage, deposition temperature, and film thickness on the performance of coatings are studied. The microstructure, mechanical and tribological properties of coatings are analyzed by energy dispersive spectrometer, X-ray diffraction, nanoindentation, friction and wear tests. The results show that with the changes of sputtering parameters, the content of Ti, Al, Si, and N fluctuates slightly. With the increase of bias voltage, deposition temperature and film thickness, the diffraction peaks of Ti3Al2N2 phase become wider. Higher bias voltage, deposition temperature, and film thickness are beneficial for obtaining coatings with high hardness, and strong wear resistance. By observing the surface morphology of coatings after grinding with Si3N4 balls, it was found that the wear mechanism of coatings contains abrasive wear, fatigue wear, and oxidative wear.
TiAlSiN is a potential protection coating for die steel to improve the surface hardness, anti-wear performance and suitability. In the present study, TiAlSiN is deposited on H13 die steel by high power impulse magnetron sputtering and the effects of bias voltage, deposition temperature, and film thickness on the performance of coatings are studied. The microstructure, mechanical and tribological properties of coatings are analyzed by energy dispersive spectrometer, X-ray diffraction, nanoindentation, friction and wear tests. The results show that with the changes of sputtering parameters, the content of Ti, Al, Si, and N fluctuates slightly. With the increase of bias voltage, deposition temperature and film thickness, the diffraction peaks of Ti3Al2N2 phase become wider. Higher bias voltage, deposition temperature, and film thickness are beneficial for obtaining coatings with high hardness, and strong wear resistance. By observing the surface morphology of coatings after grinding with Si3N4 balls, it was found that the wear mechanism of coatings contains abrasive wear, fatigue wear, and oxidative wear.
2024, 37: 13.
doi: 10.1186/s10033-024-00990-1
Abstract:
Titanium alloys are excellent structural materials in engineering fields, but their poor tribological properties limit their further applications. Electroless plating is an effective method to enhance the tribological performance of alloys, but it is difficult to efficiently apply to titanium alloys, due to titanium alloy's strong chemical activity. In this work, the electroless Nickel-Boron (Ni-B) coating was successfully deposited on the surface of titanium alloy (Ti-6AL-4V) via a new pre-treatment process. Then, linearly reciprocating sliding wear tests were performed to evaluate the tribological behaviors of titanium alloy and its electroless Ni-B coatings. It was found that the Ni-B coatings can decrease the wear rate of the titanium alloy from 19.89×10⁻³ mm3 to 0.41×10⁻³ mm3, which attributes to the much higher hardness of Ni-B coatings. After heat treatment, the hardness of Ni-B coating further increases corresponding to coating crystallization and hard phase formation. However, heat treatment does not improve the tribological performance of Ni-B coating, due to the fact that higher brittleness and more severe oxidative wear exacerbate the damage of heat-treated coatings. Furthermore, the Ni-B coatings heat-treated both in air and nitrogen almost present the same tribological performance. The finding of this work on electroless coating would further extend the practical applications of titanium alloys in the engineering fields.
Titanium alloys are excellent structural materials in engineering fields, but their poor tribological properties limit their further applications. Electroless plating is an effective method to enhance the tribological performance of alloys, but it is difficult to efficiently apply to titanium alloys, due to titanium alloy's strong chemical activity. In this work, the electroless Nickel-Boron (Ni-B) coating was successfully deposited on the surface of titanium alloy (Ti-6AL-4V) via a new pre-treatment process. Then, linearly reciprocating sliding wear tests were performed to evaluate the tribological behaviors of titanium alloy and its electroless Ni-B coatings. It was found that the Ni-B coatings can decrease the wear rate of the titanium alloy from 19.89×10⁻³ mm3 to 0.41×10⁻³ mm3, which attributes to the much higher hardness of Ni-B coatings. After heat treatment, the hardness of Ni-B coating further increases corresponding to coating crystallization and hard phase formation. However, heat treatment does not improve the tribological performance of Ni-B coating, due to the fact that higher brittleness and more severe oxidative wear exacerbate the damage of heat-treated coatings. Furthermore, the Ni-B coatings heat-treated both in air and nitrogen almost present the same tribological performance. The finding of this work on electroless coating would further extend the practical applications of titanium alloys in the engineering fields.
2024, 37: 149.
doi: 10.1186/s10033-024-01119-0
Abstract:
The annealing process is usually used to heat-treat cold-deformed 304 stainless steel to improve its microstructure and properties to a certain extent; however, it requires a high temperature and a long time. Because the thickness of the ultrathin strip reaches the micrometer level, it has only one or several layers of grains in the thickness direction, and the control of morphology and performance is complex. In this study, pulsed current loading was used to replace traditional annealing for treating ultrathin strips of cold-rolled 304 stainless steel. After loading a 25 W pulsed current treatment for 5 min on the cold-rolled sample, which had a thickness of 0.035 mm and width of 6 mm, complete recrystallization occurred, and the mechanical properties were significantly improved. At this point, the measured temperature was 540 ℃. When annealing was used to treat the sample with the same temperature and for the same duration, the microstructure was still dominated by deformed crystals, and the mechanical properties were poor. When annealing was used to obtain a microstructure and properties similar to those obtained via 25 W electrical treatment, the required annealing temperature and time were 810 ℃ and 60 min, respectively. Pulsed current can increase the vacancy diffusion flux in the sample, accelerate the atomic movement, reduce the recrystallization activation energy, and make the cold-rolled 304 stainless steel ultrathin strip completely recrystallize at a lower temperature and in a shorter time. As the current power continued to increase, the recrystallized grains grew. When the pulsed current power was increased to 25 W, the recrystallized grains grew negligibly. Both recrystallization and grain growth have power thresholds. This study provides a novel approach for regulating the microstructure and mechanical properties of ultrathin cold-rolled 304 stainless steel strips.
The annealing process is usually used to heat-treat cold-deformed 304 stainless steel to improve its microstructure and properties to a certain extent; however, it requires a high temperature and a long time. Because the thickness of the ultrathin strip reaches the micrometer level, it has only one or several layers of grains in the thickness direction, and the control of morphology and performance is complex. In this study, pulsed current loading was used to replace traditional annealing for treating ultrathin strips of cold-rolled 304 stainless steel. After loading a 25 W pulsed current treatment for 5 min on the cold-rolled sample, which had a thickness of 0.035 mm and width of 6 mm, complete recrystallization occurred, and the mechanical properties were significantly improved. At this point, the measured temperature was 540 ℃. When annealing was used to treat the sample with the same temperature and for the same duration, the microstructure was still dominated by deformed crystals, and the mechanical properties were poor. When annealing was used to obtain a microstructure and properties similar to those obtained via 25 W electrical treatment, the required annealing temperature and time were 810 ℃ and 60 min, respectively. Pulsed current can increase the vacancy diffusion flux in the sample, accelerate the atomic movement, reduce the recrystallization activation energy, and make the cold-rolled 304 stainless steel ultrathin strip completely recrystallize at a lower temperature and in a shorter time. As the current power continued to increase, the recrystallized grains grew. When the pulsed current power was increased to 25 W, the recrystallized grains grew negligibly. Both recrystallization and grain growth have power thresholds. This study provides a novel approach for regulating the microstructure and mechanical properties of ultrathin cold-rolled 304 stainless steel strips.
2024, 37: 61.
doi: 10.1186/s10033-024-01047-z
Abstract:
Cast iron alloys with low production cost and quite good mechanical properties are widely used in the automotive industry. To study the mechanical behavior of a typical ductile cast iron (GJS-450) with nodular graphite, uni-axial quasi-static and dynamic tensile tests at strain rates of 10−4, 1, 10, 100, and 250 s−1 were carried out. In order to investigate the influence of stress state on the deformation and fracture parameters, specimens with various geometries were used in the experiments. Stress strain curves and fracture strains of the GJS-450 alloy in the strain rate range of 10−4 to 250 s−1 were obtained. A strain rate-dependent plastic flow model was proposed to describe the mechanical behavior in the corresponding strain-rate range. The available damage model was extended to take the strain rate into account and calibrated based on the analysis of local fracture strains. Simulations with the proposed plastic flow model and the damage model were conducted to observe the deformation and fracture process. The results show that the strain rate has obviously nonlinear effects on the yield stress and fracture strain of GJS-450 alloys. The predictions with the proposed plastic flow and damage models at various strain rates agree well with the experimental results, which illustrates that the rate-dependent plastic flow and damage models can be used to describe the mechanical behavior of cast iron alloys at elevated strain rates. The proposed plastic flow and damage models can be used to describe the deformation and fracture analysis of materials with similar properties.
Cast iron alloys with low production cost and quite good mechanical properties are widely used in the automotive industry. To study the mechanical behavior of a typical ductile cast iron (GJS-450) with nodular graphite, uni-axial quasi-static and dynamic tensile tests at strain rates of 10−4, 1, 10, 100, and 250 s−1 were carried out. In order to investigate the influence of stress state on the deformation and fracture parameters, specimens with various geometries were used in the experiments. Stress strain curves and fracture strains of the GJS-450 alloy in the strain rate range of 10−4 to 250 s−1 were obtained. A strain rate-dependent plastic flow model was proposed to describe the mechanical behavior in the corresponding strain-rate range. The available damage model was extended to take the strain rate into account and calibrated based on the analysis of local fracture strains. Simulations with the proposed plastic flow model and the damage model were conducted to observe the deformation and fracture process. The results show that the strain rate has obviously nonlinear effects on the yield stress and fracture strain of GJS-450 alloys. The predictions with the proposed plastic flow and damage models at various strain rates agree well with the experimental results, which illustrates that the rate-dependent plastic flow and damage models can be used to describe the mechanical behavior of cast iron alloys at elevated strain rates. The proposed plastic flow and damage models can be used to describe the deformation and fracture analysis of materials with similar properties.
2024, 37: 153.
doi: 10.1186/s10033-024-01124-3
Abstract:
In the realm of engineering practice, various factors such as limited availability of measurement data and complex working conditions pose significant challenges to obtaining accurate load spectra. Thus, accurately predicting the fatigue life of structures becomes notably arduous. This paper proposed an approach to predict the fatigue life of structure based on the optimized load spectra, which is accurately estimated by an efficient hinging hyperplane neural network (EHH-NN) model. The construction of the EHH-NN model includes initial network generation and parameter optimization. Through the combination of working conditions design, multi-body dynamics analysis and structural static mechanics analysis, the simulated load spectra of the structure are obtained. The simulated load spectra are taken as the input variables for the optimized EHH-NN model, while the measurement load spectra are used as the output variables. The prediction results of case structure indicate that the optimized EHH-NN model can achieve the high-accuracy load spectra, in comparison with support vector machine (SVM), random forest (RF) model and back propagation (BP) neural network. The error rate between the prediction values and the measurement values of the optimized EHH-NN model is 4.61%. In the Cauchy-Lorentz distribution, the absolute error data of 92% with EHH-NN model appear in the intermediate range of ±1.65%. Also, the fatigue life analysis is performed for the case structure, based on the accurately predicted load spectra. The fatigue life of the case structure is calculated based on the comparison between the measured and predicted load spectra, with an accuracy of 93.56%. This research proposes the optimized EHH-NN model can more accurately reflect the measurement load spectra, enabling precise calculation of fatigue life. Additionally, the optimized EHH-NN model provides reliability assessment for industrial engineering equipment.
In the realm of engineering practice, various factors such as limited availability of measurement data and complex working conditions pose significant challenges to obtaining accurate load spectra. Thus, accurately predicting the fatigue life of structures becomes notably arduous. This paper proposed an approach to predict the fatigue life of structure based on the optimized load spectra, which is accurately estimated by an efficient hinging hyperplane neural network (EHH-NN) model. The construction of the EHH-NN model includes initial network generation and parameter optimization. Through the combination of working conditions design, multi-body dynamics analysis and structural static mechanics analysis, the simulated load spectra of the structure are obtained. The simulated load spectra are taken as the input variables for the optimized EHH-NN model, while the measurement load spectra are used as the output variables. The prediction results of case structure indicate that the optimized EHH-NN model can achieve the high-accuracy load spectra, in comparison with support vector machine (SVM), random forest (RF) model and back propagation (BP) neural network. The error rate between the prediction values and the measurement values of the optimized EHH-NN model is 4.61%. In the Cauchy-Lorentz distribution, the absolute error data of 92% with EHH-NN model appear in the intermediate range of ±1.65%. Also, the fatigue life analysis is performed for the case structure, based on the accurately predicted load spectra. The fatigue life of the case structure is calculated based on the comparison between the measured and predicted load spectra, with an accuracy of 93.56%. This research proposes the optimized EHH-NN model can more accurately reflect the measurement load spectra, enabling precise calculation of fatigue life. Additionally, the optimized EHH-NN model provides reliability assessment for industrial engineering equipment.
2024, 37: 28.
doi: 10.1186/s10033-024-01010-y
Abstract:
Copper particles emitted from braking have become a significant source of environmental pollution. However, copper plays a crucial role in resin-based braking materials. Developing high-performance braking materials without copper has become a significant challenge. In this paper, the resin-based braking materials were filled with fly-ash cenospheres to develop copper-free braking materials. The effects of fly-ash cenospheres on the physical properties, mechanical and friction and wear properties of braking materials were studied. Furthermore, the wear mechanism of copper-free resin-based braking materials filled with fly-ash cenospheres was discussed. The results indicate that the inclusion of fly-ash cenospheres in the braking materials improved their thermal stability, hardness and impact strength, reduced their density, effectively increased the friction coefficient at medium and high temperatures, and enhanced the heat-fade resistance of the braking materials. The inclusion of fly-ash cenospheres contributed to the formation of surface friction film during the friction process of the braking materials, and facilitated the transition of form from abrasive wear to adhesive wear. At 100–350 ℃, the friction coefficient of the optimal formulation is in the range of 0.57–0.61, and the wear rate is in the range (0.29–0.65) × 10−7 cm3·N−1·m−1, demonstrating excellent resistance to heat-fade and stability in friction coefficient. This research proposes the use of fly-ash cenospheres as a substitute for environmentally harmful and expensive copper in brake materials, which not only improves the performance of braking materials but also reduces their costs.
Copper particles emitted from braking have become a significant source of environmental pollution. However, copper plays a crucial role in resin-based braking materials. Developing high-performance braking materials without copper has become a significant challenge. In this paper, the resin-based braking materials were filled with fly-ash cenospheres to develop copper-free braking materials. The effects of fly-ash cenospheres on the physical properties, mechanical and friction and wear properties of braking materials were studied. Furthermore, the wear mechanism of copper-free resin-based braking materials filled with fly-ash cenospheres was discussed. The results indicate that the inclusion of fly-ash cenospheres in the braking materials improved their thermal stability, hardness and impact strength, reduced their density, effectively increased the friction coefficient at medium and high temperatures, and enhanced the heat-fade resistance of the braking materials. The inclusion of fly-ash cenospheres contributed to the formation of surface friction film during the friction process of the braking materials, and facilitated the transition of form from abrasive wear to adhesive wear. At 100–350 ℃, the friction coefficient of the optimal formulation is in the range of 0.57–0.61, and the wear rate is in the range (0.29–0.65) × 10−7 cm3·N−1·m−1, demonstrating excellent resistance to heat-fade and stability in friction coefficient. This research proposes the use of fly-ash cenospheres as a substitute for environmentally harmful and expensive copper in brake materials, which not only improves the performance of braking materials but also reduces their costs.
2024, 37: 133.
doi: 10.1186/s10033-024-01133-2
Abstract:
To evaluate the room-temperature hydrogen embrittlement susceptibility (HES) of high-pressure hydrogen storage vessels, a modified slow-strain-rate tensile (MSSRT) testing method was proposed for effectively aligning with their actual operating conditions. The effectiveness of the MSSRT testing method in evaluating the room-temperature HES of steels under high pressure was validated by comparing the results obtained using the conventional slow strain rate tensile (SSRT) and proposed MSSRT testing methods for 30CrMo steel, which is widely used for manufacturing high-pressure hydrogen storage vessels. The tensile properties and fracture morphologies of 23Cr2Ni4MoV steel were then examined using the MSSRT testing method under 35 MPa hydrogen and nitrogen at room temperature. Results indicate that 35 MPa hydrogen exerted a marginal effect on the tensile properties of 23Cr2Ni4MoV steel at room temperature when considering the MSSRT testing method; moreover, the test specimen basically exhibited macroscopic ductile fracture. Furthermore, obvious surface cracking was observed on the fractured specimen tested under hydrogen, whereas surface cracking was not observed on the fractured specimen tested under nitrogen. Hence, the relative reduction of area and surface cracking are necessary criteria for evaluating the room-temperature HES of steels using the MSSRT testing method. Overall, 23Cr2Ni4MoV steel might be unsuitable for manufacturing high-pressure hydrogen storage vessels.
To evaluate the room-temperature hydrogen embrittlement susceptibility (HES) of high-pressure hydrogen storage vessels, a modified slow-strain-rate tensile (MSSRT) testing method was proposed for effectively aligning with their actual operating conditions. The effectiveness of the MSSRT testing method in evaluating the room-temperature HES of steels under high pressure was validated by comparing the results obtained using the conventional slow strain rate tensile (SSRT) and proposed MSSRT testing methods for 30CrMo steel, which is widely used for manufacturing high-pressure hydrogen storage vessels. The tensile properties and fracture morphologies of 23Cr2Ni4MoV steel were then examined using the MSSRT testing method under 35 MPa hydrogen and nitrogen at room temperature. Results indicate that 35 MPa hydrogen exerted a marginal effect on the tensile properties of 23Cr2Ni4MoV steel at room temperature when considering the MSSRT testing method; moreover, the test specimen basically exhibited macroscopic ductile fracture. Furthermore, obvious surface cracking was observed on the fractured specimen tested under hydrogen, whereas surface cracking was not observed on the fractured specimen tested under nitrogen. Hence, the relative reduction of area and surface cracking are necessary criteria for evaluating the room-temperature HES of steels using the MSSRT testing method. Overall, 23Cr2Ni4MoV steel might be unsuitable for manufacturing high-pressure hydrogen storage vessels.
2024, 37: 154.
doi: 10.1186/s10033-024-01141-2
Abstract:
In the welding process of SiCp/Al composites, Al reacts with SiC particles in the molten pool to form Al4C3, a brittle phase, damaging the reinforcement and causing a sharp decline in the mechanical properties of weld joints. To mitigate this, a method of welding SiCp/Al composites by pulsed laser welding with powder-filling is proposed, inhibiting the interface reaction between Al and SiC particles in the molten pool. This study investigates the effect of pulse frequency on the temperature field of the molten pool, and combines thermal-fluid numerical simulation to analyze the peak temperature at different pulse frequencies, optimizing the Si content to ultimately inhibit the interface reaction in the molten pool. Results indicate that an appropriate pulse frequency achieves good welding formation and effectively regulates the peak temperature of the molten pool. Only a small amount of brittle phase is present in the weld joint, creating favorable conditions for the addition of alloying elements. The interface reaction is slowed down by adjusting the pulse frequency, though it is not completely inhibited. When the addition of Si content reaches 8%, the occurrence of the interface reaction is effectively inhibited. In weld joints with the addition of 8wt% Si powder, no Al4C3 brittle phase is present, and the tensile strength of the weld joint is 266 MPa, up to 70% of the base material.
In the welding process of SiCp/Al composites, Al reacts with SiC particles in the molten pool to form Al4C3, a brittle phase, damaging the reinforcement and causing a sharp decline in the mechanical properties of weld joints. To mitigate this, a method of welding SiCp/Al composites by pulsed laser welding with powder-filling is proposed, inhibiting the interface reaction between Al and SiC particles in the molten pool. This study investigates the effect of pulse frequency on the temperature field of the molten pool, and combines thermal-fluid numerical simulation to analyze the peak temperature at different pulse frequencies, optimizing the Si content to ultimately inhibit the interface reaction in the molten pool. Results indicate that an appropriate pulse frequency achieves good welding formation and effectively regulates the peak temperature of the molten pool. Only a small amount of brittle phase is present in the weld joint, creating favorable conditions for the addition of alloying elements. The interface reaction is slowed down by adjusting the pulse frequency, though it is not completely inhibited. When the addition of Si content reaches 8%, the occurrence of the interface reaction is effectively inhibited. In weld joints with the addition of 8wt% Si powder, no Al4C3 brittle phase is present, and the tensile strength of the weld joint is 266 MPa, up to 70% of the base material.
2024, 37: 76.
doi: 10.1186/s10033-024-01067-9
Abstract:
This study analysed the failure of dissimilar metal welds (DMWs) between ferritic heat resistant steels and austenitic stainless steels and investigated its influencing factors by means of numerical simulation, microstructure characterization and mechanical property test. Under the long-term high-temperature service condition in practical power plant, the DMW failure mode was along the interface between nickel-based weld metal (WM) and ferritic heat resistant steel, and the failure mechanism was stress/strain concentration, microstructure degradation and oxidation coupling acting on the interface. The numerical simulation results show that interface stress/strain concentration was due to the differences in coefficient of thermal expansion and creep strength, and the degree of stress/strain concentration was related to service time. The ferrite band formed at the WM/ferritic steel interface was prone to cracking, attracting the fracture along the interface. The interface crack allowed oxidation to develop along the WM/ferritic steel interface. During long-term service, the interface stress/strain concentration, microstructure and oxidation all evolved, which synergistically promoted interface failure of DMW. However, only under the long-term service of low stress conditions could trigger the interface failure of DMW. Meanwhile, long-term service would reduce the mechanical strength and plasticity of DMW.
This study analysed the failure of dissimilar metal welds (DMWs) between ferritic heat resistant steels and austenitic stainless steels and investigated its influencing factors by means of numerical simulation, microstructure characterization and mechanical property test. Under the long-term high-temperature service condition in practical power plant, the DMW failure mode was along the interface between nickel-based weld metal (WM) and ferritic heat resistant steel, and the failure mechanism was stress/strain concentration, microstructure degradation and oxidation coupling acting on the interface. The numerical simulation results show that interface stress/strain concentration was due to the differences in coefficient of thermal expansion and creep strength, and the degree of stress/strain concentration was related to service time. The ferrite band formed at the WM/ferritic steel interface was prone to cracking, attracting the fracture along the interface. The interface crack allowed oxidation to develop along the WM/ferritic steel interface. During long-term service, the interface stress/strain concentration, microstructure and oxidation all evolved, which synergistically promoted interface failure of DMW. However, only under the long-term service of low stress conditions could trigger the interface failure of DMW. Meanwhile, long-term service would reduce the mechanical strength and plasticity of DMW.
2024, 37: 18.
doi: 10.1186/s10033-024-01005-9
Abstract:
For dissimilar metal welds (DMWs) involving nickel-based weld metal (WM) and ferritic heat resistant steel base metal (BM) in power plants, there must be an interface between WM and BM, and this interface suffers mechanical and microstructure mismatches and is often the rupture location of premature failure. In this study, a new form of WM/BM interface form, namely double Y-type interface was designed for the DMWs. Creep behaviors and life of DMWs containing double Y-type interface and conventional Ⅰ-type interface were compared by finite element analysis and creep tests, and creep failure mechanisms were investigated by stress-strain analysis and microstructure characterization. By applying double Y-type interface instead of conventional Ⅰ-type interface, failure location of DMW could be shifted from the WM/ferritic heat-affected zone (HAZ) interface into the ferritic HAZ or even the ferritic BM, and the failure mode change improved the creep life of DMW. The interface premature failure of Ⅰ-type interface DMW was related to the coupling effect of microstructure degradation, stress and strain concentrations, and oxide notch on the WM/HAZ interface. The creep failure of double Y-type interface DMW was the result of Type Ⅳ fracture due to the creep voids and micro-cracks on fine-grain boundaries in HAZ, which was a result of the matrix softening of HAZ and lack of precipitate pinning at fine-grain boundaries. The double Y-type interface form separated the stress and strain concentrations in DMW from the WM/HAZ interface, preventing the trigger effect of oxide notch on interface failure and inhibiting the interfacial microstructure cracking. It is a novel scheme to prolong creep life and enhance reliability of DMW, by means of optimizing the interface form, decoupling the damage factors from WM/HAZ interface, and then changing the failure mechanism and shifting the failure location.
For dissimilar metal welds (DMWs) involving nickel-based weld metal (WM) and ferritic heat resistant steel base metal (BM) in power plants, there must be an interface between WM and BM, and this interface suffers mechanical and microstructure mismatches and is often the rupture location of premature failure. In this study, a new form of WM/BM interface form, namely double Y-type interface was designed for the DMWs. Creep behaviors and life of DMWs containing double Y-type interface and conventional Ⅰ-type interface were compared by finite element analysis and creep tests, and creep failure mechanisms were investigated by stress-strain analysis and microstructure characterization. By applying double Y-type interface instead of conventional Ⅰ-type interface, failure location of DMW could be shifted from the WM/ferritic heat-affected zone (HAZ) interface into the ferritic HAZ or even the ferritic BM, and the failure mode change improved the creep life of DMW. The interface premature failure of Ⅰ-type interface DMW was related to the coupling effect of microstructure degradation, stress and strain concentrations, and oxide notch on the WM/HAZ interface. The creep failure of double Y-type interface DMW was the result of Type Ⅳ fracture due to the creep voids and micro-cracks on fine-grain boundaries in HAZ, which was a result of the matrix softening of HAZ and lack of precipitate pinning at fine-grain boundaries. The double Y-type interface form separated the stress and strain concentrations in DMW from the WM/HAZ interface, preventing the trigger effect of oxide notch on interface failure and inhibiting the interfacial microstructure cracking. It is a novel scheme to prolong creep life and enhance reliability of DMW, by means of optimizing the interface form, decoupling the damage factors from WM/HAZ interface, and then changing the failure mechanism and shifting the failure location.
2024, 37: 134.
doi: 10.1186/s10033-024-01118-1
Abstract:
The emergence of connected and automated vehicles (CAV) indicates improved traffic mobility in future traffic transportation systems. This study addresses the research gap in macroscopic traffic modeling of mixed traffic networks where CAV and human-driven vehicles coexist. CAV behavior is explicitly included in the proposed traffic network model, and the vehicle number non-conservation problem is overcome by describing the approaching and departure vehicle number in discrete time. The proposed model is verified in typical CAV cooperation scenarios. The performance of CAV coordination is analyzed in road, intersection and network scenario. Total travel time of the vehicles in the network is proved to be reduced when coordination is applied. Simulation results validate the accuracy of the proposed model and the effectiveness of the proposed algorithm.
The emergence of connected and automated vehicles (CAV) indicates improved traffic mobility in future traffic transportation systems. This study addresses the research gap in macroscopic traffic modeling of mixed traffic networks where CAV and human-driven vehicles coexist. CAV behavior is explicitly included in the proposed traffic network model, and the vehicle number non-conservation problem is overcome by describing the approaching and departure vehicle number in discrete time. The proposed model is verified in typical CAV cooperation scenarios. The performance of CAV coordination is analyzed in road, intersection and network scenario. Total travel time of the vehicles in the network is proved to be reduced when coordination is applied. Simulation results validate the accuracy of the proposed model and the effectiveness of the proposed algorithm.
2024, 37: 6.
doi: 10.1186/s10033-023-00968-5
Abstract:
Accurate trajectory prediction of surrounding road users is the fundamental input for motion planning, which enables safe autonomous driving on public roads. In this paper, a safe motion planning approach is proposed based on the deep learning-based trajectory prediction method. To begin with, a trajectory prediction model is established based on the graph neural network (GNN) that is trained utilizing the INTERACTION dataset. Then, the validated trajectory prediction model is used to predict the future trajectories of surrounding road users, including pedestrians and vehicles. In addition, a GNN prediction model-enabled motion planner is developed based on the model predictive control technique. Furthermore, two driving scenarios are extracted from the INTERACTION dataset to validate and evaluate the effectiveness of the proposed motion planning approach, i.e., merging and roundabout scenarios. The results demonstrate that the proposed method can lower the risk and improve driving safety compared with the baseline method.
Accurate trajectory prediction of surrounding road users is the fundamental input for motion planning, which enables safe autonomous driving on public roads. In this paper, a safe motion planning approach is proposed based on the deep learning-based trajectory prediction method. To begin with, a trajectory prediction model is established based on the graph neural network (GNN) that is trained utilizing the INTERACTION dataset. Then, the validated trajectory prediction model is used to predict the future trajectories of surrounding road users, including pedestrians and vehicles. In addition, a GNN prediction model-enabled motion planner is developed based on the model predictive control technique. Furthermore, two driving scenarios are extracted from the INTERACTION dataset to validate and evaluate the effectiveness of the proposed motion planning approach, i.e., merging and roundabout scenarios. The results demonstrate that the proposed method can lower the risk and improve driving safety compared with the baseline method.
2024, 37: 16.
doi: 10.1186/s10033-024-01001-z
Abstract:
Wheel polygonal wear can immensely worsen wheel/rail interactions and vibration performances of the train and track, and ultimately, lead to the shortening of service life of railway components. At present, wheel/rail medium- or high-frequency frictional interactions are perceived as an essential reason of the high-order polygonal wear of railway wheels, which are potentially resulted by the flexible deformations of the train/track system or other external excitations. In this work, the effect of wheel/rail flexibility on polygonal wear evolution of heavy-haul locomotive wheels is explored with aid of the long-term wheel polygonal wear evolution simulations, in which different flexible modeling of the heavy-haul wheel/rail coupled system is implemented. Further, the mitigation measures for the polygonal wear of heavy-haul locomotive wheels are discussed. The results point out that the evolution of polygonal wear of heavy-haul locomotive wheels can be veritably simulated with consideration of the flexible effect of both wheelset and rails. Execution of mixed-line operation of heavy-haul trains and application of multi-cut wheel re-profiling can effectively reduce the development of wheel polygonal wear. This research can provide a deep-going understanding of polygonal wear evolution mechanism of heavy-haul locomotive wheels and its mitigation measures.
Wheel polygonal wear can immensely worsen wheel/rail interactions and vibration performances of the train and track, and ultimately, lead to the shortening of service life of railway components. At present, wheel/rail medium- or high-frequency frictional interactions are perceived as an essential reason of the high-order polygonal wear of railway wheels, which are potentially resulted by the flexible deformations of the train/track system or other external excitations. In this work, the effect of wheel/rail flexibility on polygonal wear evolution of heavy-haul locomotive wheels is explored with aid of the long-term wheel polygonal wear evolution simulations, in which different flexible modeling of the heavy-haul wheel/rail coupled system is implemented. Further, the mitigation measures for the polygonal wear of heavy-haul locomotive wheels are discussed. The results point out that the evolution of polygonal wear of heavy-haul locomotive wheels can be veritably simulated with consideration of the flexible effect of both wheelset and rails. Execution of mixed-line operation of heavy-haul trains and application of multi-cut wheel re-profiling can effectively reduce the development of wheel polygonal wear. This research can provide a deep-going understanding of polygonal wear evolution mechanism of heavy-haul locomotive wheels and its mitigation measures.
2024, 37: 68.
doi: 10.1186/s10033-024-01043-3
Abstract:
As a new grinding and maintenance technology, rail belt grinding shows significant advantages in many applications. The dynamic characteristics of the rail belt grinding vehicle largely determines its grinding performance and service life. In order to explore the vibration control method of the rail grinding vehicle with abrasive belt, the vibration response changes in structural optimization and lightweight design are respectively analyzed through transient response and random vibration simulations in this paper. Firstly, the transient response simulation analysis of the rail grinding vehicle with abrasive belt is carried out under operating conditions and non-operating conditions. Secondly, the vibration control of the grinding vehicle is implemented by setting vibration isolation elements, optimizing the structure, and increasing damping. Thirdly, in order to further explore the dynamic characteristics of the rail grinding vehicle, the random vibration simulation analysis of the grinding vehicle is carried out under the condition of the horizontal irregularity of the American AAR6 track. Finally, by replacing the Q235 steel frame material with 7075 aluminum alloy and LA43M magnesium alloy, both vibration control and lightweight design can be achieved simultaneously. The results of transient dynamic response analysis show that the acceleration of most positions in the two working conditions exceeds the standard value in GB/T 17426-1998 standard. By optimizing the structure of the grinding vehicle in three ways, the average vibration acceleration of the whole car is reduced by about 55.1% from 15.6 m/s2 to 7.0 m/s2. The results of random vibration analysis show that the grinding vehicle with Q235 steel frame does not meet the safety conditions of\begin{document}$ 3\sigma $\end{document}
As a new grinding and maintenance technology, rail belt grinding shows significant advantages in many applications. The dynamic characteristics of the rail belt grinding vehicle largely determines its grinding performance and service life. In order to explore the vibration control method of the rail grinding vehicle with abrasive belt, the vibration response changes in structural optimization and lightweight design are respectively analyzed through transient response and random vibration simulations in this paper. Firstly, the transient response simulation analysis of the rail grinding vehicle with abrasive belt is carried out under operating conditions and non-operating conditions. Secondly, the vibration control of the grinding vehicle is implemented by setting vibration isolation elements, optimizing the structure, and increasing damping. Thirdly, in order to further explore the dynamic characteristics of the rail grinding vehicle, the random vibration simulation analysis of the grinding vehicle is carried out under the condition of the horizontal irregularity of the American AAR6 track. Finally, by replacing the Q235 steel frame material with 7075 aluminum alloy and LA43M magnesium alloy, both vibration control and lightweight design can be achieved simultaneously. The results of transient dynamic response analysis show that the acceleration of most positions in the two working conditions exceeds the standard value in GB/T 17426-1998 standard. By optimizing the structure of the grinding vehicle in three ways, the average vibration acceleration of the whole car is reduced by about 55.1% from 15.6 m/s2 to 7.0 m/s2. The results of random vibration analysis show that the grinding vehicle with Q235 steel frame does not meet the safety conditions of
2024, 37: 35.
doi: 10.1186/s10033-024-01013-9
Abstract:
In the railway system, fasteners have the functions of damping, maintaining the track distance, and adjusting the track level. Therefore, routine maintenance and inspection of fasteners are important to ensure the safe operation of track lines. Currently, assessment methods for fastener tightness include manual observation, acoustic wave detection, and image detection. There are limitations such as low accuracy and efficiency, easy interference and misjudgment, and a lack of accurate, stable, and fast detection methods. Aiming at the small deformation characteristics and large elastic change of fasteners from full loosening to full tightening, this study proposes high-precision surface-structured light technology for fastener detection and fastener deformation feature extraction based on the center-line projection distance and a fastener tightness regression method based on neural networks. First, the method uses a 3D camera to obtain a fastener point cloud and then segments the elastic rod area based on the iterative closest point algorithm registration. Principal component analysis is used to calculate the normal vector of the segmented elastic rod surface and extract the point on the centerline of the elastic rod. The point is projected onto the upper surface of the bolt to calculate the projection distance. Subsequently, the mapping relationship between the projection distance sequence and fastener tightness is established, and the influence of each parameter on the fastener tightness prediction is analyzed. Finally, by setting up a fastener detection scene in the track experimental base, collecting data, and completing the algorithm verification, the results showed that the deviation between the fastener tightness regression value obtained after the algorithm processing and the actual measured value RMSE was 0.2196 mm, which significantly improved the effect compared with other tightness detection methods, and realized an effective fastener tightness regression.
In the railway system, fasteners have the functions of damping, maintaining the track distance, and adjusting the track level. Therefore, routine maintenance and inspection of fasteners are important to ensure the safe operation of track lines. Currently, assessment methods for fastener tightness include manual observation, acoustic wave detection, and image detection. There are limitations such as low accuracy and efficiency, easy interference and misjudgment, and a lack of accurate, stable, and fast detection methods. Aiming at the small deformation characteristics and large elastic change of fasteners from full loosening to full tightening, this study proposes high-precision surface-structured light technology for fastener detection and fastener deformation feature extraction based on the center-line projection distance and a fastener tightness regression method based on neural networks. First, the method uses a 3D camera to obtain a fastener point cloud and then segments the elastic rod area based on the iterative closest point algorithm registration. Principal component analysis is used to calculate the normal vector of the segmented elastic rod surface and extract the point on the centerline of the elastic rod. The point is projected onto the upper surface of the bolt to calculate the projection distance. Subsequently, the mapping relationship between the projection distance sequence and fastener tightness is established, and the influence of each parameter on the fastener tightness prediction is analyzed. Finally, by setting up a fastener detection scene in the track experimental base, collecting data, and completing the algorithm verification, the results showed that the deviation between the fastener tightness regression value obtained after the algorithm processing and the actual measured value RMSE was 0.2196 mm, which significantly improved the effect compared with other tightness detection methods, and realized an effective fastener tightness regression.
2024, 37: 65.
doi: 10.1186/s10033-024-01042-4
Abstract:
Parking difficulties have become a social issue that people have to solve. Automated parking system is practicable for quick par operations without a driver which can also greatly reduces the probability of parking accidents. The paper proposes a Lyapunov-based nonlinear model predictive controller embedding an instructable solution which is generated by the modified rear-wheel feedback method (RF-LNMPC) in order to improve the overall path tracking accuracy in parking conditions. Firstly, A discrete-time RF-LNMPC considering the position and attitude of the parking vehicle is proposed to increase the success rate of automated parking effectively. Secondly, the RF-LNMPC problem with a multi-objective cost function is solved by the Interior-Point Optimization, of which the iterative initial values are described as the instructable solutions calculated by combining modified rear-wheel feedback to improve the performance of local optimal solution. Thirdly, the details on the computation of the terminal constraint and terminal cost for the linear time-varying case is presented. The closed-loop stability is verified via Lyapunov techniques by considering the terminal constraint and terminal cost theoretically. Finally, the proposed RF-LNMPC is implemented on a self-driving Lincoln MKZ platform and the experiment results have shown improved performance in parallel and vertical parking conditions. The Monte Carlo analysis also demonstrates good stability and repeatability of the proposed method which can be applied in practical use in the near future.
Parking difficulties have become a social issue that people have to solve. Automated parking system is practicable for quick par operations without a driver which can also greatly reduces the probability of parking accidents. The paper proposes a Lyapunov-based nonlinear model predictive controller embedding an instructable solution which is generated by the modified rear-wheel feedback method (RF-LNMPC) in order to improve the overall path tracking accuracy in parking conditions. Firstly, A discrete-time RF-LNMPC considering the position and attitude of the parking vehicle is proposed to increase the success rate of automated parking effectively. Secondly, the RF-LNMPC problem with a multi-objective cost function is solved by the Interior-Point Optimization, of which the iterative initial values are described as the instructable solutions calculated by combining modified rear-wheel feedback to improve the performance of local optimal solution. Thirdly, the details on the computation of the terminal constraint and terminal cost for the linear time-varying case is presented. The closed-loop stability is verified via Lyapunov techniques by considering the terminal constraint and terminal cost theoretically. Finally, the proposed RF-LNMPC is implemented on a self-driving Lincoln MKZ platform and the experiment results have shown improved performance in parallel and vertical parking conditions. The Monte Carlo analysis also demonstrates good stability and repeatability of the proposed method which can be applied in practical use in the near future.
2024, 37: 19.
doi: 10.1186/s10033-024-00991-0
Abstract:
Regarding the lane keeping system, path tracking accuracy and lateral stability at high speeds need to be taken into account especially for commercial vehicles due to the characteristics of larger mass, longer wheelbase and higher mass center. To improve the performance mentioned above comprehensively, the control strategy based on improved artificial potential field (APF) algorithm is proposed. In the paper, time to lane crossing (TLC) is introduced into the potential field function to enhance the accuracy of path tracking, meanwhile the vehicle dynamics parameters including yaw rate and lateral acceleration are chosen as the repulsive force field source. The lane keeping controller based on improved APF algorithm is designed and the stability of the control system is proved based on Lyapunov theory. In addition, adaptive inertial weight particle swarm optimization algorithm (AIWPSO) is applied to optimize the gain of each potential field function. The co-simulation results indicate that the comprehensive evaluation index respecting lane tracking accuracy and lateral stability is reduced remarkably. Finally, the proposed control strategy is verified by the HiL test. It provides a beneficial reference for dynamics control of commercial vehicles and enriches the theoretical development and practical application of artificial potential field method in the field of intelligent driving.
Regarding the lane keeping system, path tracking accuracy and lateral stability at high speeds need to be taken into account especially for commercial vehicles due to the characteristics of larger mass, longer wheelbase and higher mass center. To improve the performance mentioned above comprehensively, the control strategy based on improved artificial potential field (APF) algorithm is proposed. In the paper, time to lane crossing (TLC) is introduced into the potential field function to enhance the accuracy of path tracking, meanwhile the vehicle dynamics parameters including yaw rate and lateral acceleration are chosen as the repulsive force field source. The lane keeping controller based on improved APF algorithm is designed and the stability of the control system is proved based on Lyapunov theory. In addition, adaptive inertial weight particle swarm optimization algorithm (AIWPSO) is applied to optimize the gain of each potential field function. The co-simulation results indicate that the comprehensive evaluation index respecting lane tracking accuracy and lateral stability is reduced remarkably. Finally, the proposed control strategy is verified by the HiL test. It provides a beneficial reference for dynamics control of commercial vehicles and enriches the theoretical development and practical application of artificial potential field method in the field of intelligent driving.
2024, 37: 45.
doi: 10.1186/s10033-024-01018-4
Abstract:
There is no unified planning standard for unstructured roads, and the morphological structures of these roads are complex and varied. It is important to maintain a balance between accuracy and speed for unstructured road extraction models. Unstructured road extraction algorithms based on deep learning have problems such as high model complexity, high computational cost, and the inability to adapt to current edge computing devices. Therefore, it is best to use lightweight network models. Considering the need for lightweight models and the characteristics of unstructured roads with different pattern shapes, such as blocks and strips, a TMB (Triple Multi-Block) feature extraction module is proposed, and the overall structure of the TMBNet network is described. The TMB module was compared with SS-nbt, Non-bottleneck-1D, and other modules via experiments. The feasibility and effectiveness of the TMB module design were proven through experiments and visualizations. The comparison experiment, using multiple convolution kernel categories, proved that the TMB module can improve the segmentation accuracy of the network. The comparison with different semantic segmentation networks demonstrates that the TMBNet network has advantages in terms of unstructured road extraction.
There is no unified planning standard for unstructured roads, and the morphological structures of these roads are complex and varied. It is important to maintain a balance between accuracy and speed for unstructured road extraction models. Unstructured road extraction algorithms based on deep learning have problems such as high model complexity, high computational cost, and the inability to adapt to current edge computing devices. Therefore, it is best to use lightweight network models. Considering the need for lightweight models and the characteristics of unstructured roads with different pattern shapes, such as blocks and strips, a TMB (Triple Multi-Block) feature extraction module is proposed, and the overall structure of the TMBNet network is described. The TMB module was compared with SS-nbt, Non-bottleneck-1D, and other modules via experiments. The feasibility and effectiveness of the TMB module design were proven through experiments and visualizations. The comparison experiment, using multiple convolution kernel categories, proved that the TMB module can improve the segmentation accuracy of the network. The comparison with different semantic segmentation networks demonstrates that the TMBNet network has advantages in terms of unstructured road extraction.
2024, 37: 147.
doi: 10.1186/s10033-024-01151-0
Abstract:
The mechanism of rail corrugation remains unclear, and the research methods require improvement. The vibration characteristics represent the system's external manifestations, but a comprehensive analysis is still lacking. Taking the vibration characteristics of the wheel-rail system as a starting point, this study investigates the formation mechanisms of rail corrugation on measured metro lines. The line sections included both steel spring floating slab tracks and long sleeper embedded tracks. First, the wavelength and frequency attributes of rail corrugation were obtained through field measurements. Then, referencing line conditions, three-dimensional finite element numerical models were established, frequency response calculations were performed, and the relationship between the vibration responses of the wheel-rail system and rail corrugation was analyzed. Finally, a parameter sensitivity analysis of the wheel-rail system was conducted to control the further development of rail corrugation. The results show distinct corrugation phenomena on both inner and outer rails in the measured sections. The characteristic wavelengths of inner and outer rail corrugation on the steel spring floating slab track are 34 mm and 59 mm, respectively, and the characteristic wavelengths of inner and outer rail corrugation on the long sleeper embedded track are 46 mm and 47 mm, respectively. The frequency response analysis indicates that the numerical results exhibit eigenfrequencies close to the passing frequencies of the measured corrugations. The formation mechanism of inner rail corrugation on the steel spring floating slab track is attributed to the third-order bending vibration of the wheelset, which leads to the generation of inner rail corrugation. In contrast, the formation mechanism of outer rail corrugation is attributed to the lateral bending vibration of the outer rail. For the long sleeper embedded track, inner rail corrugation is generated by the lateral bending vibration of the inner rail, while outer rail corrugation results from the lateral bending vibration of the outer rail. Appropriate adjustments to the fastener's vertical and lateral stiffness, as well as the steel spring's vertical and lateral stiffness, can shift the rail corrugation eigenfrequencies, thereby inhibiting the development of corrugation with the original wavelength. Changes in other parameters have no effect on the rail corrugation eigenfrequencies and only influence the development speed of corrugation with the original wavelength. This research effectively elucidates the cause of rail corrugation from the system vibration perspective and provides a valuable complement to the corrugation analysis method.
The mechanism of rail corrugation remains unclear, and the research methods require improvement. The vibration characteristics represent the system's external manifestations, but a comprehensive analysis is still lacking. Taking the vibration characteristics of the wheel-rail system as a starting point, this study investigates the formation mechanisms of rail corrugation on measured metro lines. The line sections included both steel spring floating slab tracks and long sleeper embedded tracks. First, the wavelength and frequency attributes of rail corrugation were obtained through field measurements. Then, referencing line conditions, three-dimensional finite element numerical models were established, frequency response calculations were performed, and the relationship between the vibration responses of the wheel-rail system and rail corrugation was analyzed. Finally, a parameter sensitivity analysis of the wheel-rail system was conducted to control the further development of rail corrugation. The results show distinct corrugation phenomena on both inner and outer rails in the measured sections. The characteristic wavelengths of inner and outer rail corrugation on the steel spring floating slab track are 34 mm and 59 mm, respectively, and the characteristic wavelengths of inner and outer rail corrugation on the long sleeper embedded track are 46 mm and 47 mm, respectively. The frequency response analysis indicates that the numerical results exhibit eigenfrequencies close to the passing frequencies of the measured corrugations. The formation mechanism of inner rail corrugation on the steel spring floating slab track is attributed to the third-order bending vibration of the wheelset, which leads to the generation of inner rail corrugation. In contrast, the formation mechanism of outer rail corrugation is attributed to the lateral bending vibration of the outer rail. For the long sleeper embedded track, inner rail corrugation is generated by the lateral bending vibration of the inner rail, while outer rail corrugation results from the lateral bending vibration of the outer rail. Appropriate adjustments to the fastener's vertical and lateral stiffness, as well as the steel spring's vertical and lateral stiffness, can shift the rail corrugation eigenfrequencies, thereby inhibiting the development of corrugation with the original wavelength. Changes in other parameters have no effect on the rail corrugation eigenfrequencies and only influence the development speed of corrugation with the original wavelength. This research effectively elucidates the cause of rail corrugation from the system vibration perspective and provides a valuable complement to the corrugation analysis method.
2024, 37: 31.
doi: 10.1186/s10033-024-01007-7
Abstract:
The all-wheel drive (AWD) hybrid system is a research focus on high-performance new energy vehicles that can meet the demands of dynamic performance and passing ability. Simultaneous optimization of the power and economy of hybrid vehicles becomes an issue. A unique multi-mode coupling (MMC) AWD hybrid system is presented to realize the distributed and centralized driving of the front and rear axles to achieve vectored distribution and full utilization of the system power between the axles of vehicles. Based on the parameters of the benchmarking model of a hybrid vehicle, the best model-predictive control-based energy management strategy is proposed. First, the drive system model was built after the analysis of the MMC-AWD's drive modes. Next, three fundamental strategies were established to address power distribution adjustment and battery SOC maintenance when the SOC changed, which was followed by the design of a road driving force observer. Then, the energy consumption rate in the average time domain was processed before designing the minimum fuel consumption controller based on the equivalent fuel consumption coefficient. Finally, the advantage of the MMC-AWD was confirmed by comparison with the dynamic performance and economy of the BYD Song PLUS DMI-AWD. The findings indicate that, in comparison to the comparative hybrid system at road adhesion coefficients of 0.8 and 0.6, the MMC-AWD's capacity to accelerate increases by 5.26% and 7.92%, respectively. When the road adhesion coefficient is 0.8, 0.6, and 0.4, the maximum climbing ability increases by 14.22%, 12.88%, and 4.55%, respectively. As a result, the dynamic performance is greatly enhanced, and the fuel savings rate per 100 km of mileage reaches 12.06%, which is also very economical. The proposed control strategies for the new hybrid AWD vehicle can optimize the power and economy simultaneously.
The all-wheel drive (AWD) hybrid system is a research focus on high-performance new energy vehicles that can meet the demands of dynamic performance and passing ability. Simultaneous optimization of the power and economy of hybrid vehicles becomes an issue. A unique multi-mode coupling (MMC) AWD hybrid system is presented to realize the distributed and centralized driving of the front and rear axles to achieve vectored distribution and full utilization of the system power between the axles of vehicles. Based on the parameters of the benchmarking model of a hybrid vehicle, the best model-predictive control-based energy management strategy is proposed. First, the drive system model was built after the analysis of the MMC-AWD's drive modes. Next, three fundamental strategies were established to address power distribution adjustment and battery SOC maintenance when the SOC changed, which was followed by the design of a road driving force observer. Then, the energy consumption rate in the average time domain was processed before designing the minimum fuel consumption controller based on the equivalent fuel consumption coefficient. Finally, the advantage of the MMC-AWD was confirmed by comparison with the dynamic performance and economy of the BYD Song PLUS DMI-AWD. The findings indicate that, in comparison to the comparative hybrid system at road adhesion coefficients of 0.8 and 0.6, the MMC-AWD's capacity to accelerate increases by 5.26% and 7.92%, respectively. When the road adhesion coefficient is 0.8, 0.6, and 0.4, the maximum climbing ability increases by 14.22%, 12.88%, and 4.55%, respectively. As a result, the dynamic performance is greatly enhanced, and the fuel savings rate per 100 km of mileage reaches 12.06%, which is also very economical. The proposed control strategies for the new hybrid AWD vehicle can optimize the power and economy simultaneously.
2024, 37: 14.
doi: 10.1186/s10033-024-00992-z
Abstract:
The advancement of autonomous driving heavily relies on the ability to accurate lane lines detection. As deep learning and computer vision technologies evolve, a variety of deep learning-based methods for lane line detection have been proposed by researchers in the field. However, owing to the simple appearance of lane lines and the lack of distinctive features, it is easy for other objects with similar local appearances to interfere with the process of detecting lane lines. The precision of lane line detection is limited by the unpredictable quantity and diversity of lane lines. To address the aforementioned challenges, we propose a novel deep learning approach for lane line detection. This method leverages the Swin Transformer in conjunction with LaneNet (called ST-LaneNet). The experience results showed that the true positive detection rate can reach 97.53% for easy lanes and 96.83% for difficult lanes (such as scenes with severe occlusion and extreme lighting conditions), which can better accomplish the objective of detecting lane lines. In 1000 detection samples, the average detection accuracy can reach 97.83%, the average inference time per image can reach 17.8 ms, and the average number of frames per second can reach 64.8 Hz. The programming scripts and associated models for this project can be accessed openly at the following GitHub repository:https://github.com/Duane711/Lane-line-detection-ST-LaneNet .
The advancement of autonomous driving heavily relies on the ability to accurate lane lines detection. As deep learning and computer vision technologies evolve, a variety of deep learning-based methods for lane line detection have been proposed by researchers in the field. However, owing to the simple appearance of lane lines and the lack of distinctive features, it is easy for other objects with similar local appearances to interfere with the process of detecting lane lines. The precision of lane line detection is limited by the unpredictable quantity and diversity of lane lines. To address the aforementioned challenges, we propose a novel deep learning approach for lane line detection. This method leverages the Swin Transformer in conjunction with LaneNet (called ST-LaneNet). The experience results showed that the true positive detection rate can reach 97.53% for easy lanes and 96.83% for difficult lanes (such as scenes with severe occlusion and extreme lighting conditions), which can better accomplish the objective of detecting lane lines. In 1000 detection samples, the average detection accuracy can reach 97.83%, the average inference time per image can reach 17.8 ms, and the average number of frames per second can reach 64.8 Hz. The programming scripts and associated models for this project can be accessed openly at the following GitHub repository:
2024, 37: 141.
doi: 10.1186/s10033-024-01110-9
Abstract:
This study presents a tracking and fault-tolerant controller architecture for uncertain steer-by-wire (SbW) systems using model predictive control in the presence of actuator malfunction and the nonlinear properties of tire lateral stiffness coefficients. By changing the internal model, the model predictive control (MPC) technique was used to achieve optimal tracking performance under the actuator output limitation variation problem and uncertain system parameters. System parameters and state estimates were simultaneously provided by the fault detection and isolation modules to detect actuator failure using the coupling estimation approach. The estimation accuracy was further improved by considering the replacement errors as virtual noise, which was also estimated during the estimation process. Simulation and experimental results demonstrate that the proposed fault-tolerant control technique can identify motor faults and conduct fault-tolerant control based on fault identification, showing good front-wheel steering angle tracking performance under both normal and fault conditions.
This study presents a tracking and fault-tolerant controller architecture for uncertain steer-by-wire (SbW) systems using model predictive control in the presence of actuator malfunction and the nonlinear properties of tire lateral stiffness coefficients. By changing the internal model, the model predictive control (MPC) technique was used to achieve optimal tracking performance under the actuator output limitation variation problem and uncertain system parameters. System parameters and state estimates were simultaneously provided by the fault detection and isolation modules to detect actuator failure using the coupling estimation approach. The estimation accuracy was further improved by considering the replacement errors as virtual noise, which was also estimated during the estimation process. Simulation and experimental results demonstrate that the proposed fault-tolerant control technique can identify motor faults and conduct fault-tolerant control based on fault identification, showing good front-wheel steering angle tracking performance under both normal and fault conditions.
2024, 37: 85.
doi: 10.1186/s10033-024-01070-0
Abstract:
Enhancing ride comfort has always constituted a crucial focus in the design and research of modern tracked vehicles, heavily reliant on the driving system's performance. While the road wheel is a key component of the driving system, traditional road wheels predominantly adopt a solid structure, exhibiting subpar adhesion performance and damping effects, thereby falling short of meeting the demands for high-speed, stable, and long-distance driving in tracked vehicles. Addressing this issue, this paper proposes a novel type of flexible road wheel (FRW) characterized by a catenary construction. The study investigates the ride comfort of tracked vehicles equipped with flexible road wheels by integrating finite element and vehicle dynamic. First, three-dimensional (3D) finite element (FE) models of both flexible and rigid road wheels are established, considering material and contact nonlinearities. These models are validated through a wheel radial loading test. Based on the validated FE model, the paper uncovers the relationship between load and radial deformation of the road wheel, forming the basis for a nonlinear mathematical model. Subsequently, a half-car model of a tracked vehicle with seven degrees of freedom is established using Newton's second law. A random road model, considering the track effect and employing white noise, is constructed. The study concludes by examining the ride comfort of tracked vehicles equipped with flexible and rigid road wheels under various speeds and road grades. The results demonstrate that, in comparison to the rigid road wheel (RRW), the flexible road wheel enhances the ride comfort of tracked vehicles on randomly uneven roads. This research provides a theoretical foundation for the implementation of flexible road wheels in tracked vehicles.
Enhancing ride comfort has always constituted a crucial focus in the design and research of modern tracked vehicles, heavily reliant on the driving system's performance. While the road wheel is a key component of the driving system, traditional road wheels predominantly adopt a solid structure, exhibiting subpar adhesion performance and damping effects, thereby falling short of meeting the demands for high-speed, stable, and long-distance driving in tracked vehicles. Addressing this issue, this paper proposes a novel type of flexible road wheel (FRW) characterized by a catenary construction. The study investigates the ride comfort of tracked vehicles equipped with flexible road wheels by integrating finite element and vehicle dynamic. First, three-dimensional (3D) finite element (FE) models of both flexible and rigid road wheels are established, considering material and contact nonlinearities. These models are validated through a wheel radial loading test. Based on the validated FE model, the paper uncovers the relationship between load and radial deformation of the road wheel, forming the basis for a nonlinear mathematical model. Subsequently, a half-car model of a tracked vehicle with seven degrees of freedom is established using Newton's second law. A random road model, considering the track effect and employing white noise, is constructed. The study concludes by examining the ride comfort of tracked vehicles equipped with flexible and rigid road wheels under various speeds and road grades. The results demonstrate that, in comparison to the rigid road wheel (RRW), the flexible road wheel enhances the ride comfort of tracked vehicles on randomly uneven roads. This research provides a theoretical foundation for the implementation of flexible road wheels in tracked vehicles.
2024, 37: 137.
doi: 10.1186/s10033-024-01120-7
Abstract:
The current research on the aerodynamic performance of the train running in rainy weather is primarily concerned with the trajectory of the raindrops and the aerodynamic variation of trains caused by raindrops. In fact, water film will generate on the train body when raindrops hit the train, which interacts with the flow field around the train, and would probably affect the aerodynamic performance of the train. In this paper, based on shear stress transport (SST) k-w turbulence model and Euler-Lagrange discrete phase model, the aerodynamic calculation model of a high-speed train under rainfall environment is established. The LWF (Lagrangian wall film) is used to simulate the water film distribution of the high-speed train under different rainfall intensities, and the aerodynamic performance of the train are studied. The calculation results show that raindrops will gather on the train surface and form water film under rainfall environment. With the extension of rainfall time, the thickness and coverage range of water film expand, and the maximum thickness of water film can reach 4.95 mm under the working conditions in this paper. The average thickness of water film on the train body increases with the rainfall intensity. When the rainfall intensity increases from 100 mm/h to 500 mm/h, the average water film thickness will increase by 3.26 times. The velocity of water film in the streamlined area of head car is larger than that in other areas, and the maximum velocity is 22.14 m/s. Compared with the rainless environment condition, the skin friction coefficient of the high-speed train increases and the average value will increase by 10.74% for a rainfall intensity of 500 mm/h. The positive pressure and resistance coefficient of the head car increase with the rainfall intensity. This research proposes a methodology to systematically analyze the generation of water film on the train surface and its influence on the train aerodynamic performance; the analysis can provide more practical results and can serve as a reference basis for the design and development of high-speed trains.
The current research on the aerodynamic performance of the train running in rainy weather is primarily concerned with the trajectory of the raindrops and the aerodynamic variation of trains caused by raindrops. In fact, water film will generate on the train body when raindrops hit the train, which interacts with the flow field around the train, and would probably affect the aerodynamic performance of the train. In this paper, based on shear stress transport (SST) k-w turbulence model and Euler-Lagrange discrete phase model, the aerodynamic calculation model of a high-speed train under rainfall environment is established. The LWF (Lagrangian wall film) is used to simulate the water film distribution of the high-speed train under different rainfall intensities, and the aerodynamic performance of the train are studied. The calculation results show that raindrops will gather on the train surface and form water film under rainfall environment. With the extension of rainfall time, the thickness and coverage range of water film expand, and the maximum thickness of water film can reach 4.95 mm under the working conditions in this paper. The average thickness of water film on the train body increases with the rainfall intensity. When the rainfall intensity increases from 100 mm/h to 500 mm/h, the average water film thickness will increase by 3.26 times. The velocity of water film in the streamlined area of head car is larger than that in other areas, and the maximum velocity is 22.14 m/s. Compared with the rainless environment condition, the skin friction coefficient of the high-speed train increases and the average value will increase by 10.74% for a rainfall intensity of 500 mm/h. The positive pressure and resistance coefficient of the head car increase with the rainfall intensity. This research proposes a methodology to systematically analyze the generation of water film on the train surface and its influence on the train aerodynamic performance; the analysis can provide more practical results and can serve as a reference basis for the design and development of high-speed trains.
2024, 37: 42.
doi: 10.1186/s10033-024-01015-7
Abstract:
Fuel consumption is one of the main concerns for heavy-duty trucks. Predictive cruise control (PCC) provides an intriguing opportunity to reduce fuel consumption by using the upcoming road information. In this study, a real-time implementable PCC, which simultaneously optimizes engine torque and gear shifting, is proposed for heavy-duty trucks. To minimize fuel consumption, the problem of the PCC is formulated as a nonlinear model predictive control (MPC), in which the upcoming road elevation information is used. Finding the solution of the nonlinear MPC is time consuming; thus, a real-time implementable solver is developed based on Pontryagin's maximum principle and indirect shooting method. Dynamic programming (DP) algorithm, as a global optimization algorithm, is used as a performance benchmark for the proposed solver. Simulation, hardware-in-the-loop and real-truck experiments are conducted to verify the performance of the proposed controller. The results demonstrate that the MPC-based solution performs nearly as well as the DP-based solution, with less than 1% deviation for testing roads. Moreover, the proposed co-optimization controller is implementable in a real-truck, and the proposed MPC-based PCC algorithm achieves a fuel-saving rate of 7.9% without compromising the truck's travel time.
Fuel consumption is one of the main concerns for heavy-duty trucks. Predictive cruise control (PCC) provides an intriguing opportunity to reduce fuel consumption by using the upcoming road information. In this study, a real-time implementable PCC, which simultaneously optimizes engine torque and gear shifting, is proposed for heavy-duty trucks. To minimize fuel consumption, the problem of the PCC is formulated as a nonlinear model predictive control (MPC), in which the upcoming road elevation information is used. Finding the solution of the nonlinear MPC is time consuming; thus, a real-time implementable solver is developed based on Pontryagin's maximum principle and indirect shooting method. Dynamic programming (DP) algorithm, as a global optimization algorithm, is used as a performance benchmark for the proposed solver. Simulation, hardware-in-the-loop and real-truck experiments are conducted to verify the performance of the proposed controller. The results demonstrate that the MPC-based solution performs nearly as well as the DP-based solution, with less than 1% deviation for testing roads. Moreover, the proposed co-optimization controller is implementable in a real-truck, and the proposed MPC-based PCC algorithm achieves a fuel-saving rate of 7.9% without compromising the truck's travel time.
2024, 37: 50.
doi: 10.1186/s10033-024-01035-3
Abstract:
This paper aims to develop an automatic miscalibration detection and correction framework to maintain accurate calibration of LiDAR and camera for autonomous vehicle after the sensor drift. First, a monitoring algorithm that can continuously detect the miscalibration in each frame is designed, leveraging the rotational motion each individual sensor observes. Then, as sensor drift occurs, the projection constraints between visual feature points and LiDAR 3-D points are used to compute the scaled camera motion, which is further utilized to align the drifted LiDAR scan with the camera image. Finally, the proposed method is sufficiently compared with two representative approaches in the online experiments with varying levels of random drift, then the method is further extended to the offline calibration experiment and is demonstrated by a comparison with two existing benchmark methods.
This paper aims to develop an automatic miscalibration detection and correction framework to maintain accurate calibration of LiDAR and camera for autonomous vehicle after the sensor drift. First, a monitoring algorithm that can continuously detect the miscalibration in each frame is designed, leveraging the rotational motion each individual sensor observes. Then, as sensor drift occurs, the projection constraints between visual feature points and LiDAR 3-D points are used to compute the scaled camera motion, which is further utilized to align the drifted LiDAR scan with the camera image. Finally, the proposed method is sufficiently compared with two representative approaches in the online experiments with varying levels of random drift, then the method is further extended to the offline calibration experiment and is demonstrated by a comparison with two existing benchmark methods.
2024, 37: 58.
doi: 10.1186/s10033-024-01039-z
Abstract:
Because of significantly changed load and complex and variable driving road conditions of commercial vehicles, pneumatic suspension with lower natural frequencies is widely used in commercial vehicle suspension system. However, traditional pneumatic suspension system is hardly to respond the greatly changed load of commercial vehicles. To address this issue, a new Gas-Interconnected Quasi-Zero Stiffness Pneumatic Suspension (GIQZSPS) is presented in this paper to improve the vibration isolation performance of commercial vehicle suspension systems under frequent load changes. This new structure adds negative stiffness air chambers on traditional pneumatic suspension to reduce the natural frequency of the suspension. It can adapt to different loads and road conditions by adjusting the solenoid valves between the negative stiffness air chambers. Firstly, a nonlinear mechanical model including the dimensionless stiffness characteristic and interconnected pipeline model is derived for GIQZSPS system. By the nonlinear mechanical model of GIQZSPS system, the force transmissibility rate is chosen as the evaluation index to analyze characteristics. Furthermore, a testing bench simulating 1/4 GIQZSPS system is designed, and the testing analysis of the model validation and isolating performance is carried out. The results show that compared to traditional pneumatic suspension, the GIQZSPS designed in the article has a lower natural frequency. And the system can achieve better vibration isolation performance under different load states by switching the solenoid valves between air chambers.
Because of significantly changed load and complex and variable driving road conditions of commercial vehicles, pneumatic suspension with lower natural frequencies is widely used in commercial vehicle suspension system. However, traditional pneumatic suspension system is hardly to respond the greatly changed load of commercial vehicles. To address this issue, a new Gas-Interconnected Quasi-Zero Stiffness Pneumatic Suspension (GIQZSPS) is presented in this paper to improve the vibration isolation performance of commercial vehicle suspension systems under frequent load changes. This new structure adds negative stiffness air chambers on traditional pneumatic suspension to reduce the natural frequency of the suspension. It can adapt to different loads and road conditions by adjusting the solenoid valves between the negative stiffness air chambers. Firstly, a nonlinear mechanical model including the dimensionless stiffness characteristic and interconnected pipeline model is derived for GIQZSPS system. By the nonlinear mechanical model of GIQZSPS system, the force transmissibility rate is chosen as the evaluation index to analyze characteristics. Furthermore, a testing bench simulating 1/4 GIQZSPS system is designed, and the testing analysis of the model validation and isolating performance is carried out. The results show that compared to traditional pneumatic suspension, the GIQZSPS designed in the article has a lower natural frequency. And the system can achieve better vibration isolation performance under different load states by switching the solenoid valves between air chambers.
2024, 37: 11.
doi: 10.1186/s10033-024-00993-y
Abstract:
Accurate vehicle dynamic information plays an important role in vehicle driving safety. However, due to the characteristics of high mobility and multiple controllable degrees of freedom of drive-by-wire chassis vehicles, the current mature application of traditional vehicle state estimation algorithms can not meet the requirements of drive-by-wire chassis vehicle state estimation. This paper proposes a state estimation method for drive-by-wire chassis vehicle based on the dual unscented particle filter algorithm, which make full use of the known advantages of the four-wheel drive torque and steer angle parameters of the drive-by-wire chassis vehicle. In the dual unscented particle filter algorithm, two unscented particle filter transfer information to each other, observe the vehicle state information and the tire force parameter information of the four wheels respectively, which reduce the influence of parameter uncertainty and model parameter changes on the estimation accuracy during driving. The performance with the dual unscented particle filter algorithm, which is analyzed in terms of the time-average square error, is superior of the unscented Kalman filter algorithm. The effectiveness of the algorithm is further verified by driving simulator test. In this paper, a vehicle state estimator based on dual unscented particle filter algorithm was proposed for the first time to improve the estimation accuracy of vehicle parameters and states.
Accurate vehicle dynamic information plays an important role in vehicle driving safety. However, due to the characteristics of high mobility and multiple controllable degrees of freedom of drive-by-wire chassis vehicles, the current mature application of traditional vehicle state estimation algorithms can not meet the requirements of drive-by-wire chassis vehicle state estimation. This paper proposes a state estimation method for drive-by-wire chassis vehicle based on the dual unscented particle filter algorithm, which make full use of the known advantages of the four-wheel drive torque and steer angle parameters of the drive-by-wire chassis vehicle. In the dual unscented particle filter algorithm, two unscented particle filter transfer information to each other, observe the vehicle state information and the tire force parameter information of the four wheels respectively, which reduce the influence of parameter uncertainty and model parameter changes on the estimation accuracy during driving. The performance with the dual unscented particle filter algorithm, which is analyzed in terms of the time-average square error, is superior of the unscented Kalman filter algorithm. The effectiveness of the algorithm is further verified by driving simulator test. In this paper, a vehicle state estimator based on dual unscented particle filter algorithm was proposed for the first time to improve the estimation accuracy of vehicle parameters and states.
2024, 37: 36.
doi: 10.1186/s10033-024-01024-6
Abstract:
Battery remaining charging time (RCT) prediction can facilitate charging management and alleviate mileage anxiety for electric vehicles (EVs). Also, it is of great significance to improve EV users' experience. However, the RCT for a lithium-ion battery pack in EVs changes with temperature and other battery parameters. This study proposes an electrothermal model-based method to accurately predict battery RCT. Firstly, a characteristic battery cell is adopted to represent the battery pack, thus an equivalent circuit model (ECM) of the characteristic battery cell is established to describe the electrical behaviors of a battery pack. Secondly, an equivalent thermal model (ETM) of the battery pack is developed by considering the influence of ambient temperature, thermal management, and battery connectors in the battery pack to calculate the temperature which is then fed back to the ECM to realize electrothermal coupling. Finally, the RCT prediction method is proposed based on the electrothermal model and validated in the wide temperature range from − 20 ℃ to 45 ℃. The experimental results show that the prediction error of the RCT in the whole temperature range is less than 1.5%.
Battery remaining charging time (RCT) prediction can facilitate charging management and alleviate mileage anxiety for electric vehicles (EVs). Also, it is of great significance to improve EV users' experience. However, the RCT for a lithium-ion battery pack in EVs changes with temperature and other battery parameters. This study proposes an electrothermal model-based method to accurately predict battery RCT. Firstly, a characteristic battery cell is adopted to represent the battery pack, thus an equivalent circuit model (ECM) of the characteristic battery cell is established to describe the electrical behaviors of a battery pack. Secondly, an equivalent thermal model (ETM) of the battery pack is developed by considering the influence of ambient temperature, thermal management, and battery connectors in the battery pack to calculate the temperature which is then fed back to the ECM to realize electrothermal coupling. Finally, the RCT prediction method is proposed based on the electrothermal model and validated in the wide temperature range from − 20 ℃ to 45 ℃. The experimental results show that the prediction error of the RCT in the whole temperature range is less than 1.5%.
2024, 37: 77.
doi: 10.1186/s10033-024-01052-2
Abstract:
The current research on the integrity of critical structures of rail vehicles mainly focuses on the design stage, which needs an effective method for assessing the service state. This paper proposes a framework for predicting the remaining useful life (RUL) of in-service structures with and without visible cracks. The hypothetical distribution and delay time models were used to apply the equivalent crack growth life data of heavy-duty railway cast steel knuckles, which revealed the evolution characteristics of the crack length and life scores of the knuckle under different fracture failure modes. The results indicate that the method effectively predicts the RUL of service knuckles in different failure modes based on the cumulative failure probability curves for different locations and surface crack lengths. This study proposes an RUL prediction framework that supports the dynamic overhaul and state maintenance of knuckle fatigue cracks.
The current research on the integrity of critical structures of rail vehicles mainly focuses on the design stage, which needs an effective method for assessing the service state. This paper proposes a framework for predicting the remaining useful life (RUL) of in-service structures with and without visible cracks. The hypothetical distribution and delay time models were used to apply the equivalent crack growth life data of heavy-duty railway cast steel knuckles, which revealed the evolution characteristics of the crack length and life scores of the knuckle under different fracture failure modes. The results indicate that the method effectively predicts the RUL of service knuckles in different failure modes based on the cumulative failure probability curves for different locations and surface crack lengths. This study proposes an RUL prediction framework that supports the dynamic overhaul and state maintenance of knuckle fatigue cracks.
2024, 37: 20.
doi: 10.1186/s10033-024-00997-8
Abstract:
This paper presents an integrated control scheme for enhancing the ride comfort and handling performance of a four-wheel-independent-drive electric vehicle through the coordination of active suspension system (ASS) and anti-lock braking system (ABS). First, a longitudinal-vertical coupled vehicle dynamics model is established by integrating a road input model. Then the coupling mechanisms between longitudinal and vertical vehicle dynamics are analyzed. An ASS-ABS integrated control system is proposed, utilizing an H∞ controller for ASS to optimize load transfer effect and a neural network sliding mode control for ABS implementation. Finally, the effectiveness of the proposed control scheme is evaluated through comprehensive tests conducted on a hardware-in-loop (HIL) test platform. The HIL test results demonstrate that the proposed control scheme can significantly improve the braking performance and ride comfort compared to conventional ABS control methods.
This paper presents an integrated control scheme for enhancing the ride comfort and handling performance of a four-wheel-independent-drive electric vehicle through the coordination of active suspension system (ASS) and anti-lock braking system (ABS). First, a longitudinal-vertical coupled vehicle dynamics model is established by integrating a road input model. Then the coupling mechanisms between longitudinal and vertical vehicle dynamics are analyzed. An ASS-ABS integrated control system is proposed, utilizing an H∞ controller for ASS to optimize load transfer effect and a neural network sliding mode control for ABS implementation. Finally, the effectiveness of the proposed control scheme is evaluated through comprehensive tests conducted on a hardware-in-loop (HIL) test platform. The HIL test results demonstrate that the proposed control scheme can significantly improve the braking performance and ride comfort compared to conventional ABS control methods.
2024, 37: 10.
doi: 10.1186/s10033-024-00999-6
Abstract:
Four-wheel independently driven electric vehicles (FWID-EV) endow a flexible and scalable control framework to improve vehicle performance. This paper integrates the torque vectoring and active suspension system (ASS) to enhance the vehicle’s longitudinal and vertical motion control performance. While the nonlinear characteristic of the tire model leads to a relatively heavier computational burden. To facilitate the controller design and ease the load, a half-vehicle dynamics system is built and simplified to the linear-time-varying (LTV) model. Then a model predictive controller is developed by formulating the objective function by comprehensively considering the safety, energy-saving and comfort requirements. The in-wheel motor efficiency and the power loss of tire slip are treated as optimization indices in this work to reduce energy consumption. Finally, the effectiveness of the proposed controller is verified through the rapid-control-prototype (RCP) test. The results demonstrate the enhancement of the energy-saving as well as comfort on the basis of vehicle stability.
Four-wheel independently driven electric vehicles (FWID-EV) endow a flexible and scalable control framework to improve vehicle performance. This paper integrates the torque vectoring and active suspension system (ASS) to enhance the vehicle’s longitudinal and vertical motion control performance. While the nonlinear characteristic of the tire model leads to a relatively heavier computational burden. To facilitate the controller design and ease the load, a half-vehicle dynamics system is built and simplified to the linear-time-varying (LTV) model. Then a model predictive controller is developed by formulating the objective function by comprehensively considering the safety, energy-saving and comfort requirements. The in-wheel motor efficiency and the power loss of tire slip are treated as optimization indices in this work to reduce energy consumption. Finally, the effectiveness of the proposed controller is verified through the rapid-control-prototype (RCP) test. The results demonstrate the enhancement of the energy-saving as well as comfort on the basis of vehicle stability.
2024, 37: 128.
doi: 10.1186/s10033-024-01135-0
Abstract:
The cable bracket is one of the crucial components of high-speed Electric Multiple Units (EMUs), which is fixed to the axle box by bolts to support the cable. As an important parameter of the joint surface, contact stiffness significantly affects the dynamic response and service life of the cable bracket. However, it is difficult to directly measure the contact stiffness of the joint surface. As a result, an identification method is proposed in this investigation to identify the contact stiffness. A finite element model incorporating both normal and tangential stiffness parameters is developed. According to the finite element model and modal testing results, an improved particle swarm optimization algorithm is employed to identify the contact stiffness of the joint surface. The effect of the contact stiffness on the vibrations of the cable bracket is investigated. The findings indicate that pre-tightening torque significantly influences the contact stiffness of the cable bracket. The contact stiffness has a great effect on the vibrations of the cable bracket. Optimal contact stiffness notably reduces vibrations of the cable bracket, thereby extending its service life.
The cable bracket is one of the crucial components of high-speed Electric Multiple Units (EMUs), which is fixed to the axle box by bolts to support the cable. As an important parameter of the joint surface, contact stiffness significantly affects the dynamic response and service life of the cable bracket. However, it is difficult to directly measure the contact stiffness of the joint surface. As a result, an identification method is proposed in this investigation to identify the contact stiffness. A finite element model incorporating both normal and tangential stiffness parameters is developed. According to the finite element model and modal testing results, an improved particle swarm optimization algorithm is employed to identify the contact stiffness of the joint surface. The effect of the contact stiffness on the vibrations of the cable bracket is investigated. The findings indicate that pre-tightening torque significantly influences the contact stiffness of the cable bracket. The contact stiffness has a great effect on the vibrations of the cable bracket. Optimal contact stiffness notably reduces vibrations of the cable bracket, thereby extending its service life.
2024, 37: 124.
doi: 10.1186/s10033-024-01115-4
Abstract:
Considering that the clutch cover assembly and driven disc assembly show common effect on the engagement/disengagement characteristics of the pull-type diaphragm spring clutches for heavy-duty commercial vehicles, the diaphragm spring, cushion plate, and friction plate, are thoroughly analyzed in this paper. The A-L method and the micro-element method are used to analyze the mechanical properties of diaphragm spring and cushion plate, respectively. The mechanical characteristics are obtained via numerical simulation, and the deformation and load mechanical characteristics of the cushion plate are verified by experimental tests. According to the relationship between the pressure plate temperature and the friction coefficient of the friction plate, the influence of the change of the friction coefficient on the transmission torque characteristics of the clutch is analyzed. In view of the torque fluctuation in the process of engagement/disengagement, the mathematical model of torsional characteristics is established with consideration of the torsional characteristics of torsional damper. Modeling and simulation of the handling characteristics are carried out to evaluate the influence of the boosting characteristics of the hydraulic operated pneumatic booster on the clutch pedal operating force separation characteristics. Specific tests are also conducted, and the effectiveness of the established models is verified.
Considering that the clutch cover assembly and driven disc assembly show common effect on the engagement/disengagement characteristics of the pull-type diaphragm spring clutches for heavy-duty commercial vehicles, the diaphragm spring, cushion plate, and friction plate, are thoroughly analyzed in this paper. The A-L method and the micro-element method are used to analyze the mechanical properties of diaphragm spring and cushion plate, respectively. The mechanical characteristics are obtained via numerical simulation, and the deformation and load mechanical characteristics of the cushion plate are verified by experimental tests. According to the relationship between the pressure plate temperature and the friction coefficient of the friction plate, the influence of the change of the friction coefficient on the transmission torque characteristics of the clutch is analyzed. In view of the torque fluctuation in the process of engagement/disengagement, the mathematical model of torsional characteristics is established with consideration of the torsional characteristics of torsional damper. Modeling and simulation of the handling characteristics are carried out to evaluate the influence of the boosting characteristics of the hydraulic operated pneumatic booster on the clutch pedal operating force separation characteristics. Specific tests are also conducted, and the effectiveness of the established models is verified.
2024, 37: 43.
doi: 10.1186/s10033-024-01026-4
Abstract:
The new energy vehicle plays a crucial role in green transportation, and the energy management strategy of hybrid power systems is essential for ensuring energy-efficient driving. This paper presents a state-of-the-art survey and review of reinforcement learning-based energy management strategies for hybrid power systems. Additionally, it envisions the outlook for autonomous intelligent hybrid electric vehicles, with reinforcement learning as the foundational technology. First of all, to provide a macro view of historical development, the brief history of deep learning, reinforcement learning, and deep reinforcement learning is presented in the form of a timeline. Then, the comprehensive survey and review are conducted by collecting papers from mainstream academic databases. Enumerating most of the contributions based on three main directions—algorithm innovation, powertrain innovation, and environment innovation—provides an objective review of the research status. Finally, to advance the application of reinforcement learning in autonomous intelligent hybrid electric vehicles, future research plans positioned as "Alpha HEV" are envisioned, integrating Autopilot and energy-saving control.
The new energy vehicle plays a crucial role in green transportation, and the energy management strategy of hybrid power systems is essential for ensuring energy-efficient driving. This paper presents a state-of-the-art survey and review of reinforcement learning-based energy management strategies for hybrid power systems. Additionally, it envisions the outlook for autonomous intelligent hybrid electric vehicles, with reinforcement learning as the foundational technology. First of all, to provide a macro view of historical development, the brief history of deep learning, reinforcement learning, and deep reinforcement learning is presented in the form of a timeline. Then, the comprehensive survey and review are conducted by collecting papers from mainstream academic databases. Enumerating most of the contributions based on three main directions—algorithm innovation, powertrain innovation, and environment innovation—provides an objective review of the research status. Finally, to advance the application of reinforcement learning in autonomous intelligent hybrid electric vehicles, future research plans positioned as "Alpha HEV" are envisioned, integrating Autopilot and energy-saving control.
2024, 37: 71.
doi: 10.1186/s10033-024-01055-z
Abstract:
Prognostics and health management (PHM) has gotten considerable attention in the background of Industry 4.0. Battery PHM contributes to the reliable and safe operation of electric devices. Nevertheless, relevant reviews are still continuously updated over time. In this paper, we browsed extensive literature related to battery PHM from 2018 to 2023 and summarized advances in battery PHM field, including battery testing and public datasets, fault diagnosis and prediction methods, health status estimation and health management methods. The last topic includes state of health estimation methods, remaining useful life prediction methods and predictive maintenance methods. Each of these categories is introduced and discussed in details. Based on this survey, we accordingly discuss challenges left to battery PHM, and provide future research opportunities. This research systematically reviews recent research about battery PHM from the perspective of key PHM steps and provide some valuable prospects for researchers and practitioners.
Prognostics and health management (PHM) has gotten considerable attention in the background of Industry 4.0. Battery PHM contributes to the reliable and safe operation of electric devices. Nevertheless, relevant reviews are still continuously updated over time. In this paper, we browsed extensive literature related to battery PHM from 2018 to 2023 and summarized advances in battery PHM field, including battery testing and public datasets, fault diagnosis and prediction methods, health status estimation and health management methods. The last topic includes state of health estimation methods, remaining useful life prediction methods and predictive maintenance methods. Each of these categories is introduced and discussed in details. Based on this survey, we accordingly discuss challenges left to battery PHM, and provide future research opportunities. This research systematically reviews recent research about battery PHM from the perspective of key PHM steps and provide some valuable prospects for researchers and practitioners.
2024, 37: 69.
doi: 10.1186/s10033-024-01056-y
Abstract:
Physical assistive robotics are oriented to support and improve functional capacities of people. In physical rehabilitation, robots are indeed useful for functional recovery of affected limb. However, there are still open questions related to technological aspects. This work presents a systematic review of upper limb rehabilitation robotics in order to analyze and establish technological challenges and future directions in this area. A bibliometric analysis was performed for the systematic literature review. Literature from the last six years, conducted between August 2020 and May 2021, was reviewed. The methodology for the literature search and a bibliometric analysis of the metadata are presented. After a preliminary search resulted in 820 articles, a total of 66 articles were included. A concurrency network and bibliographic analysis were provided. And an analysis of occurrences, taxonomy, and rehabilitation robotics reported in the literature is presented. This review aims to provide to the scientific community an overview of the state of the art in assistive robotics for upper limb physical rehabilitation. The literature analysis allows access to a gap of unexplored options to define the technological prospects applied to upper limb physical rehabilitation robotics.
Physical assistive robotics are oriented to support and improve functional capacities of people. In physical rehabilitation, robots are indeed useful for functional recovery of affected limb. However, there are still open questions related to technological aspects. This work presents a systematic review of upper limb rehabilitation robotics in order to analyze and establish technological challenges and future directions in this area. A bibliometric analysis was performed for the systematic literature review. Literature from the last six years, conducted between August 2020 and May 2021, was reviewed. The methodology for the literature search and a bibliometric analysis of the metadata are presented. After a preliminary search resulted in 820 articles, a total of 66 articles were included. A concurrency network and bibliographic analysis were provided. And an analysis of occurrences, taxonomy, and rehabilitation robotics reported in the literature is presented. This review aims to provide to the scientific community an overview of the state of the art in assistive robotics for upper limb physical rehabilitation. The literature analysis allows access to a gap of unexplored options to define the technological prospects applied to upper limb physical rehabilitation robotics.
2024, 37: 17.
doi: 10.1186/s10033-024-01004-w
Abstract:
An increasing number of researchers have researched fixture layout optimization for thin-walled part assembly during the past decades. However, few papers systematically review these researches. By analyzing existing literature, this paper summarizes the process of fixture layout optimization and the methods applied. The process of optimization is made up of optimization objective setting, assembly variation/deformation modeling, and fixture layout optimization. This paper makes a review of the fixture layout for thin-walled parts according to these three steps. First, two different kinds of optimization objectives are introduced. Researchers usually consider in-plane variations or out-of-plane deformations when designing objectives. Then, modeling methods for assembly variation and deformation are divided into two categories: Mechanism-based and data-based methods. Several common methods are discussed respectively. After that, optimization algorithms are reviewed systematically. There are two kinds of optimization algorithms: Traditional nonlinear programming and heuristic algorithms. Finally, discussions on the current situation are provided. The research direction of fixture layout optimization in the future is discussed from three aspects: Objective setting, improving modeling accuracy and optimization algorithms. Also, a new research point for fixture layout optimization is discussed. This paper systematically reviews the research on fixture layout optimization for thin-walled parts, and provides a reference for future research in this field.
An increasing number of researchers have researched fixture layout optimization for thin-walled part assembly during the past decades. However, few papers systematically review these researches. By analyzing existing literature, this paper summarizes the process of fixture layout optimization and the methods applied. The process of optimization is made up of optimization objective setting, assembly variation/deformation modeling, and fixture layout optimization. This paper makes a review of the fixture layout for thin-walled parts according to these three steps. First, two different kinds of optimization objectives are introduced. Researchers usually consider in-plane variations or out-of-plane deformations when designing objectives. Then, modeling methods for assembly variation and deformation are divided into two categories: Mechanism-based and data-based methods. Several common methods are discussed respectively. After that, optimization algorithms are reviewed systematically. There are two kinds of optimization algorithms: Traditional nonlinear programming and heuristic algorithms. Finally, discussions on the current situation are provided. The research direction of fixture layout optimization in the future is discussed from three aspects: Objective setting, improving modeling accuracy and optimization algorithms. Also, a new research point for fixture layout optimization is discussed. This paper systematically reviews the research on fixture layout optimization for thin-walled parts, and provides a reference for future research in this field.
2024, 37: 47.
doi: 10.1186/s10033-024-01036-2
Abstract:
Machine tools, often referred to as the "mother machines" of the manufacturing industry, are crucial in developing smart manufacturing and are increasingly becoming more intelligent. Digital twin technology can promote machine tool intelligence and has attracted considerable research interest. However, there is a lack of clear and systematic analyses on how the digital twin technology enables machine tool intelligence. Herein, digital twin modeling was identified as an enabling technology for machine tool intelligence based on a comparative study of the characteristics of machine tool intelligence and digital twin. The review then delves into state-of-the-art digital twin modeling-enabled machine tool intelligence, examining it from the aspects of data-based modeling and mechanism-data dual-driven modeling. Additionally, it highlights three bottleneck issues facing the field. Considering these problems, the architecture of a digital twin machine tool (DTMT) is proposed, and three key technologies are expounded in detail: Data perception and fusion technology, mechanism-data-knowledge hybrid-driven digital twin modeling and virtual-real synchronization technology, and dynamic optimization and collaborative control technology for multilevel parameters. Finally, future research directions for the DTMT are discussed. This work can provide a foundation basis for the research and implementation of digital-twin modeling-enabled machine tool intelligence, making it significant for developing intelligent machine tools.
Machine tools, often referred to as the "mother machines" of the manufacturing industry, are crucial in developing smart manufacturing and are increasingly becoming more intelligent. Digital twin technology can promote machine tool intelligence and has attracted considerable research interest. However, there is a lack of clear and systematic analyses on how the digital twin technology enables machine tool intelligence. Herein, digital twin modeling was identified as an enabling technology for machine tool intelligence based on a comparative study of the characteristics of machine tool intelligence and digital twin. The review then delves into state-of-the-art digital twin modeling-enabled machine tool intelligence, examining it from the aspects of data-based modeling and mechanism-data dual-driven modeling. Additionally, it highlights three bottleneck issues facing the field. Considering these problems, the architecture of a digital twin machine tool (DTMT) is proposed, and three key technologies are expounded in detail: Data perception and fusion technology, mechanism-data-knowledge hybrid-driven digital twin modeling and virtual-real synchronization technology, and dynamic optimization and collaborative control technology for multilevel parameters. Finally, future research directions for the DTMT are discussed. This work can provide a foundation basis for the research and implementation of digital-twin modeling-enabled machine tool intelligence, making it significant for developing intelligent machine tools.
2024, 37: 156.
doi: 10.1186/s10033-024-01149-8
Abstract:
Cable-driven parallel robots (CDPRs) use cables instead of the rigid limbs of traditional parallel robots, thus processing a large potential workspace, easy to assemble and disassemble characteristics, and with applications in numerous fields. However, owing to the influence of cable flexibility and nonlinear friction, model uncertainties are difficult to eliminate from the control design. Hence, in this study, the model uncertainties of CDPRs are first analyzed based on a brief introduction to related research. Control strategies for CDPRs with model uncertainties are then reviewed. The advantages and disadvantages of several control strategies for CDPRS are discussed through traditional control strategies with kinematic and dynamic uncertainties. Compared with these traditional control strategies, deep reinforcement learning and model predictive control have received widespread attention in recent years owing to their model independence and recursive feasibility with constraint limits. A comprehensive review and brief analysis of current advances in these two control strategies for CDPRs with model uncertainties are presented, concluding with discussions regarding development directions.
Cable-driven parallel robots (CDPRs) use cables instead of the rigid limbs of traditional parallel robots, thus processing a large potential workspace, easy to assemble and disassemble characteristics, and with applications in numerous fields. However, owing to the influence of cable flexibility and nonlinear friction, model uncertainties are difficult to eliminate from the control design. Hence, in this study, the model uncertainties of CDPRs are first analyzed based on a brief introduction to related research. Control strategies for CDPRs with model uncertainties are then reviewed. The advantages and disadvantages of several control strategies for CDPRS are discussed through traditional control strategies with kinematic and dynamic uncertainties. Compared with these traditional control strategies, deep reinforcement learning and model predictive control have received widespread attention in recent years owing to their model independence and recursive feasibility with constraint limits. A comprehensive review and brief analysis of current advances in these two control strategies for CDPRs with model uncertainties are presented, concluding with discussions regarding development directions.
2024, 37: 9.
doi: 10.1186/s10033-024-00998-7
Abstract:
The human digital twin (HDT) emerges as a promising human-centric technology in Industry 5.0, but challenges remain in human modeling and simulation. Digital human modeling (DHM) provides solutions for modeling and simulating human physical and cognitive aspects to support ergonomic analysis. However, it has limitations in real-time data usage, personalized services, and timely interaction. The emerging HDT concept offers new possibilities by integrating multi-source data and artificial intelligence for continuous monitoring and assessment. Hence, this paper reviews the evolution from DHM to HDT and proposes a unified HDT framework from a human factors perspective. The framework comprises the physical twin, the virtual twin, and the linkage between these two. The virtual twin integrates human modeling and AI engines to enable model-data-hybrid-enabled simulation. HDT can potentially upgrade traditional ergonomic methods to intelligent services through real-time analysis, timely feedback, and bidirectional interactions. Finally, the future perspectives of HDT for industrial applications as well as technical and social challenges are discussed. In general, this study outlines a human factors perspective on HDT for the first time, which is useful for cross-disciplinary research and human factors innovation to enhance the development of HDT in industry.
The human digital twin (HDT) emerges as a promising human-centric technology in Industry 5.0, but challenges remain in human modeling and simulation. Digital human modeling (DHM) provides solutions for modeling and simulating human physical and cognitive aspects to support ergonomic analysis. However, it has limitations in real-time data usage, personalized services, and timely interaction. The emerging HDT concept offers new possibilities by integrating multi-source data and artificial intelligence for continuous monitoring and assessment. Hence, this paper reviews the evolution from DHM to HDT and proposes a unified HDT framework from a human factors perspective. The framework comprises the physical twin, the virtual twin, and the linkage between these two. The virtual twin integrates human modeling and AI engines to enable model-data-hybrid-enabled simulation. HDT can potentially upgrade traditional ergonomic methods to intelligent services through real-time analysis, timely feedback, and bidirectional interactions. Finally, the future perspectives of HDT for industrial applications as well as technical and social challenges are discussed. In general, this study outlines a human factors perspective on HDT for the first time, which is useful for cross-disciplinary research and human factors innovation to enhance the development of HDT in industry.
2024, 37: 23.
doi: 10.1186/s10033-024-01002-y
Abstract:
Grinding, a critical precision machining process for difficult-to-cut alloys, has undergone continual technological advancements to improve machining efficiency. However, the sustainability of this process is gaining heightened attention due to significant challenges associated with the substantial specific grinding energy and the extensive heat generated when working with difficult-to-cut alloys, renowned for their exceptional physical and mechanical properties. In response to these challenges, the widespread application of massive coolant in manufacturing industries to dissipate grinding heat has led to complex post-cleaning and disposal processes. This, in turn, has resulted in issues such as large energy consumption, a considerable carbon footprint, and concerns related to worker health and safety, which have become the main factors that restrict the development of grinding technology. This paper provides a holistic review of sustainability in grinding difficult-to-cut alloys, encompassing current trends and future directions. The examination extends to developing grinding technologies explicitly tailored for these alloys, comprehensively evaluating their sustainability performance. Additionally, the exploration delves into innovative sustainable technologies, such as heat pipe/oscillating heat pipe grinding wheels, minimum quantity lubrication, cryogenic cooling, and others. These groundbreaking technologies aim to reduce dependence on hazardous coolants, minimizing energy and resource consumption and carbon emissions associated with coolant-related or subsequent disposal processes. The essence of these technologies lies in their potential to revolutionize traditional grinding practices, presenting environmentally friendly alternatives. Finally, future development trends and research directions are put forward to pursue the current limitation of sustainable grinding for difficult-to-cut alloys. This paper can guide future research and development efforts toward more environmentally friendly grinding operations by understanding the current state of sustainable grinding and identifying emerging trends.
Grinding, a critical precision machining process for difficult-to-cut alloys, has undergone continual technological advancements to improve machining efficiency. However, the sustainability of this process is gaining heightened attention due to significant challenges associated with the substantial specific grinding energy and the extensive heat generated when working with difficult-to-cut alloys, renowned for their exceptional physical and mechanical properties. In response to these challenges, the widespread application of massive coolant in manufacturing industries to dissipate grinding heat has led to complex post-cleaning and disposal processes. This, in turn, has resulted in issues such as large energy consumption, a considerable carbon footprint, and concerns related to worker health and safety, which have become the main factors that restrict the development of grinding technology. This paper provides a holistic review of sustainability in grinding difficult-to-cut alloys, encompassing current trends and future directions. The examination extends to developing grinding technologies explicitly tailored for these alloys, comprehensively evaluating their sustainability performance. Additionally, the exploration delves into innovative sustainable technologies, such as heat pipe/oscillating heat pipe grinding wheels, minimum quantity lubrication, cryogenic cooling, and others. These groundbreaking technologies aim to reduce dependence on hazardous coolants, minimizing energy and resource consumption and carbon emissions associated with coolant-related or subsequent disposal processes. The essence of these technologies lies in their potential to revolutionize traditional grinding practices, presenting environmentally friendly alternatives. Finally, future development trends and research directions are put forward to pursue the current limitation of sustainable grinding for difficult-to-cut alloys. This paper can guide future research and development efforts toward more environmentally friendly grinding operations by understanding the current state of sustainable grinding and identifying emerging trends.
2024, 37: 87.
doi: 10.1186/s10033-024-01064-y
Abstract:
Titanium and its alloys have been widely applied in many biomedical fields because of its excellent mechanical properties, corrosion resistance and good biocompatibility. However, problems such as rejection, shedding and infection will occur after titanium alloy implantation due to the low biological activity of titanium alloy surface. The structures with specific functions, which can enhance osseointegration and antibacterial properties, are fabricated on the surface of titanium implants to improve the biological activity between the titanium implants and human tissues. This paper presents a comprehensive review of recent developments and applications of surface functional structure in titanium and titanium alloy implants. The applications of surface functional structure on different titanium and titanium alloy implants are introduced, and their manufacturing technologies are summarized and compared. Furthermore, the fabrication of various surface functional structures used for titanium and titanium alloy implants is reviewed and analyzed in detail. Finally, the challenges affecting the development of surface functional structures applied in titanium and titanium alloy implants are outlined, and recommendations for future research are presented.
Titanium and its alloys have been widely applied in many biomedical fields because of its excellent mechanical properties, corrosion resistance and good biocompatibility. However, problems such as rejection, shedding and infection will occur after titanium alloy implantation due to the low biological activity of titanium alloy surface. The structures with specific functions, which can enhance osseointegration and antibacterial properties, are fabricated on the surface of titanium implants to improve the biological activity between the titanium implants and human tissues. This paper presents a comprehensive review of recent developments and applications of surface functional structure in titanium and titanium alloy implants. The applications of surface functional structure on different titanium and titanium alloy implants are introduced, and their manufacturing technologies are summarized and compared. Furthermore, the fabrication of various surface functional structures used for titanium and titanium alloy implants is reviewed and analyzed in detail. Finally, the challenges affecting the development of surface functional structures applied in titanium and titanium alloy implants are outlined, and recommendations for future research are presented.
2024, 37: 78.
doi: 10.1186/s10033-024-01050-4
Abstract:
Efficiency of calculating a dynamic response is an important point of the compliant mechanism for posture adjustment. Dynamic modeling with low orders of a 2R1T compliant parallel mechanism is studied in the paper. The mechanism with two out-of-plane rotational and one lifting degrees of freedom (DoFs) plays an important role in posture adjustment. Based on elastic beam theory, the stiffness matrix and mass matrix of the beam element are established where the moment of inertia is considered. To improve solving efficiency, a dynamic model with low orders of the mechanism is established based on a modified modal synthesis method. Firstly, each branch of the RPR type mechanism is divided into a substructure. Subsequently, a set of hypothetical modes of each substructure is obtained based on the C-B method. Finally, dynamic equation of the whole mechanism is established by the substructure assembly. A dynamic experiment is conducted to verify the dynamic characteristics of the compliant mechanism.
Efficiency of calculating a dynamic response is an important point of the compliant mechanism for posture adjustment. Dynamic modeling with low orders of a 2R1T compliant parallel mechanism is studied in the paper. The mechanism with two out-of-plane rotational and one lifting degrees of freedom (DoFs) plays an important role in posture adjustment. Based on elastic beam theory, the stiffness matrix and mass matrix of the beam element are established where the moment of inertia is considered. To improve solving efficiency, a dynamic model with low orders of the mechanism is established based on a modified modal synthesis method. Firstly, each branch of the RPR type mechanism is divided into a substructure. Subsequently, a set of hypothetical modes of each substructure is obtained based on the C-B method. Finally, dynamic equation of the whole mechanism is established by the substructure assembly. A dynamic experiment is conducted to verify the dynamic characteristics of the compliant mechanism.
2024, 37: 62.
doi: 10.1186/s10033-024-01045-1
Abstract:
Currently, two rotations and one translation (2R1T) three-degree-of-freedom (DOF) parallel mechanisms (PMs) are widely applied in five-DOF hybrid machining robots. However, there is a lack of an effective method to evaluate the configuration stiffness of mechanisms during the mechanism design stage. It is a challenge to select appropriate 2R1T PMs with excellent stiffness performance during the design stage. Considering the operational status of 2R1T PMs, the bending and torsional stiffness are considered as indices to evaluate PMs' configuration stiffness. Subsequently, a specific method is proposed to calculate these stiffness indices. Initially, the various types of structural and driving stiffness for each branch are assessed and their specific values defined. Subsequently, a rigid-flexible coupled force model for the over-constrained 2R1T PM is established, and the proposed evaluation method is used to analyze the configuration stiffness of the five 2R1T PMs in the entire workspace. Finally, the driving force and constraint force of each branch in the whole working space are calculated to further elucidate the stiffness evaluating results by using the proposed method above. The obtained results demonstrate that the bending and torsional stiffness of the 2RPU/UPR/RPR mechanism along the x and y-directions are larger than the other four mechanisms.
Currently, two rotations and one translation (2R1T) three-degree-of-freedom (DOF) parallel mechanisms (PMs) are widely applied in five-DOF hybrid machining robots. However, there is a lack of an effective method to evaluate the configuration stiffness of mechanisms during the mechanism design stage. It is a challenge to select appropriate 2R1T PMs with excellent stiffness performance during the design stage. Considering the operational status of 2R1T PMs, the bending and torsional stiffness are considered as indices to evaluate PMs' configuration stiffness. Subsequently, a specific method is proposed to calculate these stiffness indices. Initially, the various types of structural and driving stiffness for each branch are assessed and their specific values defined. Subsequently, a rigid-flexible coupled force model for the over-constrained 2R1T PM is established, and the proposed evaluation method is used to analyze the configuration stiffness of the five 2R1T PMs in the entire workspace. Finally, the driving force and constraint force of each branch in the whole working space are calculated to further elucidate the stiffness evaluating results by using the proposed method above. The obtained results demonstrate that the bending and torsional stiffness of the 2RPU/UPR/RPR mechanism along the x and y-directions are larger than the other four mechanisms.
2024, 37: 89.
doi: 10.1186/s10033-024-01060-2
Abstract:
The establishment of an elastostatic stiffness model for over constrained parallel manipulators (PMs), particularly those with over constrained subclosed loops, poses a challenge while ensuring numerical stability. This study addresses this issue by proposing a systematic elastostatic stiffness model based on matrix structural analysis (MSA) and independent displacement coordinates (IDCs) extraction techniques. To begin, the closed-loop PM is transformed into an open-loop PM by eliminating constraints. A subassembly element is then introduced, which considers the flexibility of both rods and joints. This approach helps circumvent the numerical instability typically encountered with traditional constraint equations. The IDCs and analytical constraint equations of nodes constrained by various joints are summarized in the appendix, utilizing multipoint constraint theory and singularity analysis, all unified within a single coordinate frame. Subsequently, the open-loop mechanism is efficiently closed by referencing the constraint equations presented in the appendix, alongside its elastostatic model. The proposed method proves to be both modeling and computationally efficient due to the comprehensive summary of the constraint equations in the Appendix, eliminating the need for additional equations. An example utilizing an over constrained subclosed loops demonstrate the application of the proposed method. In conclusion, the model proposed in this study enriches the theory of elastostatic stiffness modeling of PMs and provides an effective solution for stiffness modeling challenges they present.
The establishment of an elastostatic stiffness model for over constrained parallel manipulators (PMs), particularly those with over constrained subclosed loops, poses a challenge while ensuring numerical stability. This study addresses this issue by proposing a systematic elastostatic stiffness model based on matrix structural analysis (MSA) and independent displacement coordinates (IDCs) extraction techniques. To begin, the closed-loop PM is transformed into an open-loop PM by eliminating constraints. A subassembly element is then introduced, which considers the flexibility of both rods and joints. This approach helps circumvent the numerical instability typically encountered with traditional constraint equations. The IDCs and analytical constraint equations of nodes constrained by various joints are summarized in the appendix, utilizing multipoint constraint theory and singularity analysis, all unified within a single coordinate frame. Subsequently, the open-loop mechanism is efficiently closed by referencing the constraint equations presented in the appendix, alongside its elastostatic model. The proposed method proves to be both modeling and computationally efficient due to the comprehensive summary of the constraint equations in the Appendix, eliminating the need for additional equations. An example utilizing an over constrained subclosed loops demonstrate the application of the proposed method. In conclusion, the model proposed in this study enriches the theory of elastostatic stiffness modeling of PMs and provides an effective solution for stiffness modeling challenges they present.
2024, 37: 152.
doi: 10.1186/s10033-024-01130-5
Abstract:
Robot-automated spraying is widely used in various fields, such as the automotive, metalworking, furniture, and aerospace industries. Spraying quality is influenced by multiple factors, including robot speed, acceleration, end-effector trajectory, and spraying process constraints. To achieve high-quality spraying under the influence of multiple factors, this study proposes a multi-objective optimization method for the spraying trajectory that integrates spraying process constraints into the optimization process. First, a 7-degree-of-freedom rigid-flexible coupling serial spray painting robot system is introduced, which includes a motion decoupling mechanism and a tension amplification mechanism. Subsequently, a paint deposition model for the spray gun was established, and the influence of process constraints on spraying quality was analyzed. Trajectory planning for the spray painting robot, based on the septic B-spline interpolation method, was then performed. Based on this foundation, objective functions and constraint equations for spraying trajectory optimization were established. A multi-objective trajectory optimization method for spraying by the robot is proposed based on the NSGA-Ⅱ, which integrates the spraying process constraints. Finally, a prototype system of a 7-degree-of-freedom rigid-flexible coupling serial spray painting robot was constructed. Simulations and spraying experiments were conducted to verify the effectiveness of the proposed multi-objective trajectory optimization method. This paper presents a multi-objective optimization method for the spraying trajectory of a robot. In the proposed method, the optimized spraying trajectory is generated with the spraying process as the constraint and time, energy consumption, and impact during the spraying operation of the robot as the optimization objectives.
Robot-automated spraying is widely used in various fields, such as the automotive, metalworking, furniture, and aerospace industries. Spraying quality is influenced by multiple factors, including robot speed, acceleration, end-effector trajectory, and spraying process constraints. To achieve high-quality spraying under the influence of multiple factors, this study proposes a multi-objective optimization method for the spraying trajectory that integrates spraying process constraints into the optimization process. First, a 7-degree-of-freedom rigid-flexible coupling serial spray painting robot system is introduced, which includes a motion decoupling mechanism and a tension amplification mechanism. Subsequently, a paint deposition model for the spray gun was established, and the influence of process constraints on spraying quality was analyzed. Trajectory planning for the spray painting robot, based on the septic B-spline interpolation method, was then performed. Based on this foundation, objective functions and constraint equations for spraying trajectory optimization were established. A multi-objective trajectory optimization method for spraying by the robot is proposed based on the NSGA-Ⅱ, which integrates the spraying process constraints. Finally, a prototype system of a 7-degree-of-freedom rigid-flexible coupling serial spray painting robot was constructed. Simulations and spraying experiments were conducted to verify the effectiveness of the proposed multi-objective trajectory optimization method. This paper presents a multi-objective optimization method for the spraying trajectory of a robot. In the proposed method, the optimized spraying trajectory is generated with the spraying process as the constraint and time, energy consumption, and impact during the spraying operation of the robot as the optimization objectives.
2024, 37: 135.
doi: 10.1186/s10033-024-01123-4
Abstract:
Soft robotics focuses on addressing the locomotion problem in unstructured environments and the manipulation problem of non-cooperative objects, which inevitably leads to soft robots encountering multiple uncertainties and damages. Therefore, improving the robustness of soft robots in hostile environmental conditions has always been a challenge. Existing methods usually improve this robustness through damage isolation, material elasticity, and self-healing mechanisms. In contrast to existing methods, this paper proposes a method to improve the robustness of an untethered soft-swallowing robot based on the physical properties of fluids, such as the high specific heat capacity of water, the viscosity of soft glue, and the shear thickening of non-Newtonian fluids. Based on this method, we developed a soft-swallowing robot with enhanced heat resistance, damage tolerance, and impact mitigation capability by only replacing its fluid working medium. Experiments show that the developed soft-swallowing robot can withstand high temperatures above 600 ℃, maintain high performance even after enduring hundreds of damages, and protect grasped object from more than 90% of external impacts. This principle extends beyond the three fluids used in this study. Other fluids, such as magnetic fluid, can increase adhesion to metal materials, whereas oily fluids can reduce frictional resistance between soft structures. Additionally, other solid materials with elasticity and compliance can serve as alternative working mediums for the soft-swallowing robot. This work contributes an effective method for fluid-dependent soft robotic systems to resist the damage from uncertain factors in harsh environments.
Soft robotics focuses on addressing the locomotion problem in unstructured environments and the manipulation problem of non-cooperative objects, which inevitably leads to soft robots encountering multiple uncertainties and damages. Therefore, improving the robustness of soft robots in hostile environmental conditions has always been a challenge. Existing methods usually improve this robustness through damage isolation, material elasticity, and self-healing mechanisms. In contrast to existing methods, this paper proposes a method to improve the robustness of an untethered soft-swallowing robot based on the physical properties of fluids, such as the high specific heat capacity of water, the viscosity of soft glue, and the shear thickening of non-Newtonian fluids. Based on this method, we developed a soft-swallowing robot with enhanced heat resistance, damage tolerance, and impact mitigation capability by only replacing its fluid working medium. Experiments show that the developed soft-swallowing robot can withstand high temperatures above 600 ℃, maintain high performance even after enduring hundreds of damages, and protect grasped object from more than 90% of external impacts. This principle extends beyond the three fluids used in this study. Other fluids, such as magnetic fluid, can increase adhesion to metal materials, whereas oily fluids can reduce frictional resistance between soft structures. Additionally, other solid materials with elasticity and compliance can serve as alternative working mediums for the soft-swallowing robot. This work contributes an effective method for fluid-dependent soft robotic systems to resist the damage from uncertain factors in harsh environments.
2024, 37: 158.
doi: 10.1186/s10033-024-01150-1
Abstract:
Autonomous aerial refueling technology is gaining increasing attention to enhance aircraft combat capabilities. Current research on autonomous refueling focuses mainly on flight control laws, with little attention to the automation of refueling pipes. This leads to high demands on control law performance and navigation accuracy, making it difficult to ensure reliability. To address this, we propose a robotic arm system capable of automatic docking during the flexible aerial refueling process. The system uses a conical kinematic space configuration, offering enhanced stability and impact resistance. The frame-type structure achieves a lightweight design. Additionally, we establish a single-objective optimization model for the connecting rod dimensions and apply a genetic algorithm (GA) for their optimization. We also propose a trajectory-fitting calibration theory based on the robotic arm's special configuration and complete its movement accuracy calibration using a laser tracker. This calibration method reduces the robotic arm's motion error by 71%, achieving an absolute positioning accuracy better than 3.5 mm, which meets the requirements for autonomous aerial refueling. In summary, this research presents a hybrid robotic arm that meets automatic docking requirements, offering a new approach to autonomous aerial refueling.
Autonomous aerial refueling technology is gaining increasing attention to enhance aircraft combat capabilities. Current research on autonomous refueling focuses mainly on flight control laws, with little attention to the automation of refueling pipes. This leads to high demands on control law performance and navigation accuracy, making it difficult to ensure reliability. To address this, we propose a robotic arm system capable of automatic docking during the flexible aerial refueling process. The system uses a conical kinematic space configuration, offering enhanced stability and impact resistance. The frame-type structure achieves a lightweight design. Additionally, we establish a single-objective optimization model for the connecting rod dimensions and apply a genetic algorithm (GA) for their optimization. We also propose a trajectory-fitting calibration theory based on the robotic arm's special configuration and complete its movement accuracy calibration using a laser tracker. This calibration method reduces the robotic arm's motion error by 71%, achieving an absolute positioning accuracy better than 3.5 mm, which meets the requirements for autonomous aerial refueling. In summary, this research presents a hybrid robotic arm that meets automatic docking requirements, offering a new approach to autonomous aerial refueling.
2024, 37: 29.
doi: 10.1186/s10033-024-01009-5
Abstract:
The most widely adopted method for diagnosing respiratory infectious diseases is to conduct polymerase chain reaction (PCR) assays on patients' respiratory specimens, which are collected through either nasal or oropharyngeal swabs. The manual swab sampling process poses a high risk to the examiner and may cause false-negative results owing to improper sampling. In this paper, we propose a pneumatically actuated soft end-effector specifically designed to achieve all of the tasks involved in swab sampling. The soft end-effector utilizes circumferential instability to ensure grasping stability, and exhibits several key properties, including high load-to-weight ratio, error tolerance, and variable swab-tip stiffness, leading to successful automatic robotic oropharyngeal swab sampling, from loosening and tightening the transport medium tube cap, holding the swab, and conducting sampling, to snapping off the swab tail and sterilizing itself. Using an industrial collaborative robotic arm, we integrated the soft end-effector, force sensor, camera, lights, and remote-control stick, and developed a robotic oropharyngeal swab sampling system. Using this swab sampling system, we conducted oropharyngeal swab-sampling tests on 20 volunteers. Our Digital PCR assay results (RNase P RNA gene absolute copy numbers for the samples) revealed that our system successfully collected sufficient numbers of cells from the pharyngeal wall for respiratory disease diagnosis. In summary, we have developed a pharyngeal swab-sampling system based on an "enveloping" soft actuator, studied the sampling process, and implemented whole-process robotic oropharyngeal swab-sampling.
The most widely adopted method for diagnosing respiratory infectious diseases is to conduct polymerase chain reaction (PCR) assays on patients' respiratory specimens, which are collected through either nasal or oropharyngeal swabs. The manual swab sampling process poses a high risk to the examiner and may cause false-negative results owing to improper sampling. In this paper, we propose a pneumatically actuated soft end-effector specifically designed to achieve all of the tasks involved in swab sampling. The soft end-effector utilizes circumferential instability to ensure grasping stability, and exhibits several key properties, including high load-to-weight ratio, error tolerance, and variable swab-tip stiffness, leading to successful automatic robotic oropharyngeal swab sampling, from loosening and tightening the transport medium tube cap, holding the swab, and conducting sampling, to snapping off the swab tail and sterilizing itself. Using an industrial collaborative robotic arm, we integrated the soft end-effector, force sensor, camera, lights, and remote-control stick, and developed a robotic oropharyngeal swab sampling system. Using this swab sampling system, we conducted oropharyngeal swab-sampling tests on 20 volunteers. Our Digital PCR assay results (RNase P RNA gene absolute copy numbers for the samples) revealed that our system successfully collected sufficient numbers of cells from the pharyngeal wall for respiratory disease diagnosis. In summary, we have developed a pharyngeal swab-sampling system based on an "enveloping" soft actuator, studied the sampling process, and implemented whole-process robotic oropharyngeal swab-sampling.
2024, 37: 15.
doi: 10.1186/s10033-024-01000-0
Abstract:
The current gait planning for legged robots is mostly based on human presets, which cannot match the flexible characteristics of natural mammals. This paper proposes a gait optimization framework for hexapod robots called Smart Gait. Smart Gait contains three modules: swing leg trajectory optimization, gait period & duty optimization, and gait sequence optimization. The full dynamics of a single leg, and the centroid dynamics of the overall robot are considered in the respective modules. The Smart Gait not only helps the robot to decrease the energy consumption when in locomotion, mostly, it enables the hexapod robot to determine its gait pattern transitions based on its current state, instead of repeating the formalistic clock-set step cycles. Our Smart Gait framework allows the hexapod robot to behave nimbly as a living animal when in 3D movements for the first time. The Smart Gait framework combines offline and online optimizations without any fussy data-driven training procedures, and it can run efficiently on board in real-time after deployment. Various experiments are carried out on the hexapod robot LittleStrong. The results show that the energy consumption is reduced by 15.9% when in locomotion. Adaptive gait patterns can be generated spontaneously both in regular and challenge environments, and when facing external interferences.
The current gait planning for legged robots is mostly based on human presets, which cannot match the flexible characteristics of natural mammals. This paper proposes a gait optimization framework for hexapod robots called Smart Gait. Smart Gait contains three modules: swing leg trajectory optimization, gait period & duty optimization, and gait sequence optimization. The full dynamics of a single leg, and the centroid dynamics of the overall robot are considered in the respective modules. The Smart Gait not only helps the robot to decrease the energy consumption when in locomotion, mostly, it enables the hexapod robot to determine its gait pattern transitions based on its current state, instead of repeating the formalistic clock-set step cycles. Our Smart Gait framework allows the hexapod robot to behave nimbly as a living animal when in 3D movements for the first time. The Smart Gait framework combines offline and online optimizations without any fussy data-driven training procedures, and it can run efficiently on board in real-time after deployment. Various experiments are carried out on the hexapod robot LittleStrong. The results show that the energy consumption is reduced by 15.9% when in locomotion. Adaptive gait patterns can be generated spontaneously both in regular and challenge environments, and when facing external interferences.
2024, 37: 146.
doi: 10.1186/s10033-024-01098-2
Abstract:
Variable stiffness mechanisms (VSMs) are a class of compliant mechanisms that can adjust their intrinsic stiffness, which promises to be beneficial in applications needed to interact with the environment, such as collaborative robots, wearable robots, and polishing robots. This paper presents the design and optimization of a novel linear VSM, called cLVSM, to produce linear motion, conversely to the majority of VSMs designed to perform rotary motion. By changing the effective length of specially designed circular beams, the cLVSM is capable of continuous stiffness regulation from a minimum value to almost rigid. Different from the VSMs which need rotation-to-translation converting mechanisms for stiffness regulation, the stiffness of the proposed design is adjusted by directly rotating the beams without the use of additional mechanisms, which contributes to improving the structural compactness, and reducing the energy loss and error in transmission. Moreover, the beam rotation needed to regulate the stiffness is almost perpendicular to the beam deflection force, which helps to reduce the torque needed for stiffness regulation. The stiffness model of the proposed VSM is developed using the screw theory, and the design parameters are optimized using the genetic algorithm. The effectiveness of the mathematical model and the performance of the design are verified by simulation and experiments.
Variable stiffness mechanisms (VSMs) are a class of compliant mechanisms that can adjust their intrinsic stiffness, which promises to be beneficial in applications needed to interact with the environment, such as collaborative robots, wearable robots, and polishing robots. This paper presents the design and optimization of a novel linear VSM, called cLVSM, to produce linear motion, conversely to the majority of VSMs designed to perform rotary motion. By changing the effective length of specially designed circular beams, the cLVSM is capable of continuous stiffness regulation from a minimum value to almost rigid. Different from the VSMs which need rotation-to-translation converting mechanisms for stiffness regulation, the stiffness of the proposed design is adjusted by directly rotating the beams without the use of additional mechanisms, which contributes to improving the structural compactness, and reducing the energy loss and error in transmission. Moreover, the beam rotation needed to regulate the stiffness is almost perpendicular to the beam deflection force, which helps to reduce the torque needed for stiffness regulation. The stiffness model of the proposed VSM is developed using the screw theory, and the design parameters are optimized using the genetic algorithm. The effectiveness of the mathematical model and the performance of the design are verified by simulation and experiments.
2024, 37: 24.
doi: 10.1186/s10033-024-01003-x
Abstract:
The kinematic equivalent model of an existing ankle-rehabilitation robot is inconsistent with the anatomical structure of the human ankle, which influences the rehabilitation effect. Therefore, this study equates the human ankle to the UR model and proposes a novel three degrees of freedom (3-DOF) generalized spherical parallel mechanism for ankle rehabilitation. The parallel mechanism has two spherical centers corresponding to the rotation centers of tibiotalar and subtalar joints. Using screw theory, the mobility of the parallel mechanism, which meets the requirements of the human ankle, is analyzed. The inverse kinematics are presented, and singularities are identified based on the Jacobian matrix. The workspaces of the parallel mechanism are obtained through the search method and compared with the motion range of the human ankle, which shows that the parallel mechanism can meet the motion demand of ankle rehabilitation. Additionally, based on the motion-force transmissibility, the performance atlases are plotted in the parameter optimal design space, and the optimum parameter is obtained according to the demands of practical applications. The results show that the parallel mechanism can meet the motion requirements of ankle rehabilitation and has excellent kinematic performance in its rehabilitation range, which provides a theoretical basis for the prototype design and experimental verification.
The kinematic equivalent model of an existing ankle-rehabilitation robot is inconsistent with the anatomical structure of the human ankle, which influences the rehabilitation effect. Therefore, this study equates the human ankle to the UR model and proposes a novel three degrees of freedom (3-DOF) generalized spherical parallel mechanism for ankle rehabilitation. The parallel mechanism has two spherical centers corresponding to the rotation centers of tibiotalar and subtalar joints. Using screw theory, the mobility of the parallel mechanism, which meets the requirements of the human ankle, is analyzed. The inverse kinematics are presented, and singularities are identified based on the Jacobian matrix. The workspaces of the parallel mechanism are obtained through the search method and compared with the motion range of the human ankle, which shows that the parallel mechanism can meet the motion demand of ankle rehabilitation. Additionally, based on the motion-force transmissibility, the performance atlases are plotted in the parameter optimal design space, and the optimum parameter is obtained according to the demands of practical applications. The results show that the parallel mechanism can meet the motion requirements of ankle rehabilitation and has excellent kinematic performance in its rehabilitation range, which provides a theoretical basis for the prototype design and experimental verification.
2024, 37: 82.
doi: 10.1186/s10033-024-01038-0
Abstract:
The encapsulation of lunar samples is a core research area in the third phase of the Chinese Lunar Exploration Program. The seal assembly, opening and closing mechanism (OCM), and locking mechanism are the core components of the encapsulation device of the lunar samples, and the requirements of a tight seal, lightweight, and low power make the design of these core components difficult. In this study, a combined sealing assembly, OCM, and locking mechanism were investigated for the device. The sealing architecture consists of rubber and an Ag-In alloy, and a theory was built to analyze the seal. Experiments of the electroplate Au coating on the knife-edge revealed that the hermetic seal can be significantly improved. The driving principle for coaxial double-helical pairs was investigated and used to design the OCM. Moreover, a locking mechanism was created using an electric initiating explosive device with orifice damping. By optimizing the design, the output parameters were adjusted to meet the requirements of the lunar explorer. The experimental results showed that the helium leak rate of the test pieces were not more than 5 × 10⁻¹¹ Pa·m3·s−1, the minimum power of the OCM was 0.3 W, and the total weight of the principle prototype was 2.9 kg. The explosive driven locking mechanism has low impact. This investigation solved the difficulties in achieving tight seal, light weight, and low power for the lunar explorer, and the results can also be used to explore other extraterrestrial objects in the future.
The encapsulation of lunar samples is a core research area in the third phase of the Chinese Lunar Exploration Program. The seal assembly, opening and closing mechanism (OCM), and locking mechanism are the core components of the encapsulation device of the lunar samples, and the requirements of a tight seal, lightweight, and low power make the design of these core components difficult. In this study, a combined sealing assembly, OCM, and locking mechanism were investigated for the device. The sealing architecture consists of rubber and an Ag-In alloy, and a theory was built to analyze the seal. Experiments of the electroplate Au coating on the knife-edge revealed that the hermetic seal can be significantly improved. The driving principle for coaxial double-helical pairs was investigated and used to design the OCM. Moreover, a locking mechanism was created using an electric initiating explosive device with orifice damping. By optimizing the design, the output parameters were adjusted to meet the requirements of the lunar explorer. The experimental results showed that the helium leak rate of the test pieces were not more than 5 × 10⁻¹¹ Pa·m3·s−1, the minimum power of the OCM was 0.3 W, and the total weight of the principle prototype was 2.9 kg. The explosive driven locking mechanism has low impact. This investigation solved the difficulties in achieving tight seal, light weight, and low power for the lunar explorer, and the results can also be used to explore other extraterrestrial objects in the future.
2024, 37: 160.
doi: 10.1186/s10033-024-01116-3
Abstract:
Due to the complex structures of multi-limbed parallel robots, conventional parallel robots generally have limited workspace, complex kinematics, and complex dynamics, which increases the application difficulty of parallel robot in industrial engineering. To solve the above problems, this paper proposes a single-loop Schönflies motion parallel robot with full cycle rotation, the robot can generate Schönflies motion by the most simplified structure. The novel Schönflies motion parallel robot is a two-limb parallel mechanism with least links and joints, and each limb is driven by a 2-degree of freedom (DOF) cylindrical driver (C-driver). The full cycle rotation of the output link is achieved by "…R-H…" structure, where the revolute (R) and helical (H) joints are coaxial. Mobility, kinematics, workspace and singularity analysis of the novel Schönflies motion parallel robot are analyzed. Then, dynamic model is formulated based on the principle of virtual work. Moreover, a pick-and-place task is implemented by the proposed Schönflies motion parallel robot and a serial SCARA robot, respectively. The simulation results verify the correctness of the theoretical model. Furthermore, dynamics performances of the proposed Schönflies motion parallel robot and a serial SCARA robot are compared, which reveal the performance merits of the proposed Schönflies motion parallel robot.
Due to the complex structures of multi-limbed parallel robots, conventional parallel robots generally have limited workspace, complex kinematics, and complex dynamics, which increases the application difficulty of parallel robot in industrial engineering. To solve the above problems, this paper proposes a single-loop Schönflies motion parallel robot with full cycle rotation, the robot can generate Schönflies motion by the most simplified structure. The novel Schönflies motion parallel robot is a two-limb parallel mechanism with least links and joints, and each limb is driven by a 2-degree of freedom (DOF) cylindrical driver (C-driver). The full cycle rotation of the output link is achieved by "…R-H…" structure, where the revolute (R) and helical (H) joints are coaxial. Mobility, kinematics, workspace and singularity analysis of the novel Schönflies motion parallel robot are analyzed. Then, dynamic model is formulated based on the principle of virtual work. Moreover, a pick-and-place task is implemented by the proposed Schönflies motion parallel robot and a serial SCARA robot, respectively. The simulation results verify the correctness of the theoretical model. Furthermore, dynamics performances of the proposed Schönflies motion parallel robot and a serial SCARA robot are compared, which reveal the performance merits of the proposed Schönflies motion parallel robot.
2024, 37: 37.
doi: 10.1186/s10033-024-01025-5
Abstract:
The lower limb exoskeletons are used to assist wearers in various scenarios such as medical and industrial settings. Complex modeling errors of the exoskeleton in different application scenarios pose challenges to the robustness and stability of its control algorithm. The Radial Basis Function (RBF) neural network is used widely to compensate for modeling errors. In order to solve the problem that the current RBF neural network controllers cannot guarantee the asymptotic stability, a neural network robust control algorithm based on computed torque method is proposed in this paper, focusing on trajectory tracking. It innovatively incorporates the robust adaptive term while introducing the RBF neural network term, improving the compensation ability for modeling errors. The stability of the algorithm is proved by Lyapunov method, and the effectiveness of the robust adaptive term is verified by the simulation. Experiments wearing the exoskeleton under different walking speeds and scenarios were carried out, and the results show that the absolute value of tracking errors of the hip and knee joints of the exoskeleton are consistently less than 1.5°and 2.5°, respectively. The proposed control algorithm effectively compensates for modeling errors and exhibits high robustness.
The lower limb exoskeletons are used to assist wearers in various scenarios such as medical and industrial settings. Complex modeling errors of the exoskeleton in different application scenarios pose challenges to the robustness and stability of its control algorithm. The Radial Basis Function (RBF) neural network is used widely to compensate for modeling errors. In order to solve the problem that the current RBF neural network controllers cannot guarantee the asymptotic stability, a neural network robust control algorithm based on computed torque method is proposed in this paper, focusing on trajectory tracking. It innovatively incorporates the robust adaptive term while introducing the RBF neural network term, improving the compensation ability for modeling errors. The stability of the algorithm is proved by Lyapunov method, and the effectiveness of the robust adaptive term is verified by the simulation. Experiments wearing the exoskeleton under different walking speeds and scenarios were carried out, and the results show that the absolute value of tracking errors of the hip and knee joints of the exoskeleton are consistently less than 1.5°and 2.5°, respectively. The proposed control algorithm effectively compensates for modeling errors and exhibits high robustness.
2024, 37: 57.
doi: 10.1186/s10033-024-01041-5
Abstract:
Automation advancements prompts the extensive integration of collaborative robot (cobot) across a range of industries. Compared to the commonly used design approach of increasing the payload-to-weight ratio of cobot to enhance load capacity, equal attention should be paid to the dynamic response characteristics of cobot during the design process to make the cobot more flexible. In this paper, a new method for designing the drive train parameters of cobot is proposed. Firstly, based on the analysis of factors influencing the load capacity and dynamic response characteristics, design criteria for both aspects are established for cobot with all optimization design criteria normalized within the design domain. Secondly, with the cobot in the horizontal pose, the motor design scheme is discretized and it takes the joint motor diameter and gearbox speed ratio as optimization design variables. Finally, all the discrete values of the optimization objectives are obtained through the enumeration method and the Pareto front is used to select the optimal solution through multi-objective optimization. Base on the cobot design method proposed in this paper, a six-axis cobot is designed and compared with the commercial cobot. The result shows that the load capacity of the designed cobot in this paper reaches 8.4 kg, surpassing the 5 kg load capacity commercial cobot which is used as a benchmark. The minimum resonance frequency of the joints is 42.70 Hz.
Automation advancements prompts the extensive integration of collaborative robot (cobot) across a range of industries. Compared to the commonly used design approach of increasing the payload-to-weight ratio of cobot to enhance load capacity, equal attention should be paid to the dynamic response characteristics of cobot during the design process to make the cobot more flexible. In this paper, a new method for designing the drive train parameters of cobot is proposed. Firstly, based on the analysis of factors influencing the load capacity and dynamic response characteristics, design criteria for both aspects are established for cobot with all optimization design criteria normalized within the design domain. Secondly, with the cobot in the horizontal pose, the motor design scheme is discretized and it takes the joint motor diameter and gearbox speed ratio as optimization design variables. Finally, all the discrete values of the optimization objectives are obtained through the enumeration method and the Pareto front is used to select the optimal solution through multi-objective optimization. Base on the cobot design method proposed in this paper, a six-axis cobot is designed and compared with the commercial cobot. The result shows that the load capacity of the designed cobot in this paper reaches 8.4 kg, surpassing the 5 kg load capacity commercial cobot which is used as a benchmark. The minimum resonance frequency of the joints is 42.70 Hz.
2024, 37: 59.
doi: 10.1186/s10033-024-01040-6
Abstract:
To improve locomotion and operation integration, this paper presents an integrated leg-arm quadruped robot (ILQR) that has a reconfigurable joint. First, the reconfigurable joint is designed and assembled at the end of the leg-arm chain. When the robot performs a task, reconfigurable configuration and mode switching can be achieved using this joint. In contrast from traditional quadruped robots, this robot can stack in a designated area to optimize the occupied volume in a nonworking state. Kinematics modeling and dynamics modeling are established to evaluate the mechanical properties for multiple modes. All working modes of the robot are classified, which can be defined as deployable mode, locomotion mode and operation mode. Based on the stability margin and mechanical modeling, switching analysis and evaluation between each mode is carried out. Finally, the prototype experimental results verify the function realization and switching stability of multimode and provide a design method to integrate and perform multimode for quadruped robots with deployable characteristics.
To improve locomotion and operation integration, this paper presents an integrated leg-arm quadruped robot (ILQR) that has a reconfigurable joint. First, the reconfigurable joint is designed and assembled at the end of the leg-arm chain. When the robot performs a task, reconfigurable configuration and mode switching can be achieved using this joint. In contrast from traditional quadruped robots, this robot can stack in a designated area to optimize the occupied volume in a nonworking state. Kinematics modeling and dynamics modeling are established to evaluate the mechanical properties for multiple modes. All working modes of the robot are classified, which can be defined as deployable mode, locomotion mode and operation mode. Based on the stability margin and mechanical modeling, switching analysis and evaluation between each mode is carried out. Finally, the prototype experimental results verify the function realization and switching stability of multimode and provide a design method to integrate and perform multimode for quadruped robots with deployable characteristics.
2024, 37: 26.
doi: 10.1186/s10033-024-01008-6
Abstract:
Exoskeletons generally require accurate dynamic models to design the model-based controller conveniently under the human-robot interaction condition. However, due to unknown model parameters such as the mass, moment of inertia and mechanical size, the dynamic model of exoskeletons is difficult to construct. Hence, an enhanced whale optimization algorithm (EWOA) is proposed to identify the exoskeleton model parameters. Meanwhile, the periodic excitation trajectories are designed by finite Fourier series to input the desired position demand of exoskeletons with mechanical physical constraints. Then a backstepping controller based on the identified model is adopted to improve the human-robot wearable comfortable performance under cooperative motion. Finally, the proposed Model parameters identification and control are verified by a two-DOF exoskeletons platform. The knee joint motion achieves a steady-state response after 0.5 s. Meanwhile, the position error of hip joint response is less than 0.03 rad after 0.9 s. In addition, the steady-state human-robot interaction torque of the two joints is constrained within 15\begin{document}$ {\text{N}\cdot\text{m}} $\end{document}
Exoskeletons generally require accurate dynamic models to design the model-based controller conveniently under the human-robot interaction condition. However, due to unknown model parameters such as the mass, moment of inertia and mechanical size, the dynamic model of exoskeletons is difficult to construct. Hence, an enhanced whale optimization algorithm (EWOA) is proposed to identify the exoskeleton model parameters. Meanwhile, the periodic excitation trajectories are designed by finite Fourier series to input the desired position demand of exoskeletons with mechanical physical constraints. Then a backstepping controller based on the identified model is adopted to improve the human-robot wearable comfortable performance under cooperative motion. Finally, the proposed Model parameters identification and control are verified by a two-DOF exoskeletons platform. The knee joint motion achieves a steady-state response after 0.5 s. Meanwhile, the position error of hip joint response is less than 0.03 rad after 0.9 s. In addition, the steady-state human-robot interaction torque of the two joints is constrained within 15
2024, 37: 32.
doi: 10.1186/s10033-024-01014-8
Abstract:
Existing mobile robots mostly use graph search algorithms for path planning, which suffer from relatively low planning efficiency owing to high redundancy and large computational complexity. Due to the limitations of the neighborhood search strategy, the robots could hardly obtain the most optimal global path. A global path planning algorithm, denoted as EDG*, is proposed by expanding nodes using a well-designed expanding disconnected graph operator (EDG) in this paper. Firstly, all obstacles are marked and their corners are located through the map pre-processing. Then, the EDG operator is designed to find points in non-obstruction areas to complete the rapid expansion of disconnected nodes. Finally, the EDG* heuristic iterative algorithm is proposed. It selects the candidate node through a specific valuation function and realizes the node expansion while avoiding collision with a minimum offset. Path planning experiments were conducted in a typical indoor environment and on the public dataset CSM. The result shows that the proposed EDG* reduced the planning time by more than 90% and total length of paths reduced by more than 4.6%. Compared to A*, Dijkstra and JPS, EDG* does not show an exponential explosion effect in map size. The EDG* showed better performance in terms of path smoothness, and collision avoidance. This shows that the EDG* algorithm proposed in this paper can improve the efficiency of path planning and enhance path quality.
Existing mobile robots mostly use graph search algorithms for path planning, which suffer from relatively low planning efficiency owing to high redundancy and large computational complexity. Due to the limitations of the neighborhood search strategy, the robots could hardly obtain the most optimal global path. A global path planning algorithm, denoted as EDG*, is proposed by expanding nodes using a well-designed expanding disconnected graph operator (EDG) in this paper. Firstly, all obstacles are marked and their corners are located through the map pre-processing. Then, the EDG operator is designed to find points in non-obstruction areas to complete the rapid expansion of disconnected nodes. Finally, the EDG* heuristic iterative algorithm is proposed. It selects the candidate node through a specific valuation function and realizes the node expansion while avoiding collision with a minimum offset. Path planning experiments were conducted in a typical indoor environment and on the public dataset CSM. The result shows that the proposed EDG* reduced the planning time by more than 90% and total length of paths reduced by more than 4.6%. Compared to A*, Dijkstra and JPS, EDG* does not show an exponential explosion effect in map size. The EDG* showed better performance in terms of path smoothness, and collision avoidance. This shows that the EDG* algorithm proposed in this paper can improve the efficiency of path planning and enhance path quality.
2024, 37: 53.
doi: 10.1186/s10033-024-01032-6
Abstract:
Architectural singularity belongs to the Type Ⅱ singularity, in which a parallel manipulator (PM) gains one or more degrees of freedom and becomes uncontrollable. PMs remaining permanently in a singularity are beneficial for linear-to-rotary motion conversion. Griffis-Duffy (GD) platform is a mobile structure admitting a Bricard motion. In this paper, we present a coordinate-free approach to the design of generalized GD platforms, which consists in determining the shape and attachment of both the moving platform and the fixed base. The generalized GD platform is treated as a combination of six coaxial single-loop mechanisms under the same constraints. Owing to the inversion, hidden in the geometric structure of these single-loop mechanisms, the mapping from a line to a circle establishes the geometric transformation between the fixed base and the moving platform based on the center of inversion, and describes the shape and attachment of the generalized GD platform. Moreover, the center of inversion not only identifies the location of rotation axis, but also affects the shape of the platform mechanism. A graphical construction of generalized GD platforms using inversion, proposed in the paper, provides geometrically feasible solutions of the manipulator design for the requirement of the location of rotation axis.
Architectural singularity belongs to the Type Ⅱ singularity, in which a parallel manipulator (PM) gains one or more degrees of freedom and becomes uncontrollable. PMs remaining permanently in a singularity are beneficial for linear-to-rotary motion conversion. Griffis-Duffy (GD) platform is a mobile structure admitting a Bricard motion. In this paper, we present a coordinate-free approach to the design of generalized GD platforms, which consists in determining the shape and attachment of both the moving platform and the fixed base. The generalized GD platform is treated as a combination of six coaxial single-loop mechanisms under the same constraints. Owing to the inversion, hidden in the geometric structure of these single-loop mechanisms, the mapping from a line to a circle establishes the geometric transformation between the fixed base and the moving platform based on the center of inversion, and describes the shape and attachment of the generalized GD platform. Moreover, the center of inversion not only identifies the location of rotation axis, but also affects the shape of the platform mechanism. A graphical construction of generalized GD platforms using inversion, proposed in the paper, provides geometrically feasible solutions of the manipulator design for the requirement of the location of rotation axis.
2024, 37: 74.
doi: 10.1186/s10033-024-01063-z
Abstract:
A dual-arm nursing robot can gently lift patients and transfer them between a bed and a wheelchair. With its lightweight design, high load-bearing capacity, and smooth surface, the coupled-drive joint is particularly well suited for these robots. However, the coupled nature of the joint disrupts the direct linear relationship between the input and output torques, posing challenges for dynamic modeling and practical applications. This study investigated the transmission mechanism of this joint and employed the Lagrangian method to construct a dynamic model of its internal dynamics. Building on this foundation, the Newton-Euler method was used to develop a dynamic model for the entire robotic arm. A continuously differentiable friction model was incorporated to reduce the vibrations caused by speed transitions to zero. An experimental method was designed to compensate for gravity, inertia, and modeling errors to identify the parameters of the friction model. This method establishes a mapping relationship between the friction force and motor current. In addition, a Fourier series-based excitation trajectory was developed to facilitate the identification of the dynamic model parameters of the robotic arm. Trajectory tracking experiments were conducted during the experimental validation phase, demonstrating the high accuracy of the dynamic model and the parameter identification method for the robotic arm. This study presents a dynamic modeling and parameter identification method for coupled-drive joint robotic arms, thereby establishing a foundation for motion control in humanoid nursing robots.
A dual-arm nursing robot can gently lift patients and transfer them between a bed and a wheelchair. With its lightweight design, high load-bearing capacity, and smooth surface, the coupled-drive joint is particularly well suited for these robots. However, the coupled nature of the joint disrupts the direct linear relationship between the input and output torques, posing challenges for dynamic modeling and practical applications. This study investigated the transmission mechanism of this joint and employed the Lagrangian method to construct a dynamic model of its internal dynamics. Building on this foundation, the Newton-Euler method was used to develop a dynamic model for the entire robotic arm. A continuously differentiable friction model was incorporated to reduce the vibrations caused by speed transitions to zero. An experimental method was designed to compensate for gravity, inertia, and modeling errors to identify the parameters of the friction model. This method establishes a mapping relationship between the friction force and motor current. In addition, a Fourier series-based excitation trajectory was developed to facilitate the identification of the dynamic model parameters of the robotic arm. Trajectory tracking experiments were conducted during the experimental validation phase, demonstrating the high accuracy of the dynamic model and the parameter identification method for the robotic arm. This study presents a dynamic modeling and parameter identification method for coupled-drive joint robotic arms, thereby establishing a foundation for motion control in humanoid nursing robots.
2024, 37: 21.
doi: 10.1186/s10033-024-00996-9
Abstract:
The current parallel ankle rehabilitation robot (ARR) suffers from the problem of difficult real-time alignment of the human-robot joint center of rotation, which may lead to secondary injuries to the patient. This study investigates type synthesis of a parallel self-alignment ankle rehabilitation robot (PSAARR) based on the kinematic characteristics of ankle joint rotation center drift from the perspective of introducing "suitable passive degrees of freedom (DOF)" with a suitable number and form. First, the self-alignment principle of parallel ARR was proposed by deriving conditions for transforming a human-robot closed chain (HRCC) formed by an ARR and human body into a kinematic suitable constrained system and introducing conditions of "decoupled" and "less limb". Second, the relationship between the self-alignment principle and actuation wrenches (twists) of PSAARR was analyzed with the velocity Jacobian matrix as a "bridge". Subsequently, the type synthesis conditions of PSAARR were proposed. Third, a PSAARR synthesis method was proposed based on the screw theory and type of PSAARR synthesis conducted. Finally, an HRCC kinematic model was established to verify the self-alignment capability of the PSAARR. In this study, 93 types of PSAARR limb structures were synthesized and the self-alignment capability of a human-robot joint axis was verified through kinematic analysis, which provides a theoretical basis for the design of such an ARR.
The current parallel ankle rehabilitation robot (ARR) suffers from the problem of difficult real-time alignment of the human-robot joint center of rotation, which may lead to secondary injuries to the patient. This study investigates type synthesis of a parallel self-alignment ankle rehabilitation robot (PSAARR) based on the kinematic characteristics of ankle joint rotation center drift from the perspective of introducing "suitable passive degrees of freedom (DOF)" with a suitable number and form. First, the self-alignment principle of parallel ARR was proposed by deriving conditions for transforming a human-robot closed chain (HRCC) formed by an ARR and human body into a kinematic suitable constrained system and introducing conditions of "decoupled" and "less limb". Second, the relationship between the self-alignment principle and actuation wrenches (twists) of PSAARR was analyzed with the velocity Jacobian matrix as a "bridge". Subsequently, the type synthesis conditions of PSAARR were proposed. Third, a PSAARR synthesis method was proposed based on the screw theory and type of PSAARR synthesis conducted. Finally, an HRCC kinematic model was established to verify the self-alignment capability of the PSAARR. In this study, 93 types of PSAARR limb structures were synthesized and the self-alignment capability of a human-robot joint axis was verified through kinematic analysis, which provides a theoretical basis for the design of such an ARR.
2024, 37: 120.
doi: 10.1186/s10033-024-01121-6
Abstract:
Metamorphic mechanisms have attracted considerable attention owing to their capability to switch their topology to adapt to different operational tasks. One feature of topological change is the re-contact of different bodies, which inevitably causes collisions affecting operation accuracy and service life. Consequently, in this study, a collision incidence matrix was introduced to describe the topology of a system involved in collisions, and a method for reducing the closed-loop system to an open-loop system was proposed. The complex movement of the metamorphic mechanism in a changing topology was classified into two different running stages of the source metamorphic mechanism. Based on the relative coordinate method, dynamic modeling of the source metamorphic mechanism considering the impact effects was conducted. Combining the classical collision theory and Newton–Euler equation, the generated impact impulse and the motion after collision were determined. Subsequently, a dynamic analytical method for the full configuration of metamorphic mechanisms was proposed to reflect the changes in the topological structure in the dynamic model. Finally, two typical metamorphic mechanisms used in packaging and spinning were considered as examples to verify the correctness and effectiveness of the proposed method, and their impact characteristics during configuration transformation were analyzed. The proposed analytical method of internal impact for a variable topology process provides effective theoretical guidance for the stability analysis of configuration transformation and structural design aimed at minimizing impacts.
Metamorphic mechanisms have attracted considerable attention owing to their capability to switch their topology to adapt to different operational tasks. One feature of topological change is the re-contact of different bodies, which inevitably causes collisions affecting operation accuracy and service life. Consequently, in this study, a collision incidence matrix was introduced to describe the topology of a system involved in collisions, and a method for reducing the closed-loop system to an open-loop system was proposed. The complex movement of the metamorphic mechanism in a changing topology was classified into two different running stages of the source metamorphic mechanism. Based on the relative coordinate method, dynamic modeling of the source metamorphic mechanism considering the impact effects was conducted. Combining the classical collision theory and Newton–Euler equation, the generated impact impulse and the motion after collision were determined. Subsequently, a dynamic analytical method for the full configuration of metamorphic mechanisms was proposed to reflect the changes in the topological structure in the dynamic model. Finally, two typical metamorphic mechanisms used in packaging and spinning were considered as examples to verify the correctness and effectiveness of the proposed method, and their impact characteristics during configuration transformation were analyzed. The proposed analytical method of internal impact for a variable topology process provides effective theoretical guidance for the stability analysis of configuration transformation and structural design aimed at minimizing impacts.


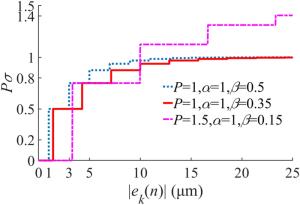
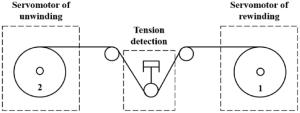
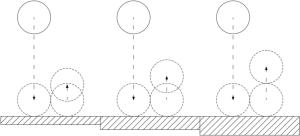
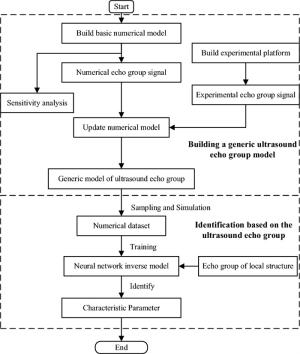

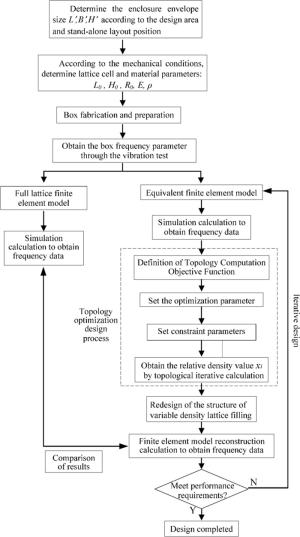
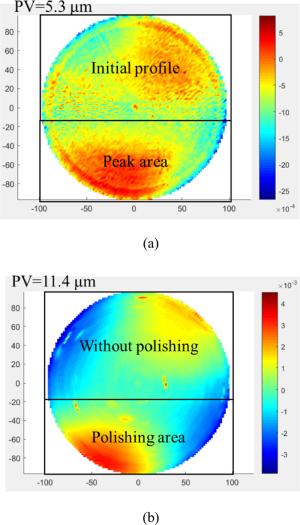

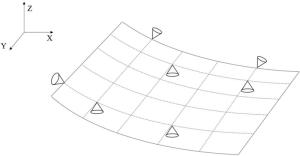
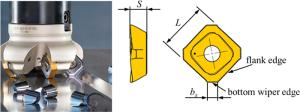
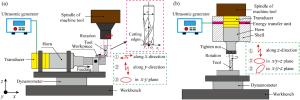
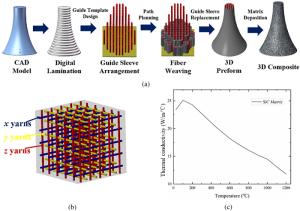
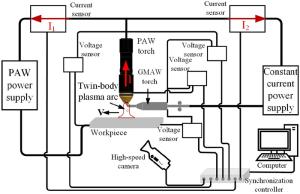
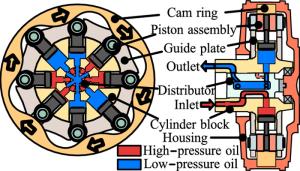
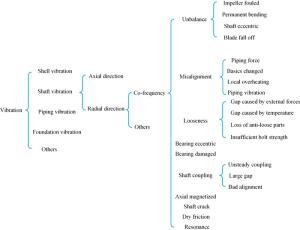
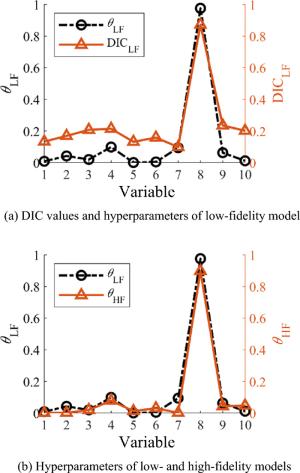
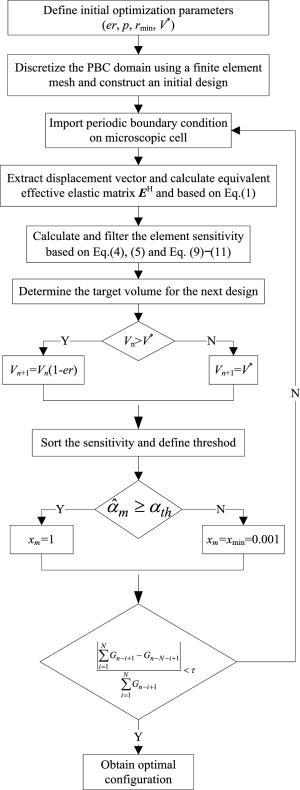


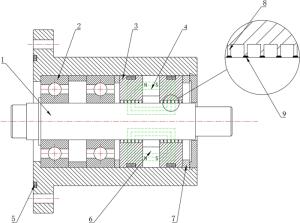
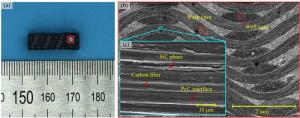
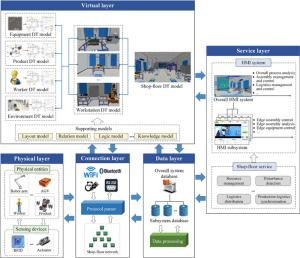
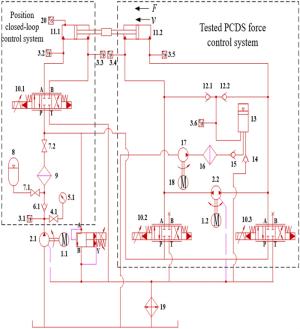
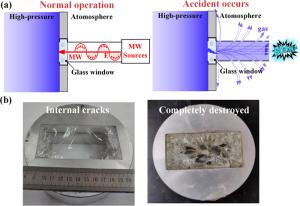
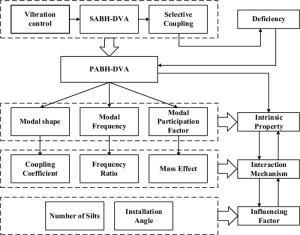
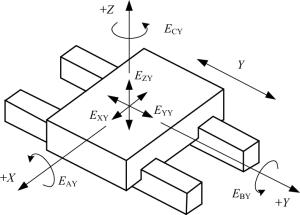
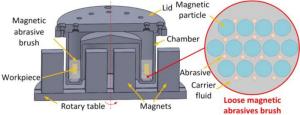
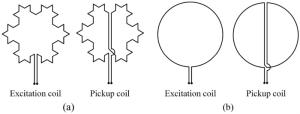
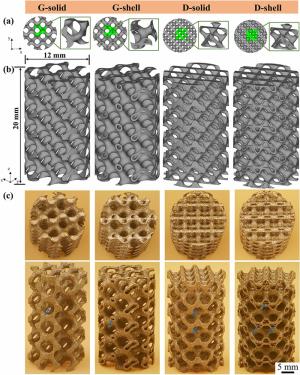

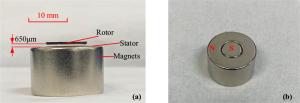

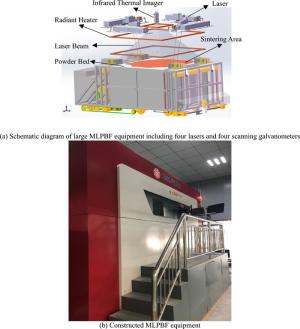
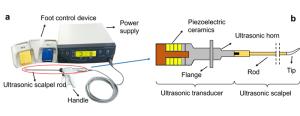
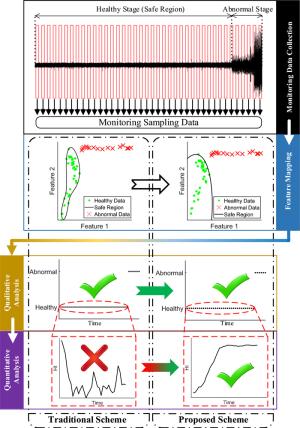
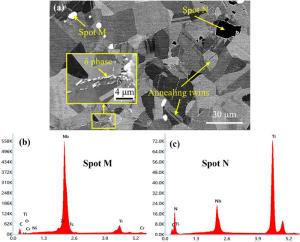
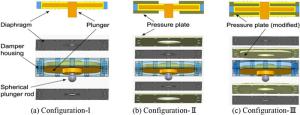
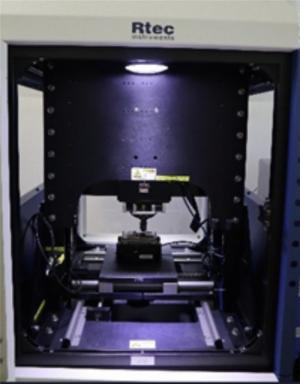
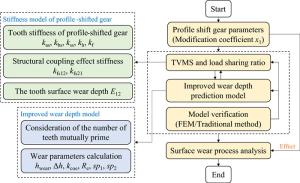
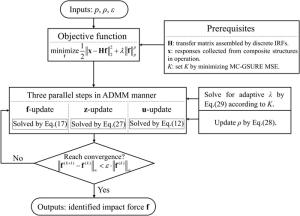
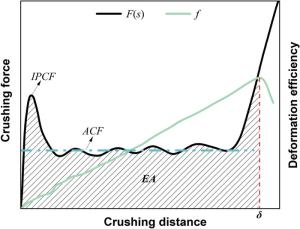
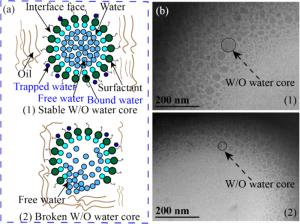
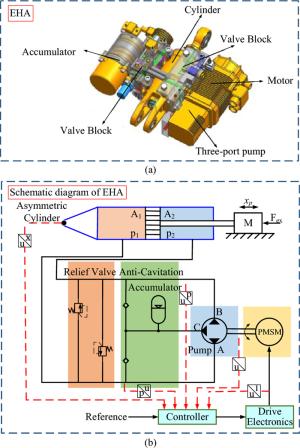
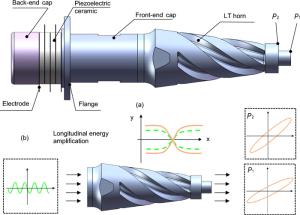
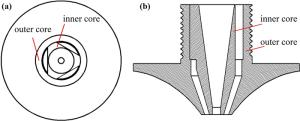
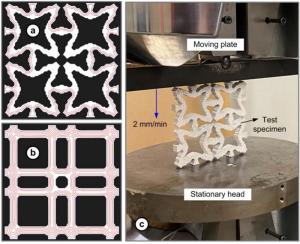

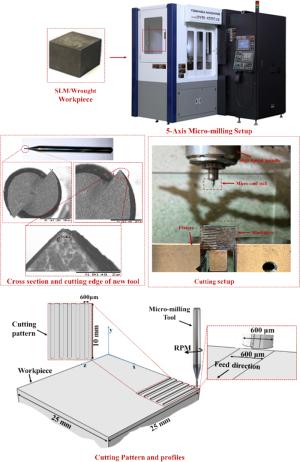
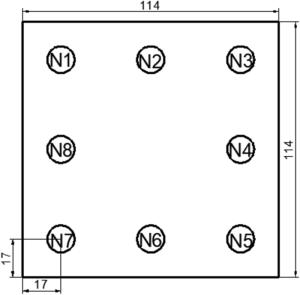


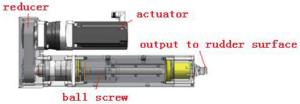

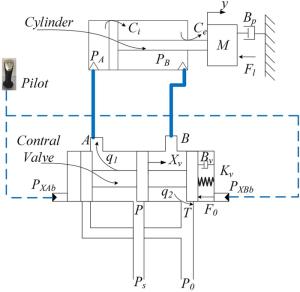
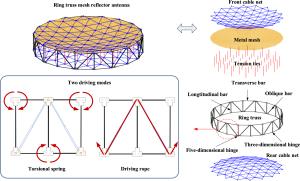
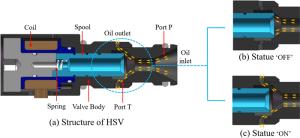
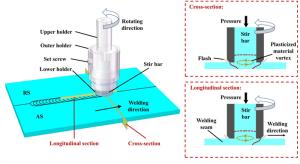
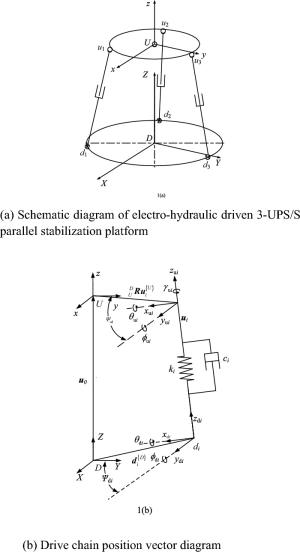
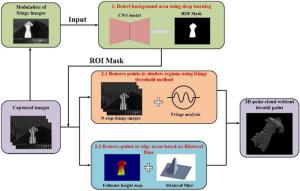

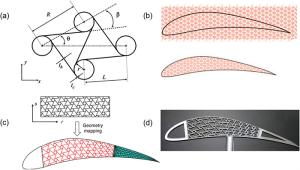
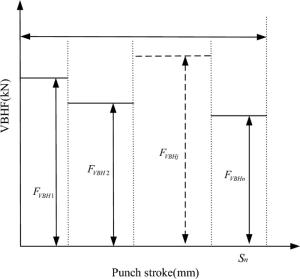
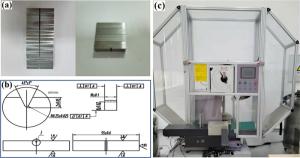
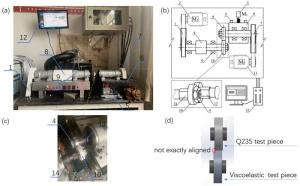

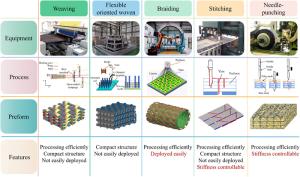
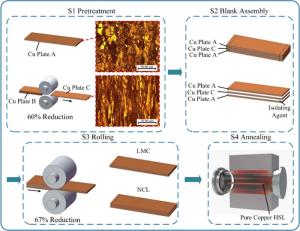
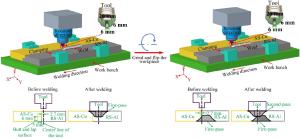

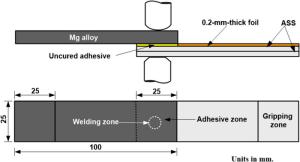
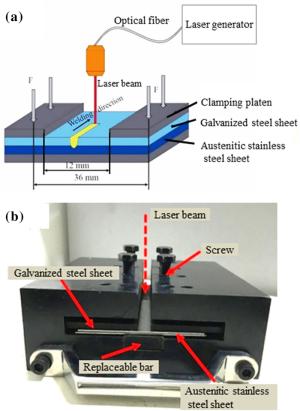


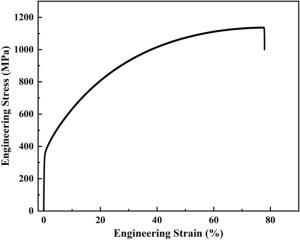
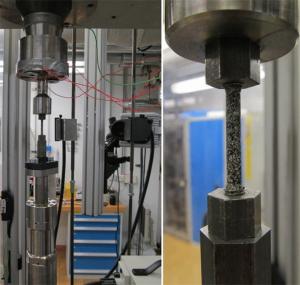
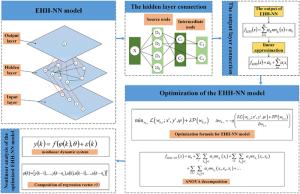
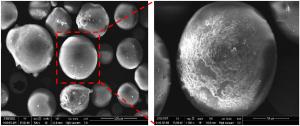
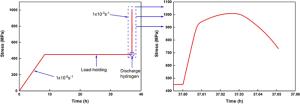
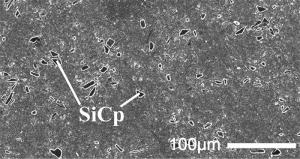
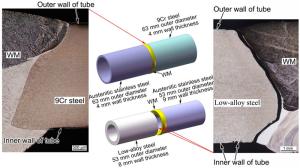
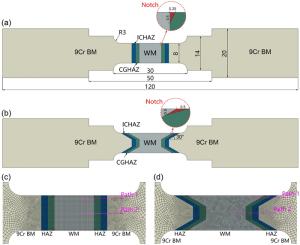


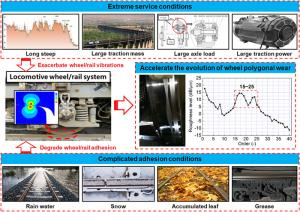
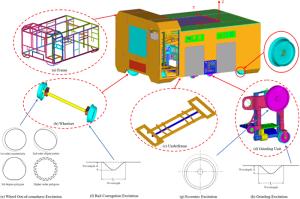
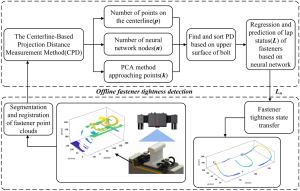
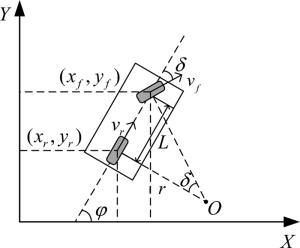
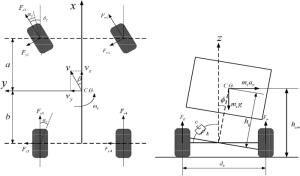
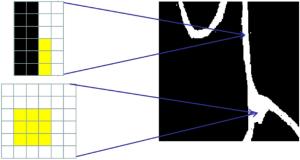
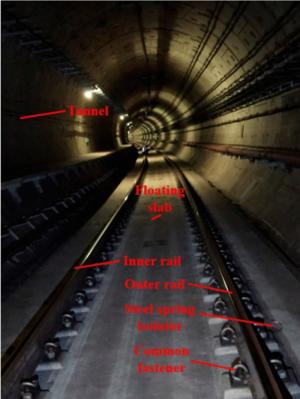
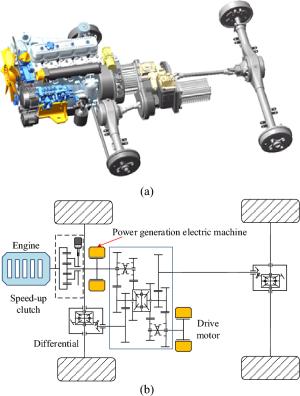
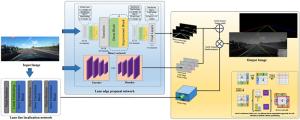
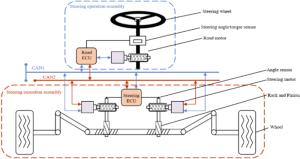

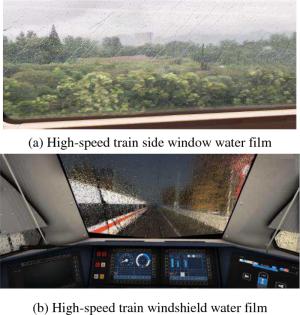
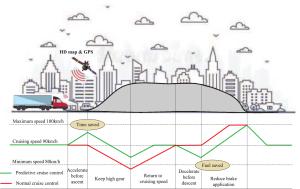
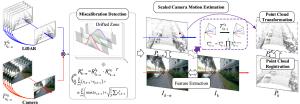

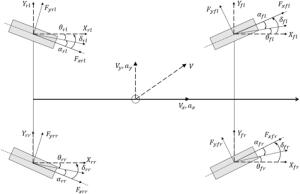
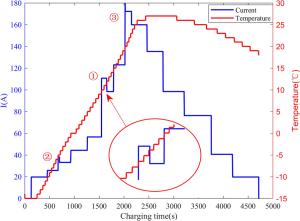
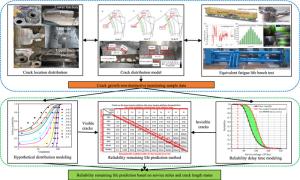
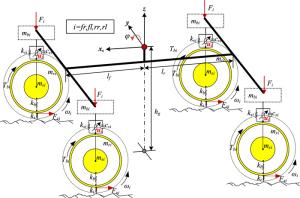
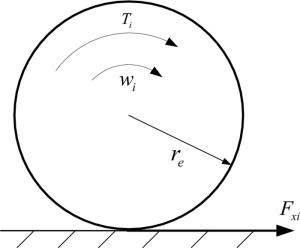
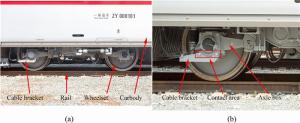
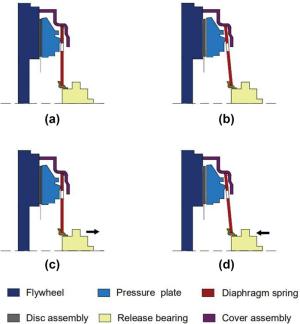

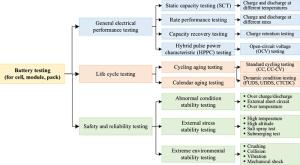
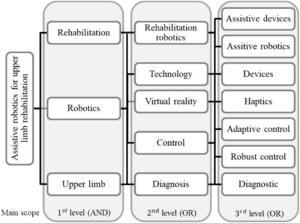
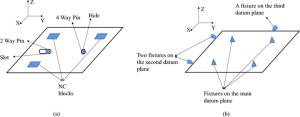
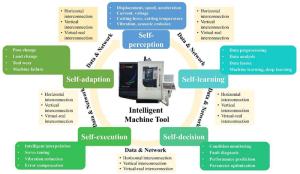

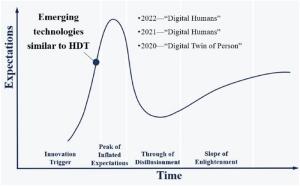
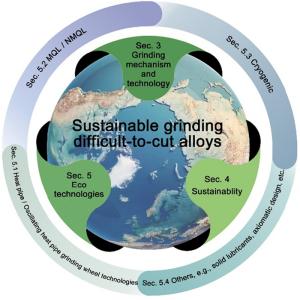
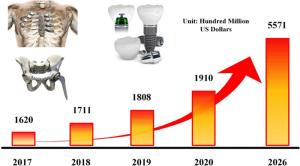
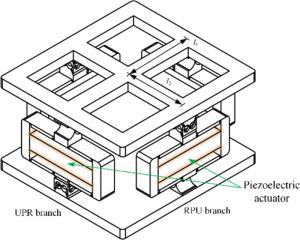
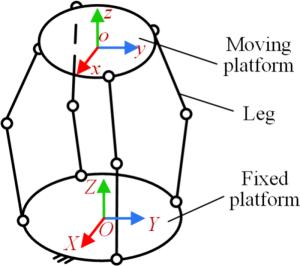
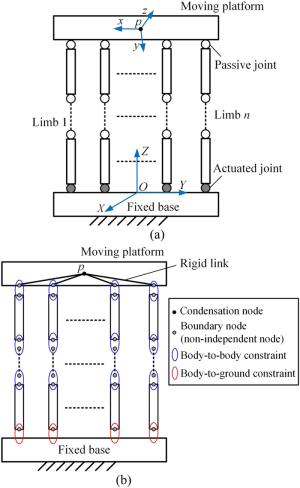
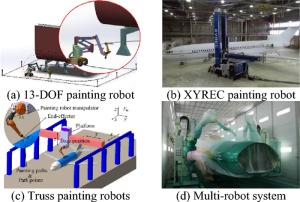
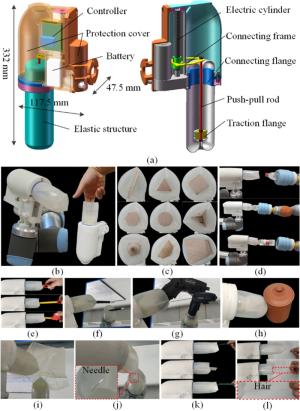
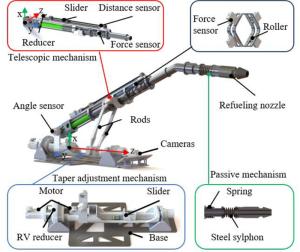
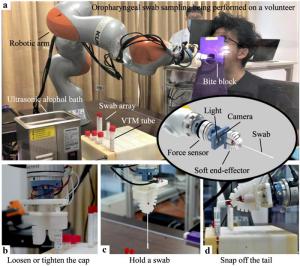


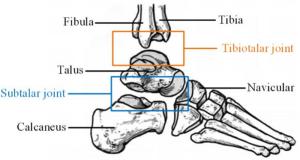
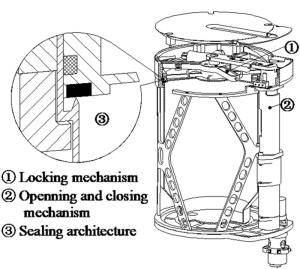
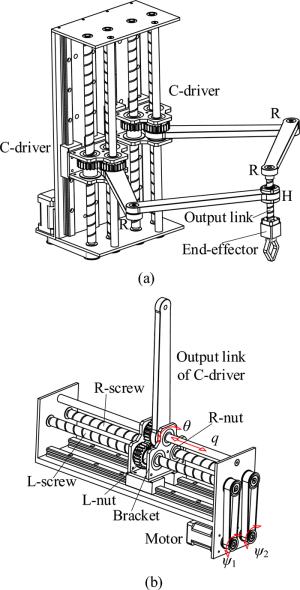
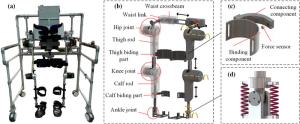
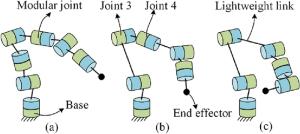
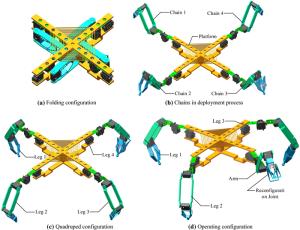
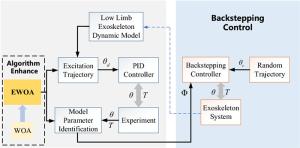
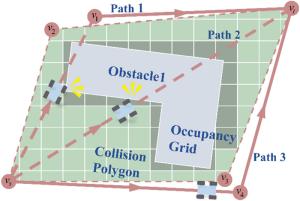
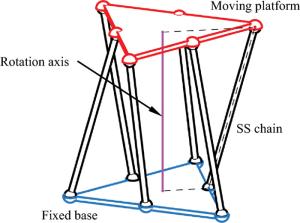
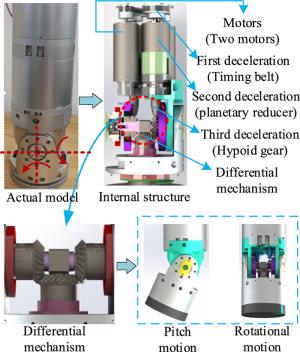
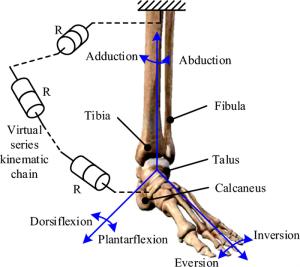
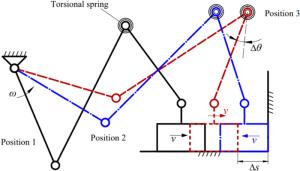
 E-mail Alerts
